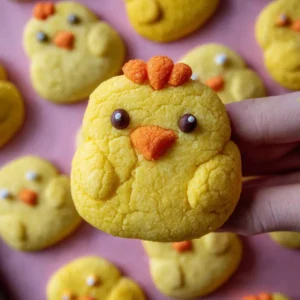
If there was ever a treat that can brighten up a spring day (or any day, really), it’s these chick cookies. Soft, chewy, and impossibly adorable, they’re shaped and decorated to look just like sweet little chicks—no fancy cutter needed. When you pull a tray of these sunny, lemon-zest-scented cookies from the oven, you’ll find it almost impossible not to smile.
What I love most about this chick cookies recipe is how inviting the process is. The dough is lovely to work with, and shaping each chick feels like a fun, crafty break from the usual cookie routine. Whether you’re making them for an Easter party or letting little hands help decorate, these cookies are as playful as they are delicious.

Crafting Cute Chick Cookies: Tools That Make It Fun
Part of the magic of chick cookies is that you don’t need any specialty equipment. Here’s what you’ll use to make your own adorable batch:
- Large bowl or stand mixer bowl – For beating together the dough until creamy and smooth.
- Hand mixer or stand mixer – Makes combining the butter and cream cheese a breeze.
- Rubber spatula – Perfect for scraping down the sides of the bowl and folding everything together thoroughly.
- Cookie scoop (about 3 tablespoons size) – Helps you portion out perfectly even chick bodies every time.
- Baking sheet – Where your chicks will take shape and bake to soft, golden perfection.
- Silicone baking mat or parchment paper – Keeps cookies from sticking and ensures even baking.
- Spoon or fingers – Handy for shaping wings, beaks, feet, and those sweet little feather tufts on top.
- Scribe tool or toothpick – For adding feather details that make your chicks extra expressive.
Ingredients That Make Chick Cookies Soft, Zesty, and Bright
- Unsalted butter – Lends a rich, classic cookie flavor and keeps things tender.
- Full-fat cream cheese – Adds a creamy tang and helps the cookies stay impossibly soft and chewy.
- Granulated sugar – Sweetens the dough and helps those vibrant colors shine through.
- Fresh lemon zest – Infuses every bite with a gentle, bright citrus aroma.
- Large egg yolk – Makes the dough plush, soft, and slightly richer than egg whites alone.
- Vanilla extract or vanilla bean paste – Brings out warm, aromatic undertones to balance the lemon.
- All-purpose flour – Gives the cookies just enough structure to hold their shape while staying soft.
- Cornstarch – Helps make the crumb extra tender and delicate.
- Fine salt – Balances the sweetness and sharpens the flavors.
- Baking powder – Gives a gentle lift so the chick cookies don’t turn out flat or dense.
- Yellow and orange gel food coloring – Creates vibrant chick bodies, beaks, and feet with a little drop of fun.
- Round black sprinkles – The simplest way to make those charming chick eyes stand out.
See the recipe card below for the full list of ingredients and measurements.
Shaping and Baking Easy Chick Cookies: Step-by-Step Guide
- Make the dough base. Beat the unsalted butter and cream cheese together in a large bowl (a stand or hand mixer works perfectly) until smooth and creamy. You’re aiming for a fluffy, pale yellow mixture.
- Infuse sugar with lemon zest. In a separate bowl, rub the lemon zest into your granulated sugar with your fingertips. You’ll notice the sugar turning fragrant and yellow—that’s the lemon oil infusing every grain.
- Combine sugar mixture with butter mixture. Beat the lemon sugar into your butter and cream cheese until the whole mixture looks lighter in color and a bit fluffy.
- Add egg yolk, vanilla, and food coloring. Mix in the egg yolk, vanilla extract (or paste), and a good squirt of yellow gel coloring. Go for a cheerful chick yellow! Scrape down the bowl as needed.
- Incorporate the dry ingredients. On low speed, blend in the flour, cornstarch, salt, and baking powder until just combined. Don’t overmix—the dough should still feel a little sticky.
- Prepare colored dough for details. Scoop out about a tablespoon of dough into a separate bowl and color it orange with the gel food coloring. This will become beaks and feet.
- Preheat your oven and prep the baking sheet. Preheat to 175°C and line a large baking sheet with parchment or a silicone mat.
- Shape the chicks. Use your cookie scoop to portion out 12 balls of yellow dough for bodies. Roll them between your palms, then flatten gently into circles on the baking sheet, spacing them out so they don’t touch (about two finger-widths in between).
- Make and attach the feet and beak. Using the orange dough, roll out 24 small balls and flatten two at the bottom of each cookie for feet. For the beak, shape another small piece of orange dough and place it at the center of the chick’s face.
- Add the chick’s eyes. Gently press two black round sprinkles (sugar pearls or similar) just above the beak on each chick body.
- Sculpt the wings. From the remaining yellow dough, roll 24 slightly larger balls, flatten and shape them into upside-down teardrops. Press two onto the sides of each chick body, aiming close to the face so they’ll stay attached as the cookies bake.
- Add feather tufts. Shape a small tuft of yellow dough for the top of each chick. Use a toothpick or scribe to give it a distinctive line for dimension.
- Chill, if possible. For crisp shapes, chill the whole pan in the fridge for 15 minutes (or freezer for 5 minutes) before baking.
- Bake to perfection. Bake on the middle rack for 15–17 minutes, rotating the pan halfway through to encourage even coloring. Watch closely and remove the cookies before edges brown—they should look set and slightly puffed but not golden.
- Adjust and cool. If any wings slide, gently press them back in place while the cookies are hot. Let cookies cool completely before moving or serving—they’ll firm up as they sit.
Tips, Troubleshooting, and Common Mistakes for Chick Cookies Success
Getting chick cookies just right is all about those little details. Here’s how to sidestep common tripping points and end up with cookies that look and taste as good as you hope:
- Soft dough? Don’t panic! This dough is meant to be sticky—chilling the shaped cookies briefly sets them up and keeps their details crisp while baking.
- Wings falling off? Nestle wings close to the face. If any slide during baking, press them back in as soon as the cookies come out of the oven.
- Avoid overbaking. These cookies should be just set and almost pale; if they brown, the texture won’t be as soft and chewy.
- Color bleeding? Gel food coloring helps prevent color bleed. Go easy with liquid dyes.
- Details not sticking? Press decorations in gently but firmly, especially with cold dough.
- Flat cookies? Check that your baking powder is fresh, and avoid overmixing the dough.
Sometimes the littlest hands (or the most impatient adults) want to rush the decorating—embrace those wonky wings and eyes. Each chick gets its own personality, and that’s half the joy.
Pairings and Playful Variations to Make These Cookies Your Own
Chick cookies are utterly charming with a glass of cold milk, but they also love to mingle at a dessert table. Here are a few pairing and twist ideas:
- Pair with:
- Fresh fruit salad (think berries or tangerine wedges)
- Hot tea—chamomile or earl grey play well with the lemon zest
- A platter of other spring cookies for an Easter brunch
- Try these variations:
- Make “white chicks”—leave some dough uncolored for a variety of hues on your tray.
- Swap the lemon zest for orange or lime for a different citrus twist.
- Switch up the sprinkle “eyes”—use chocolate chips for a more decadent touch.
- Fill with fun—add a tiny pinch of coconut or colored sugar for texture in the wings.
- Make them mini—simply scale everything down for bite-size versions.
Decorating these cookies can become a spring tradition, and every batch feels like a fresh blank canvas to personalize for holidays or just because.
FAQs about Chick Cookies
Can I make chick cookies ahead of time and freeze them?
Freshly baked chick cookies freeze beautifully. Let them cool completely, then arrange in a single layer in an airtight container. You can freeze decorated cookies for up to 1 month. Thaw at room temperature before serving so they’re soft and tender.
What substitutions work for making chick cookies egg-free?
Since this recipe calls for only one egg yolk, you can try replacing it with a tablespoon of plain Greek yogurt or applesauce for extra moisture. The texture may be slightly different—just keep an eye on the final dough so it’s not too wet or sticky.
How should I store chick cookies to keep them soft?
Keep chick cookies in an airtight container at room temperature for up to 4 days. For longer storage, refrigerate them (especially in humid climates) or freeze your baked and cooled cookies as mentioned above. Their softness will last when the container is well sealed.
Bringing It All Together: The Joy of Chick Cookies
There’s nothing quite like the scent of lemon and vanilla wafting from the oven while a tray of chick cookies gently rises. Their sunny colors and playful shapes are guaranteed to bring a smile, and biting into that soft, chewy center is pure comfort. Whether you’re sharing them with friends, baking with kids, or just treating yourself to something special, chick cookies invite a little extra brightness to your table. Serve them up, enjoy the giggles, and let every bite remind you how sweet a little whimsy can be.
More Delicious Recipes
- Soft Chewy Lemon Cookies: These cookies share a bright lemon flavor that complements the sunny chick cookies perfectly.
- Lemon Rolls: These sweet rolls infused with lemon zest are a delightful treat for spring gatherings similar to the playful chick cookies.
- Sunrise Mocktail: A refreshing drink that pairs wonderfully with sweet treats like chick cookies, perfect for a festive occasion.
Easy Chick Cookies
Equipment
- Large bowl or stand mixer bowl
- Hand mixer or stand mixer
- Rubber spatula
- Cookie scoop (about 3 tablespoons size)
- baking sheet
- Silicone baking mat or parchment paper
- Scribe tool or toothpick
Ingredients
Ingredients
- 1/2 cup unsalted butter, room temperature (113g)
- 1/4 cup full-fat cream cheese, room temperature (56g)
- 1 cup granulated sugar (200g)
- 1 Tbsp fresh lemon zest (zest of 1 large lemon) (6g)
- 1 large egg yolk (20g)
- 1 tsp vanilla extract or vanilla bean paste (5g)
- 2 cups all-purpose flour (260g)
- 2 tsp cornstarch (6g)
- 1/2 tsp fine salt
- 1/4 tsp baking powder
- yellow and orange gel food coloring
- round black sprinkles
Instructions
Instructions
- NOTE: It takes 30-45 minutes to shape and decorate these chick cookies, so wait to preheat your oven until after you've made the cookie dough.
- In a large bowl or the bowl of a stand mixer, beat 1/2 cup or 1 stick (113g) unsalted butter and 1/4 cup (56g) cream cheese on medium speed with a hand mixer until smooth.
- In a separate bowl, add 1 cup (200g) granulated sugar and the zest of a large lemon (about 6g). Use your fingertips to massage the zest into the sugar. The rubbing action releases the natural oils from the lemon zest, intensifying the citrus flavor throughout the sugar.
- Add the lemon sugar into the butter/cream cheese mixture and mix on a medium-high speed for a couple of minutes, until the mixture becomes lighter in color.
- Add in 1 egg yolk (20g), 1 tsp (5g) vanilla bean paste or vanilla extract, and a generous squirt of yellow gel food coloring. You can also leave the remaining dough uncolored if you want to make white chicks. Mix on a medium speed until incorporated. Scrape the sides and bottom of the bowl with a rubber spatula as needed.
- Then, add 2 cups (260g) of flour, 2 tsp (6g) of cornstarch, 1/2 tsp of fine salt, and 1/4 tsp of baking powder to the butter mixture and mix at a low speed until it is JUST incorporated. Scrape the sides and bottom of the bowl with a rubber spatula to make sure everything is properly mixed together.
- At this point, the dough should still be pretty sticky. Scoop about 1 Tbsp of the dough into a separate bowl and color it orange with gel food coloring.
- Preheat the oven to 350°F/175°C and line a large baking sheet with a silicone baking mat or parchment paper. Set aside.
- Use a 3 Tbsp cookie scoop to scoop out 12 scoops of yellow dough (each dough ball should be about 50g). You should have about 2 Tbsp of yellow dough left to shape the wings. Roll the cookie dough into balls, then place them about 2 inches apart on the prepared baking sheets. Use your palm to gently flatten the dough into a flattened circle.
- Use the orange cookie dough to roll out 24 balls that are about 3/4 cm in diameter. Place two at the bottom of each cookie to be the chick's feet. Use your finger to gently flatten them and stick them into place.
- Then use about the same amount of dough that you used to make each foot to make each chick's beak. Place these in the center of each cookie.
- Gently press two round, black sprinkles into each cookie to be the chick's eyes.
- Then roll out 24 balls of yellow cookie dough that are about 1 cm in diameter. Use your fingers to flatten them a bit and shape them into an upside-down teardrop. Press 2 of these onto the sides of each cookie to be the chick's wings.
- The last step is to make 12 tiny tufts of feathers to place on the top of each chick cookie. Use a scribe or toothpick to make a line down the middle of the dough to give it more dimension.
- If you have the time and space in your fridge or freezer, chill the cookies (pan and all) in the fridge for 15 minutes or the freezer for 5 minutes to help them keep their shape as they bake.
- Bake one sheet of cookies at a time for 15-17 minutes on the middle rack of your oven. Rotate the pan halfway through to help them bake more evenly. Keep a close eye on the cookies and be sure to pull them out before the edges start to brown. If any of the wings do slide off the sides, carefully press them back into place right when the cookies come out of the oven and are still hot. Let the baked cookies cool fully on the pan, then enjoy!