There was a time I thought great bread had to come from a bakery. The chewy crust, the open crumb, that deep, savory aroma—surely it required a sourdough starter or at least a stand mixer. Then I tried making no knead garlic bread on a whim, with just a bowl, a spoon, and a bit of time. And it changed everything.
This recipe isn’t just beginner-friendly—it’s nearly impossible to mess up. No kneading. No fancy equipment. Just bold garlic flavor, a golden crust, and a soft, airy center that rivals any artisan loaf. Whether you’re dipping it into soup, layering it into a cheese board, or sneaking slices warm from the oven, this is the kind of bread that disappears fast.

Table of Contents
No Knead Garlic Bread: Recipe Overview & Why You’ll Love It
This no knead garlic bread strikes that magical balance between rustic and refined. It bakes up with a crisp, shattering crust and a pillowy interior that’s full of garlicky depth, thanks to a homemade garlic confit. You’ll taste subtle herbs, warm olive oil, and just enough salt to round it all out.
There’s no kneading or special technique required—just time. The dough rests while you go about your day, and the baking method starts in a cold oven, eliminating the stress of timing everything perfectly. It’s ideal for new bakers, garlic enthusiasts, and anyone who wants to serve something extraordinary with minimal effort.
Ingredients & Smart Substitutions for No Knead Garlic Bread
For the Garlic Confit
- 16 cloves garlic, peeled
- Olive oil (enough to cover the cloves; approx. ¾ cup)
Substitutions & Tips:
- You can roast extra garlic for spreading on the finished bread.
- Try infusing the oil with a pinch of chili flakes or lemon zest for added dimension.
For the Dough
- 3 cups (375g) all-purpose flour, plus more for dusting
- 1 teaspoon salt
- ½ teaspoon active dry yeast (check expiration)
- 1¾ cups (415ml) warm water (100–110°F / 37–43°C)
- Dried oregano or rosemary, to taste
Smart Swaps:
- Replace up to 1 cup of flour with whole wheat for a heartier loaf.
- Use instant yeast if needed—just skip activation and reduce rise time slightly.
- Herbs like thyme, basil, or parsley work beautifully.
- Optional mix-ins: chopped olives, sun-dried tomatoes, caramelized onions, or grated parmesan.
Equipment You’ll Need for No Knead Garlic Bread
- Large mixing bowl
- Measuring cups and spoons
- Liquid measuring cup
- Small ramekin or oven-safe dish for confit
- Parchment paper
- Oven-safe covered dish (Dutch oven or Corning Ware)
- Clean kitchen towel or plastic wrap
- Optional: spatula or bench scraper for shaping
If you don’t have a lid, you can tent foil over your baking dish to trap steam during the first half of baking.
Step-by-Step Instructions for No Knead Garlic Bread
Step 1 – Make the Garlic Confit
Preheat your oven to 400°F (200°C).
Place 16 peeled garlic cloves into a small ramekin or oven-safe dish. Pour in enough olive oil to just cover the cloves—about ¾ cup. Cover tightly and bake for 30 to 40 minutes, or until the garlic is soft and lightly golden. You should be able to pierce it easily with a knife.
Let the garlic cool in the oil. Set aside both the cloves and the infused oil—you’ll use the cloves in the dough and the oil for dipping later.
Step 2 – Mix the Dough
In a large bowl, whisk together:
- 3 cups all-purpose flour
- 1 tsp salt
- ½ tsp active dry yeast
- Your chosen herbs (start with 1 tsp)
Add the soft garlic cloves (drained from oil) into the bowl. Mix them in gently.
Pour in 1¾ cups warm water (between 100–110°F / 37–43°C). Stir with a spatula or wooden spoon until a sticky, shaggy dough forms. It won’t look pretty—just cohesive.
Cover the bowl with a towel or wrap. Let it rest at room temperature for 3 hours, or overnight, in a warm, draft-free spot. The dough should triple in size and look bubbly on top.
Step 3 – Shape and Bake
Flour your countertop generously. Tip the dough out gently, sprinkle more flour on top, and fold it lightly into an oval shape. You don’t need to knead—just gather and form until it’s no longer sticking to your hands.
Line your oven-safe baking dish with parchment. Transfer the dough into the dish and cover with a lid (or foil).
Place the dish into a cold oven, then set it to 450°F (230°C). Bake for 30 minutes covered, then remove the lid and bake for another 25–30 minutes uncovered, or until the loaf is golden brown all over.
Let the bread rest for at least 10 minutes before slicing.
Why This Recipe Works
At the heart of this no knead garlic bread is a brilliant technique: slow fermentation + steam baking. Here’s what makes it effective:
- Time does the kneading. Long resting activates gluten naturally, creating structure without effort.
- A cold oven start maximizes oven spring, helping the bread puff before the crust sets.
- Steam trapped under the lid keeps the crust soft early on, allowing for full expansion before crisping.
- Garlic confit delivers mellow, buttery garlic flavor throughout the loaf without harshness.
It’s a near-failproof process that delivers consistent results—even if you’ve never baked bread before.
Pro Tips & Creative Variations
- If your dough feels too wet when shaping, dust it with flour—but don’t overdo it. You want a tacky texture.
- For an extra burst of flavor, stir in ¼ cup grated parmesan or 2 tbsp chopped sun-dried tomatoes.
- Want to double the recipe? Make two loaves and bake in separate dishes, or freeze one portion of shaped dough for later.
- The garlic oil isn’t just for dipping—use it to brush the loaf before baking or toast slices afterward.
Make-Ahead, Storage & Freezing
Make-ahead: Mix the dough the night before and let it rise in the fridge. Bring to room temp before shaping.
Storage: Cool bread completely, then wrap in a clean towel or plastic wrap. Store at room temperature for up to 2 days.
Freezing: Slice the loaf and freeze pieces in a zip-top bag for up to 2 months. Reheat in a 325°F (160°C) oven or toaster.
Reheating: Wrap slices in foil and warm in the oven for 10–12 minutes at 300°F (150°C) to revive the crust.
Serving Suggestions & Pairings for No Knead Garlic Bread
This no knead garlic bread is endlessly versatile:
- Serve alongside tomato soup, lentil stew, or creamy chowders.
- Add to a cheese board with soft goat cheese and roasted red peppers.
- Toast and top with ricotta, honey, and chili flakes for a sweet-savory bite.
- Use thick slices for rustic grilled cheese or paninis.
- Tear and dip into the reserved garlic oil mixed with balsamic vinegar.
Dietary Notes & Allergen Considerations
- Vegan: Yes, this recipe is naturally plant-based.
- Dairy-Free: Yes—no milk, butter, or cheese unless added later.
- Nut-Free: Contains no nuts.
- Gluten-Free: Can be made with a 1:1 gluten-free baking flour, but results may vary.
- Low-Sodium Option: Reduce salt to ½ tsp, or omit entirely if needed.
Troubleshooting & Common Mistakes
- Bread didn’t rise: Your yeast may be expired, or water was too hot/cold. Always test your yeast if unsure.
- Dough too sticky to handle: Add flour in small increments while shaping—start with 1 tablespoon.
- Crust too hard: Wrap warm loaf in a clean towel as it cools to soften slightly.
- Bottom burned: Move rack higher in oven or use a thicker baking dish.
- Flat loaf: Overproofing can deflate dough—bake once tripled in size.
Nutritional Information (Per Slice – Approximate)
- Serving Size: 1 slice (1/10 loaf)
- Calories: 144
- Carbohydrates: 30g
- Sugar: 0.1g
- Sodium: 236mg
- Fat: 0.4g
- Saturated Fat: 0.1g
- Unsaturated Fat: 0.3g
- Trans Fat: 0g
- Fiber: 1g
- Protein: 4g
- Cholesterol: 0mg
FAQs About No Knead Garlic Bread
Can I use a Dutch oven for baking no knead garlic bread?
Absolutely. A Dutch oven works beautifully because it traps steam, which helps the bread rise and creates a crackly crust. Preheat it with the oven or use the cold start method described here.
What should the dough look like before baking?
After resting, your dough should be loose, bubbly, and sticky—not dry or smooth. Once floured and shaped, it should hold a soft oval form without spreading too much.
How long does no knead garlic bread stay fresh?
It’s best the day it’s made but stays soft for 1–2 days at room temperature. Reheating in the oven or toaster restores texture.
Can I freeze no knead garlic bread?
Yes. Slice the loaf and freeze the pieces in a sealed bag. Toast or reheat directly from frozen.
What if I only have instant yeast?
Instant yeast works fine. You don’t need to activate it—just mix it in dry. The rise time may be slightly faster, so check after 2–2½ hours.
Conclusion
This no knead garlic bread proves that great bread doesn’t have to be complicated. It gives you everything you want—crust, chew, flavor—without the learning curve of traditional techniques. And because it leans on time instead of elbow grease, it’s the kind of recipe you’ll actually want to make again.
If you’ve been intimidated by bread baking before, let this loaf be your entry point. One bowl, one rise, one incredible payoff. Try it. Tweak it. Make it yours.
More Relevant Recipes
- Garlic Bread Rolls: These soft, buttery rolls pack all the garlic flavor you crave, wrapped in a tender, fluffy dough. They’re the perfect dinner companion or stand-alone snack when you’re craving a twist on classic no knead garlic bread.
- Cheesy Garlic Bread: Layered with melted cheese and infused with roasted garlic butter, this recipe delivers gooey, golden perfection. It’s ideal for when you want your no knead garlic bread with an indulgent, melty upgrade.
- Crusty Italian Bread: This rustic loaf features a crackling crust and chewy interior—perfect for dipping, toasting, or pairing with soups. It mirrors the texture of no knead garlic bread with a classic Italian bakery vibe.
No Knead Garlic Bread
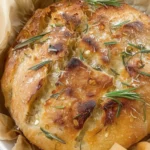
This no knead garlic bread is an easy, rustic loaf that combines garlic confit with a soft, chewy crumb and a golden, crisp crust. Perfect for serving with soups, spreads, or dipping in oil, it’s a hands-off recipe that delivers bakery-quality results with minimal effort.
- Prep Time: 10 minutes
- Cook Time: 70 minutes
- Total Time: 80 minutes
- Yield: 10 slices
- Category: Bread
- Method: Baking
- Cuisine: Bulgarian
- Diet: Vegetarian
Ingredients
- 16 cloves garlic
- 3/4 cup olive oil (enough to cover garlic)
- 3 cups all-purpose flour, plus more for dusting
- 1 teaspoon salt
- 1/2 teaspoon active dry yeast
- Dried oregano or rosemary, to taste
- 1 3/4 cups warm water (100–110°F / 37–43°C)
Instructions
- Preheat oven to 400°F (200°C). Place garlic cloves in a small oven-safe dish or ramekin and cover with olive oil. Cover and bake for 40 minutes until soft and golden. Let cool.
- In a large mixing bowl, whisk together flour, salt, yeast, and dried herbs. Add the garlic cloves (drained from oil) and mix gently.
- Pour in warm water and stir with a spatula until a sticky dough forms. Cover bowl with a towel and let rest at room temperature for at least 3 hours or overnight until tripled in size.
- Flour a work surface and gently tip out the dough. Dust with additional flour and shape into an oval without kneading.
- Line an oven-safe dish with parchment paper. Place dough inside, cover with a lid or foil, and put the dish in a cold oven. Turn the oven to 450°F (230°C).
- Bake covered for 30 minutes, then uncover and bake an additional 30 minutes until golden brown.
- Cool bread for 10 minutes before slicing. Serve with reserved garlic oil and balsamic vinegar if desired.
Notes
- You can substitute instant yeast for active dry yeast; adjust rise time accordingly.
- Use any dried herbs you like such as thyme, basil, or parsley.
- Store leftover bread at room temperature wrapped in a towel or plastic wrap for up to 2 days.
- Freeze sliced bread in an airtight bag for up to 2 months. Reheat from frozen.
- For extra flavor, add grated parmesan or sun-dried tomatoes to the dough.