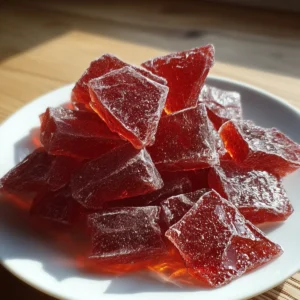
There’s something magical about making Old-Fashioned Cinnamon Rock Candy from scratch. The air in your kitchen shifts as that bold cinnamon aroma blooms, promising a treat that’s both spicy and sweet, with a satisfying crunch that instantly transports you to festive days gone by. Whether you’re after a vintage-style holiday gift or looking to recreate a nostalgic favorite, this cinnamon rock candy brings big flavor and bright, jolly color to any candy dish.
You don’t need fancy equipment or hard-to-find ingredients—just a little patience and a careful eye on your thermometer. The best part? Breaking the glossy slab into perfect, sparkly shards (and sneaking a warm bite along the way) is half the fun. Let’s dive into the simple steps and secrets to nailing this beloved classic at home.

Bringing the Candy Shop Home: Essential Tools for Perfect Cinnamon Rock Candy
To get that crunchy, glass-like snap and gorgeous fiery hue, you only need a few trusty kitchen tools—no specialty supplies required. Here’s what you’ll want on hand:
- Heavy-bottomed saucepan – Helps prevent scorching and keeps the syrup heating evenly.
- Candy thermometer – Absolutely essential for reaching the right temperature, ensuring your candy sets hard and crisp instead of staying sticky or chewy.
- 9×13 inch baking pan – For cooling and setting the candy as one shimmering slab before breaking.
- Parchment paper or light oil/grease – Keeps your candy from sticking to the pan and makes it easy to remove once set.
- Sturdy plastic bag (optional) – For mess-free candy breaking if you want to avoid hard shards flying across the kitchen.
- Meat mallet or the back of a spoon – For breaking the set candy into those classic irregular “rock” pieces.
With these tools, you’re set up for homemade candy shop success right in your kitchen.
The Spark of Spice: What’s Inside Old-Fashioned Cinnamon Rock Candy
The classic flavor and texture start with just a handful of simple but powerful ingredients. Every component has a job, ensuring your candy turns out spicy, shiny, and satisfyingly crunchy.
- sugar – The base of your candy, caramelizes for that crisp glassy texture and sweetness.
- Light corn syrup – Helps prevent crystallization, keeping your candy smooth and clear.
- Water – Dissolves the sugar and controls how the syrup cooks down.
- Cinnamon oil (or cinnamon extract) – Packs the bold, spicy punch that defines cinnamon rock candy.
- Red food coloring (optional) – Adds that signature ruby red sparkle, perfect for holidays or gift jars.
- Cream of tartar – Stabilizes the syrup and helps stop unwanted sugar crystals from forming.
See the recipe card below for the full list of ingredients and measurements.
From Syrup to Shards: Step-by-Step Cinnamon Rock Candy Magic
There’s nothing tricky—just a bit of mindful attention and careful timing will help you turn syrup into those spicy shards you remember from grandma’s candy dish. Follow these key steps and use your senses for the best results:
- Prepare your pan. Lightly grease a 33×23 cm (9×13 inch) baking pan or line it with parchment paper. Set it aside within easy reach.
- Combine the base. In a heavy-bottomed saucepan, add the sugar, corn syrup, water, and cream of tartar. Stir gently over medium heat until the sugar has fully dissolved and the mixture looks clear, not cloudy.
- Heat to hard crack. Attach your candy thermometer to the side of the pan, making sure the tip is submerged in the syrup but not resting against the bottom. Increase heat and let the mixture come to a boil. Once it starts boiling, stop stirring. Keep cooking, watching as big bubbles appear and the syrup thickens. Cook without stirring until the thermometer reads 149°C (the hard crack stage). The syrup will look clear and glassy at this point.
- Remove from heat and flavor. Immediately take the pan off the heat the moment it hits 149°C. Step back and let the bubbling subside for about 30 seconds—the surface will start to look slightly less foamy.
- Add flavor and color. Carefully stir in the cinnamon oil and, if using, the red food coloring. Stand back—the aroma is powerful! Stir just enough to mix, but don’t linger over the pot.
- Pour and set. Quickly pour the hot candy syrup into your prepared pan. Don’t scrape the sides or try to spread the syrup—let it settle and find its own level. This prevents sugar crystals from forming on your beautiful slab.
- Cool completely. Let the candy cool at room temperature, uncovered, for at least 2 hours. It will harden as it cools—don’t refrigerate.
- Break into pieces. Gently lift the candy slab from the pan. Place it on a clean counter or inside a sturdy plastic bag. Use a meat mallet or the back of a spoon to crack the slab into small, jagged shards—the real “rock” candy look.
- Store right. Transfer the candy pieces to an airtight container and keep at room temperature. This preserves the crunch and keeps moisture out.
One tip: Candy-making can move quickly once the temperature climbs, so have everything ready and move with care once you reach the final steps.
Sweet Success: Avoiding Mistakes with Old-Fashioned Cinnamon Rock Candy
Homemade rock candy is rewarding, but it does ask for a little focus—and a few key habits will stack the odds in your favor. Here’s how to dodge common slip-ups and keep your candy crunchy, shiny, and beautifully flavored:
- Sugar crystallization: The enemy of clear, smooth rock candy. Don’t stir once the syrup starts boiling, and avoid scraping the edges of the pot or pan, which can reintroduce unwanted crystals.
- Temperature missteps: The syrup must reach 149°C. Under-cooked syrup will make sticky, soft candy. Over-cooked syrup turns bitter and can burn. A candy thermometer is absolutely worth having here.
- Mixing in flavors and colors: Always wait until you’ve removed the pan from the heat to add flavoring and coloring. Stir carefully and quickly—too much stirring, and you risk grainy texture.
- Humidity issues: Never refrigerate or make this candy on a super humid day if possible. Moisture will make your candy tacky and dull its sparkle.
- Cooling impatience: Let the slab cool fully at room temperature before breaking it up. Breaking it while warm leaves a sticky mess instead of crisp shards.
If you do end up with slightly sticky pieces, dusting them lightly with powdered sugar can help. And if your candy clouds up, don’t sweat it—it’ll still taste fabulous!
Sparkle on Your Table: Pairing Ideas and Flavor Variations
Old-Fashioned Cinnamon Rock Candy is surprisingly versatile. It’s a show-stopper in glass jars on your holiday table, and it makes a thoughtful, homespun gift. But there are other ways to get creative, too.
- Pair with: Hot tea, spiced chai, or mulled wine for a spicy-sweet treat that melts slowly and brightens up your mug.
- Dessert topping: Scatter shards over vanilla ice cream or a creamy cheesecake for color and crackle.
- Gift inspiration: Fill cellophane bags or mason jars with rock candy for homemade gifts, stocking stuffers, or party favors.
- Make a “mixed jar”: Try using different food colorings (green or gold) for a rainbow effect, especially around the holidays.
- Vary the spice: Use less cinnamon oil for a milder heat, or swap in other extracts like wintergreen or clove for a twist.
- Kid-friendly variation: Stick with extract instead of oil, which mellows the spice and is easier on sensitive palates.
This recipe is vegetarian-friendly and easily adaptable for different spice levels or special occasions. Mix and match to suit your crowd!
FAQs about Old-Fashioned Cinnamon Rock Candy
How do I store Old-Fashioned Cinnamon Rock Candy to keep it crunchy?
Keep your cinnamon rock candy in an airtight container at room temperature—never refrigerate it. Moisture is not your friend here, so store it away from direct sunlight and humidity to preserve that signature crunch for several weeks.
Can I swap out the cinnamon oil in Old-Fashioned Cinnamon Rock Candy?
Absolutely. If cinnamon oil is too strong (or hard to find), you can use cinnamon extract instead for a gentler flavor. You can also experiment with other extracts like peppermint, anise, or wintergreen for unique spins on the classic.
Is it possible to freeze homemade cinnamon rock candy?
Freezing is not recommended, as the candy can quickly become sticky or attract condensation. It’s best enjoyed and stored at room temperature, tightly sealed, for the crispiest texture.
Sharing the Spice: A Final Sweet Note on Homemade Candy
Homemade Old-Fashioned Cinnamon Rock Candy captures the spirit of childhood and the joy of a hands-on kitchen project. Each bite shatters with a spicy-sweet burst and a sparkle that’s right at home at any holiday table (or just for a simple afternoon treat). Pour yourself a cup of something warm, help yourself to a shard, and let the bold cinnamon flavor sing—this is the kind of classic candy worth sharing all year round.
More Tasty Ideas
- Irish Scones: These classic scones make a delightful pairing with tea, just like your cinnamon rock candy.
- Butter Mints: A sweet treat with a fun texture that’s perfect for holidays and special occasions.
- No-Bake Oreo Cheesecake Bites: These fun bites offer a different sweet experience that complements your homemade rock candy perfectly.
Old-Fashioned Cinnamon Rock Candy: A Classic Homemade Treat
Equipment
- heavy-bottomed saucepan
- candy thermometer
- 9x13 inch baking pan
- parchment paper or light oil/grease
- sturdy plastic bag (optional)
- meat mallet or the back of a spoon
Ingredients
Ingredients
- 2 cups granulated sugar
- 2/3 cup light corn syrup
- 2/3 cup water
- 1 teaspoon cinnamon oil (or 1 1/2 teaspoons cinnamon extract)
- 1/4 teaspoon red food coloring (optional, for vibrant color)
- 1 teaspoon cream of tartar
Instructions
Instructions
- Lightly grease a 9×13 inch baking pan or line it with parchment paper. Set aside.
- Combine the sugar, corn syrup, water, and cream of tartar in a heavy-bottomed saucepan. Stir gently over medium heat until the sugar dissolves completely. Do not stir once the mixture boils.
- Attach a candy thermometer to the side of the pan, making sure the tip is submerged but not touching the bottom.
- Boil the mixture without stirring until it reaches 300 degrees Fahrenheit (the hard crack stage). Watch the temperature closely as it rises quickly near the end.
- Remove the pan immediately from the heat once 300 degrees Fahrenheit is reached. Wait about 30 seconds for the bubbling to subside slightly.
- Carefully stir in the cinnamon oil and the red food coloring, if you are using it. Stir just enough to combine the flavor and color.
- Quickly pour the hot candy mixture into your prepared pan. Do not spread or scrape the sides of the pan, as this can cause crystallization.
- Allow the candy to cool completely and harden at room temperature for at least 2 hours, or until fully set. Do not refrigerate.
- Once hard, place the candy slab on a clean surface or inside a sturdy plastic bag. Use a heavy object, like a meat mallet or the back of a spoon, to break the candy into small, irregular pieces (rock candy).
- Store your homemade cinnamon candy in an airtight container at room temperature.