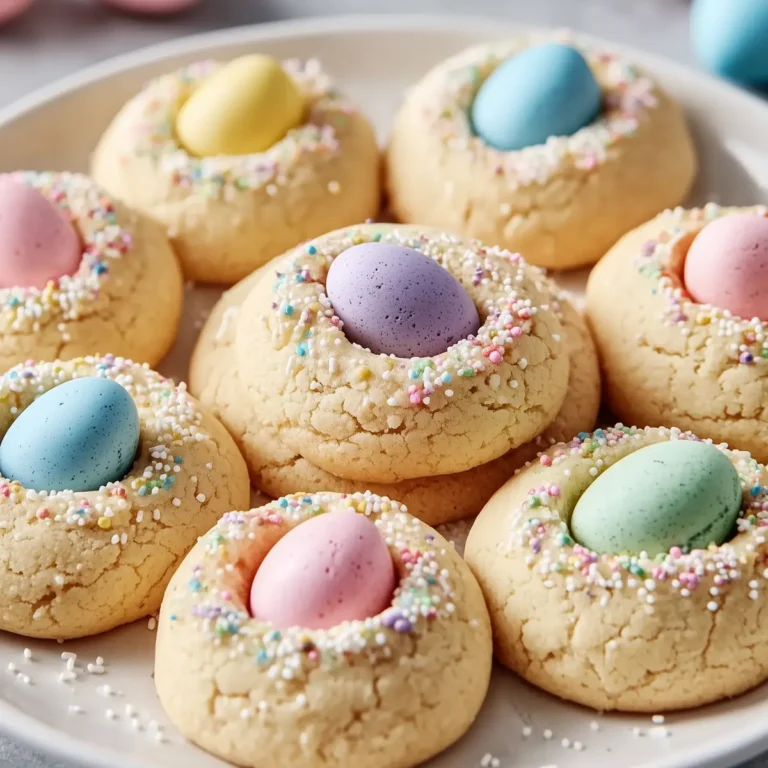
Some desserts just have a way of making people light up—no explanation required. The first time I set a plate of pastel crinkle cookies on the kitchen counter, I watched my family’s conversation drop off mid-sentence. Bright pinks, blues, pale yellow and minty greens, all dusted in thick clouds of powdered sugar, just have that magnetic pull. The crackled tops look almost like festive little snowcaps scattered across a meadow. If you love the soft chew of a classic crinkle cookie with a playful, springtime twist, these belong in your regular baking rotation. I reach for this recipe when I want rave reviews with minimal fuss, especially for Easter, baby showers, or any sunny-day gathering.
There’s a pure nostalgia in these cookies even if, like me, you didn’t grow up with pastel crinkles on your childhood dessert table. They’re not just pretty—they’re pillow-soft with creamy vanilla undertones and a whiff of almond if you like, melting under your fingers and your teeth. It’s the sort of cookie that just disappears fast, so don’t plan on leftovers.

Pastel Crinkle Cookies and the Magic of Colorful Baking
There’s nothing ordinary about the moment you pull a tray of pastel crinkle cookies from the oven. The cookies are slightly puffed up, their crackled tops making each one look a little different—some with dramatic, jagged lines, others sporting subtle swirls. Even the aroma is a mix of vanilla, sugar, and something almost floral hovering right beneath it all. As the cookies cool, the colors seem to peek through the sugar haze more vividly, practically inviting you to reach for one before they’re even set.
Honestly, I find that baking these cookies has as much to do with chasing joy as it does with following a recipe. There’s that childhood thrill of swirling colors into dough and waiting to see which shade comes out brightest. With every batch, you’ll discover that the magic is in the details: the edges just set, the sugar clinging to the surface in cozy clusters, and the anticipation as everyone waits for them to be cool enough to eat.
The Ingredients That Make These Cookies Stand Out
- Flour – the essential structure-builder here; choose plain, all-purpose for a tender cookie that holds its shape.
- Baking powder & baking soda – together, these give the cookies their signature lift and help develop those deep crackles across the top.
- Fine salt – balances the sweetness and makes the vanilla pop.
- Unsalted butter – softened, this brings the classic richness you expect in a homemade cookie.
- Granulated sugar – sweetens the dough and also gets used for rolling, adding a subtle crunch and sparkle.
- Egg and extra egg yolk – the combination keeps the cookies extra tender and gives a bit of chew.
- Vanilla extract – the base note in the flavor symphony; always use real vanilla if you can.
- Almond extract (optional) – a whisper of fragrant complexity that deepens the aroma (entirely optional, but I love that subtle boost).
- Cream cheese – makes the finished cookies pillowy-soft and keeps their insides lush, almost like a little secret in each bite.
- Powdered sugar – used for the dramatic outer coating; it’s what creates the visual “crinkle” as the cookies puff up in the oven.
- Gel food coloring (pastel shades) – pink, blue, lavender, mint… this is where things get playful; use what makes you happy, but stick to gels for the brightest colors and least mess.
See the recipe card below for the full list of ingredients and measurements.
Building Each Whimsical Cookie Step by Step
Mixing up these cookies can feel a bit like doing a science experiment in the very best way. Each step has its own personality, from swirling in colors to rolling in clouds of sugar. Here’s how it all comes together—no rush, just enjoy the process:
- Start by whisking together your dry ingredients—flour, baking powder, baking soda, and salt—in a medium bowl. Getting everything blended now guarantees even fluffiness later.
- In a bigger bowl, beat the softened butter and granulated sugar until the mixture turns pale and billowy. It should almost look like whipped cream. Take your time, and scrape down the sides now and then so everything is smooth.
- Add in the whole egg plus an extra yolk. Let the mixer run until everything is slick and shiny—no streaks left behind. That extra yolk makes such a difference for chewiness later.
- Now, pour in the vanilla and almond extracts along with the softened cream cheese. The dough will become rich and almost mousse-like. Take a moment to sniff; it should smell like a bakery window at springtime.
- Stir your flour mixture in, just until no visible white remains. Over-mixing is the enemy of tenderness, so stop as soon as the dough comes together.
- Divide the dough into separate bowls—one for each color you’re using. Swirl gel food coloring into each batch, starting light and building to your preferred pastel vibrancy. You’ll likely find your fingers getting a little colorful too; that’s half the fun.
- Cover the bowls and set them in the fridge. They need a good chill, at least a couple of hours or ideally overnight, so they don’t spread too much in the oven.
- When you’re ready to bake, heat your oven to a moderate temperature and line two baking trays with parchment. This keeps the cookies from sticking and makes clean-up a breeze.
- Shape the chilled dough into balls—roughly walnut-sized—and give each one a generous roll in granulated sugar. Then, roll them again in powdered sugar, pressing so it really clings. This double-coating is what creates those storybook crinkles.
- Space them well apart; the cookies need room to puff up and spread without running into each other. They’re ready for the oven now.
- Bake until you notice the edges set and the tops have broken open with dramatic cracks. The middle should look slightly underdone when you pull them—resist the urge to overbake. They’ll finish setting as they cool.
- Let the cookies cool on their trays for a few minutes before moving them to a rack. Admire how the pastel shades peek out from beneath those powdery fissures. That’s the moment they’re at their photogenic best.
Texture, Flavor, and the Colorful Crackle
There’s a subtle anticipation in taking that first bite—an audible flake of sugar, then the pillowy chew at the center. Pastel crinkle cookies are the kind of sweet that’s both soft and structured, melting at the very edges while holding their pastel-hued cores. The vanilla comes through clear as day, with a gentle creamy richness from the cream cheese, and the faintest echo of almond if you added it. It’s not just about the taste, though: each cookie feels like a celebration of warmer days, bright colors, and outdoor picnics on clean, fresh grass.
The sugar shell creates those distinct crackles that tease the eye and fingers alike. Every cookie is a tiny surprise once broken open—the color inside never lands quite the same way twice. That’s part of what turns a simple cookie into a table centerpiece.
Little Tweaks for Perfect Pastel Crinkle Cookies
Making pastel crinkle cookies isn’t rocket science, but there are a few small tricks that make the end result extra dreamy. First, don’t skip the chill time—even if you’re impatient. Overnight is even better. Chilled dough makes tidy, thick cookies with dramatic crinkles instead of pancake-flat messes.
Stick with gel food coloring, as the liquid versions can leave your dough sticky and the hues a bit muddy. You can mix pastel shades however you want—think ombre balls for something extra playful. The double sugar roll is non-negotiable if you want the classic crinkle effect.
If you’re out of cream cheese, Greek yogurt makes a reasonable backup, though you’ll notice the flavor is slightly tangier. Unsalted butter is ideal, but salted works if you simply skip any extra pinch of salt in the recipe.
For storage, the cookies keep soft in an airtight tin for several days, though they’re at their most magical within the first forty-eight hours. If you’d like to freeze, freeze the unbaked, sugar-coated dough balls and bake straight from the freezer—adding an extra minute or two. Leftovers heat up gently in a low oven for that just-baked aroma.
Serving These Cookies at Your Springtime Celebrations
When it comes to serving, pastel crinkle cookies seem to practically beg for a festive setting: think a big platter for Easter brunch, a baby shower dessert table, or alongside a spread of berries and tea for a sunny afternoon snack. You can even stack them in clear jars or boxes as homemade gifts—no ribbon required, because the colors do all the talking.
Pair these cookies with lemonade, fresh mint iced tea, or a creamy latte. Their pretty colors aren’t reserved for spring, though—they brighten gloomy winter days, too. If you’re going all out, consider making a double batch with every color imaginable, letting the kids “paint” their dough. It’s one of those rare recipes that makes even grown-ups hope for a few extras in their lunchbox.
FAQs about Pastel Crinkle Cookie
Can pastel crinkle cookies be made ahead and frozen?
Yes, you can freeze these cookies in two ways. Either freeze the unbaked dough balls after they’ve been rolled in sugar, then bake from frozen adding a minute or two, or freeze the finished, cooled cookies in an airtight container. While baked cookies stay tasty for up to two months in the freezer, they’re best enjoyed fresh for the fullest flavor.
What are the best food coloring options for pastel crinkle cookies?
Gel food colorings are the top choice because they produce vibrant, even colors without thinning out the dough. Liquid food dyes can throw off the consistency and make the cookies spread too much, so stick with gels for those crisp, playful hues.
How do you keep pastel crinkle cookies soft after baking?
Once cooled, store the cookies in an airtight container at room temperature. Adding a slice of fresh bread to the container helps soak up any extra moisture and keeps the cookies tender for days. Just change out the bread slice after two days if you still have cookies around.
Can I make pastel crinkle cookies without cream cheese?
You can substitute thick Greek yogurt or even a bit of sour cream if you’re out of cream cheese. The texture will be just as soft, though you might notice a faint tanginess replacing that subtle creaminess. It’s a trade-off, but still delicious.
Pastel crinkle cookies are the kind of treat that turn an ordinary afternoon into something a bit more sparkling—every bite is sweet, pillowy, and wrapped in a playful sugared shell. I love them for their cheerful colors, but even more for the way they bring a sense of celebration to the table. Whether you’re baking for a spring crowd or just indulging a personal craving for something a little whimsical, this recipe delivers both comfort and delight. Give them a try—just be warned, the hardest part is saving a few for later.
More Delicious Recipes
- Soft Chewy Lemon Cookies: These cookies offer a delightful tanginess that pairs perfectly with the sweetness of pastel crinkle cookies.
- Lemon Rolls: The bright flavor of lemon in these rolls makes them a wonderful addition to any springtime gathering, just like the vibrant pastel crinkle cookies.
- Homemade Divinity Candy: This fluffy, sweet treat complements the light, airy texture of pastel crinkle cookies, adding a whimsical touch to your dessert table.

Pastel Crinkle Cookie
Equipment
- Baking sheets
- Parchment paper
- medium bowl
- Larger bowl
Ingredients
Ingredients
- 2 1/4 cups all-purpose flour (270 g)
- 1 teaspoon baking powder
- 1/2 teaspoon baking soda
- 1/2 teaspoon fine salt
- 3/4 cup unsalted butter (softened (170 g))
- 1 cup granulated sugar (200 g)
- 1 large egg
- 1 large egg yolk
- 2 teaspoons vanilla extract
- 1/2 teaspoon almond extract (optional)
- 1/4 cup cream cheese (softened (60 g))
- 1/2 cup granulated sugar for rolling
- 1 cup powdered sugar for rolling
- Gel food coloring in 3–4 pastel shades such as pink, blue, lavender, and mint
Instructions
Instructions
- Whisk the flour, baking powder, baking soda, and salt together in a medium bowl and set aside.
- Beat the softened butter and granulated sugar together until light and fluffy, scraping down the bowl as needed.
- Add the whole egg and egg yolk and mix until smooth and glossy.
- Mix in the vanilla extract, almond extract if using, and softened cream cheese until fully combined.
- Add the dry ingredients and mix just until no streaks of flour remain.
- Divide the dough evenly into separate bowls based on how many pastel colors you are using.
- Stir gel food coloring into each portion of dough until evenly colored.
- Cover the dough and chill for at least 2 hours or overnight.
- Preheat the oven to 350°F and line two baking sheets with parchment paper.
- Scoop the chilled dough into 1 1/2 tablespoon balls, about 35–40 grams each.
- Roll each dough ball in granulated sugar.
- Roll again in powdered sugar, pressing lightly for a thick coat.
- Place the dough balls about 2 inches apart on the prepared baking sheets.
- Bake for 10–12 minutes until the edges are set and the tops are crackled, starting to check at 9 minutes if needed.
- Allow the cookies to cool on the baking sheet for 5 minutes before transferring them to a wire rack to cool completely.