There’s something uniquely comforting about the smell of pumpkin pie baking in the oven. The rich scent of cinnamon, nutmeg, and cloves feels like a warm blanket on a cool autumn day. For many, pumpkin pie isn’t just a dessert—it’s the centerpiece of family traditions and cherished holidays. Whether you’re preparing for Thanksgiving or simply craving a cozy treat, learning how to make pumpkin pie from scratch allows you to create something truly special.
In this guide, you’ll discover how to craft a silky, flavorful pumpkin filling encased in a tender, flaky crust—no shortcuts, no canned crusts—just pure, homemade goodness. Whether you’ve baked pies before or are trying this for the first time, you’ll find everything you need right here. Let’s get started.

Table of Contents
Why You’ll Love This Homemade Pumpkin Pie Recipe
There’s a reason this recipe has been passed down through generations. It delivers a classic experience without being overly complicated.
- Rich and creamy filling with just the right balance of spices.
- Flaky, buttery crust that complements the filling perfectly.
- Customizable options for using either canned or fresh pumpkin puree.
- Perfect make-ahead dessert for busy holiday schedules.
You’ll gain not just a recipe but the confidence to make a pie that tastes as good as it looks—every single time.
Essential Ingredients for Pumpkin Pie From Scratch
Before you begin, gather your ingredients. Sticking to simple, quality components makes all the difference.
For the Homemade Pie Crust
- 1¼ cups all-purpose flour
- ½ teaspoon salt
- 4 ounces Crisco or cold unsalted butter
- ⅛ cup ice-cold water
For the Pumpkin Pie Filling
- 15 ounces pumpkin puree (fresh or canned)
- 12 ounces evaporated milk
- ¾ cup light brown sugar
- 1½ teaspoons ground cinnamon
- ½ teaspoon salt
- ½ teaspoon ground ginger
- ½ teaspoon ground cloves
- 2 large eggs
This classic combination yields a velvety filling that’s neither too sweet nor too spicy, giving you that unmistakable pumpkin pie flavor.
Step-by-Step Instructions for Making Pumpkin Pie From Scratch
Let’s break it down into manageable steps so that you can move through the process confidently and smoothly.
1. Make the Pie Dough
Start by combining the flour and salt in a large bowl. Add the Crisco or butter and use your fingers to gently work it into the flour until the mixture resembles coarse crumbs. Don’t overmix—you’re aiming for texture, not uniformity.
Create a small well in the center of the mixture and slowly add the ice-cold water. Gently pull the flour into the water using a fork or your hands, just until the dough comes together. Avoid kneading.
Form the dough into a flat disc, wrap it in plastic wrap, and chill it in the refrigerator for 30 minutes to an hour.
2. Roll and Shape the Crust
Once the dough has chilled, lightly flour a clean surface and roll it out from the center until it’s about ¼ inch thick and large enough to fit your 9-inch pie plate with at least a ½-inch overhang.
Transfer the dough to your pie plate, letting it drape naturally. Trim any excess and tuck the edges under to create a smooth border. Crimp the edges decoratively using your fingers or a fork. Set aside while you make the filling.
3. Prepare the Filling
In a blender or large mixing bowl, combine the pumpkin puree, evaporated milk, brown sugar, cinnamon, salt, ginger, cloves, and eggs. Blend on low or mix just until the ingredients are fully incorporated and smooth.
Avoid over-blending—doing so can introduce air into the mixture and lead to cracks during baking.
4. Assemble and Bake the Pie
Preheat your oven to 425°F (218°C). Pour the prepared filling into the unbaked pie crust, smoothing out the top with a spatula if needed.
Place the pie on the middle rack and bake for 15 minutes. Without opening the oven, reduce the temperature to 350°F (177°C) and continue baking for an additional 45 to 50 minutes.
Check for doneness by gently shaking the pie. If the center has a slight jiggle while the edges are set, it’s ready. A knife inserted into the center should come out clean.
If the crust begins to brown too quickly, loosely cover the edges with aluminum foil to prevent overbaking.
5. Cool and Serve
Let the pie cool completely on a wire rack. This helps the filling set and makes slicing easier. Serve at room temperature with a generous dollop of whipped cream or a scoop of vanilla ice cream for the perfect finish.
Tips for the Perfect Pumpkin Pie
Small adjustments can make a big difference in the final outcome. Here are some expert tips to guide you.
- Keep your crust ingredients cold to ensure a tender, flaky texture.
- Avoid overworking the dough—this can lead to toughness.
- Don’t skip chilling the dough—it helps prevent shrinking in the oven.
- Use room temperature ingredients for the filling to ensure a smooth blend.
- Resist opening the oven door too often—sudden changes in temperature can cause cracks.
- Let the pie cool completely before slicing to ensure clean cuts and fully set filling.
Make-Ahead, Storage & Freezing Instructions
Time is precious during the holidays. Thankfully, pumpkin pie is easy to make ahead.
- Make the crust in advance: Wrap it tightly and refrigerate for up to 2 days, or freeze for longer storage.
- Bake the full pie and freeze: Cool it completely, wrap in foil, then plastic, and freeze for up to 2 months. Thaw in the fridge overnight.
- Store leftovers: Keep covered in the fridge for up to 5 days.
This flexibility means you can prep ahead and enjoy more time with your loved ones when it matters most.
Nutritional Information
Serving Size: 1 slice (1/8 of 9-inch pie)
Calories: 364
Sugar: 25g
Sodium: 358mg
Fat: 19g
Saturated Fat: 6g
Unsaturated Fat: 11g
Trans Fat: 2g
Carbohydrates: 43g
Fiber: 2g
Protein: 7g
Cholesterol: 59mg
These values are estimated based on standard ingredients and preparation methods.
Frequently Asked Questions About Pumpkin Pie From Scratch
How do I know when my pumpkin pie is done?
Look for a gently jiggling center with firm edges. You can also insert a knife into the center—it should come out clean. If the crust browns too quickly, cover it with foil and finish baking.
Is canned pumpkin or fresh pumpkin better?
Canned pumpkin offers consistency in both texture and flavor, which is why it’s often preferred. Fresh pumpkin works well too, especially if you enjoy a slightly different texture and natural sweetness.
Can I make pumpkin pie from scratch ahead of time?
Yes, you can make the crust or the entire pie ahead. Freeze the pie before or after baking, or prepare the crust and filling separately to assemble the day you plan to serve it. Let the baked pie cool fully before refrigerating or freezing.
Conclusion
When you make pumpkin pie from scratch, you’re not just baking—you’re creating something meaningful. Each step, from blending the spices to crimping the crust, invites you to slow down and enjoy the process. The result is a dessert that brings people together, stirs up nostalgia, and tastes like home.
Now that you know exactly how to do it, why not make this the year you ditch the store-bought crust and canned filling? Once you taste the difference, you’ll never look back. Try it for your next holiday gathering or surprise your family on a quiet Sunday afternoon. Either way, you’ll be serving more than just a pie—you’ll be serving a memory in the making.
Discover More Recipes
- Fresh Pumpkin Pie Recipe: This classic take on pumpkin pie features a homemade crust and a creamy filling made from fresh pumpkin puree, ideal if you’re looking to elevate your traditional holiday dessert with a fresher, farm-to-table taste.
- Libby’s Classic Pumpkin Pie: A timeless favorite, this recipe uses Libby’s canned pumpkin and delivers that nostalgic flavor you’ve loved for years. It’s a straightforward and reliable choice for any holiday table.
- Pumpkin Pie Recipe: Classic Homemade Dessert: This richly spiced version of the beloved dessert includes a smooth custard filling with the perfect blend of cinnamon and nutmeg. A great choice if you’re seeking a balanced and flavorful pie with old-fashioned charm.
pumpkin pie from scratch
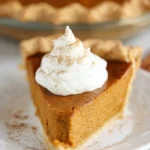
This classic pumpkin pie from scratch features a rich, creamy filling made with warm spices and a buttery homemade crust. It’s a comforting, traditional dessert perfect for fall gatherings and holiday tables.
- Prep Time: 30 minutes
- Cook Time: 60 minutes
- Total Time: 90 minutes
- Yield: 1 9-inch pie
- Category: Dessert
- Method: Baking
- Cuisine: American
- Diet: Vegetarian
Ingredients
- 1¼ cups all-purpose flour
- ½ teaspoon salt
- 4 ounces Crisco or cold unsalted butter
- ⅛ cup ice-cold water
- 15 ounces pumpkin puree
- 12 ounces evaporated milk
- ¾ cup light brown sugar
- 1½ teaspoons ground cinnamon
- ½ teaspoon salt
- ½ teaspoon ground ginger
- ½ teaspoon ground cloves
- 2 large eggs
Instructions
- In a large bowl, mix flour and salt. Add Crisco or butter and combine until mixture resembles coarse crumbs.
- Add ice-cold water and gently mix just until dough forms. Do not knead. Shape into a disc, wrap, and chill for 60 minutes.
- Roll dough out to ¼ inch thickness and fit into a 9-inch pie plate. Trim and crimp edges. Set aside.
- In a blender, combine pumpkin puree, evaporated milk, brown sugar, cinnamon, salt, ginger, cloves, and eggs. Blend until smooth.
- Pour the filling into the prepared crust.
- Bake at 425°F for 15 minutes. Reduce oven temperature to 350°F and bake for an additional 50 minutes, or until center is set and crust is golden.
- Cool the pie on a wire rack to room temperature before slicing and serving.
Notes
- Use canned pumpkin for a consistent texture and flavor.
- If crust browns too quickly, cover edges with foil during baking.
- Let pie cool completely to help it set properly.
- You can substitute butter for Crisco if preferred.
- Make ahead and freeze for up to 2 months.