The holiday season brings a special kind of magic — one that fills your home with warmth, laughter, and the sweet aroma of baked treats. And while there are plenty of desserts to whip up during this time of year, few are as charming, whimsical, and downright fun as Reindeer Cupcakes. Whether you’re preparing for a classroom party, hosting a family gathering, or just looking for a memorable kitchen activity with your kids, this recipe delivers festive flavor and unforgettable presentation.
These Easy Reindeer Cupcakes offer more than just a delicious bite. They’re a creative outlet, an opportunity to make memories, and an eye-catching addition to any holiday dessert table. Best of all, they’re simple enough for even novice bakers or little helpers to assist with — turning the process into a delightful experience from start to finish.
If you’re ready to wow your guests, keep little hands entertained, or leave Santa something extra special this year, these cupcakes are exactly what you need.

Table of Contents
Why You’ll Love These Reindeer Cupcakes
Holiday baking doesn’t have to be complicated. With this recipe, you’re creating something playful and festive without spending hours in the kitchen. Here’s what makes these cupcakes stand out:
- Easy to decorate — even for beginners
- Great project to involve children
- Customizable to suit your taste or ingredients on hand
- Perfect for potlucks, parties, and gift boxes
- Can be made using a boxed mix or your favorite homemade cupcake recipe
These Reindeer Cupcakes strike the perfect balance between effort and payoff — high visual appeal with minimal complexity.
Ingredients and Supplies You’ll Need
Before you get started, take a moment to gather everything you’ll need. Having your ingredients and supplies ready will streamline the process and make decorating more enjoyable.
Cupcake Base
You can use your go-to cupcake recipe or simplify things with a boxed mix. To enhance a boxed mix, consider the following:
- 1 boxed cake mix (any flavor)
- 1 small box of instant pudding (matching the cake flavor)
- 1 extra egg (in addition to what’s listed on the box)
These additions make the cupcakes extra moist and bakery-quality.
Tools and Supplies
- Cupcake baking pan
- Cupcake liners (holiday-themed for added festivity)
- Cookie scoop (for even batter distribution)
- Cooling rack
- Parchment paper
Decoration Essentials
- Candy melts (chocolate flavored for the antlers)
- Wilton #4 and #10 decorating tips
- Disposable piping bags
- Wilton icing in:
- Brown (for the base)
- Red (for the nose)
- Black (for the eyes)
- Edible eyeball sprinkles (optional)
- Red M&M candies (alternative nose option)
How to Make Reindeer Cupcakes: Step-by-Step Guide
Now that you’ve got your ingredients and tools lined up, it’s time to bring your Reindeer Cupcakes to life. This process is broken down into manageable steps so you can stay organized and enjoy the experience.
1. Bake Your Cupcakes
Start by preheating your oven according to your recipe or boxed mix instructions — typically 350°F.
- Line your cupcake pan with festive paper liners
- Use a cookie scoop to evenly distribute batter into each cavity
- Bake as directed (usually 17–20 minutes)
- Remove from oven and allow cupcakes to cool on a rack for 15–20 minutes
A uniform size helps with decorating later, especially when applying symmetrical antlers.
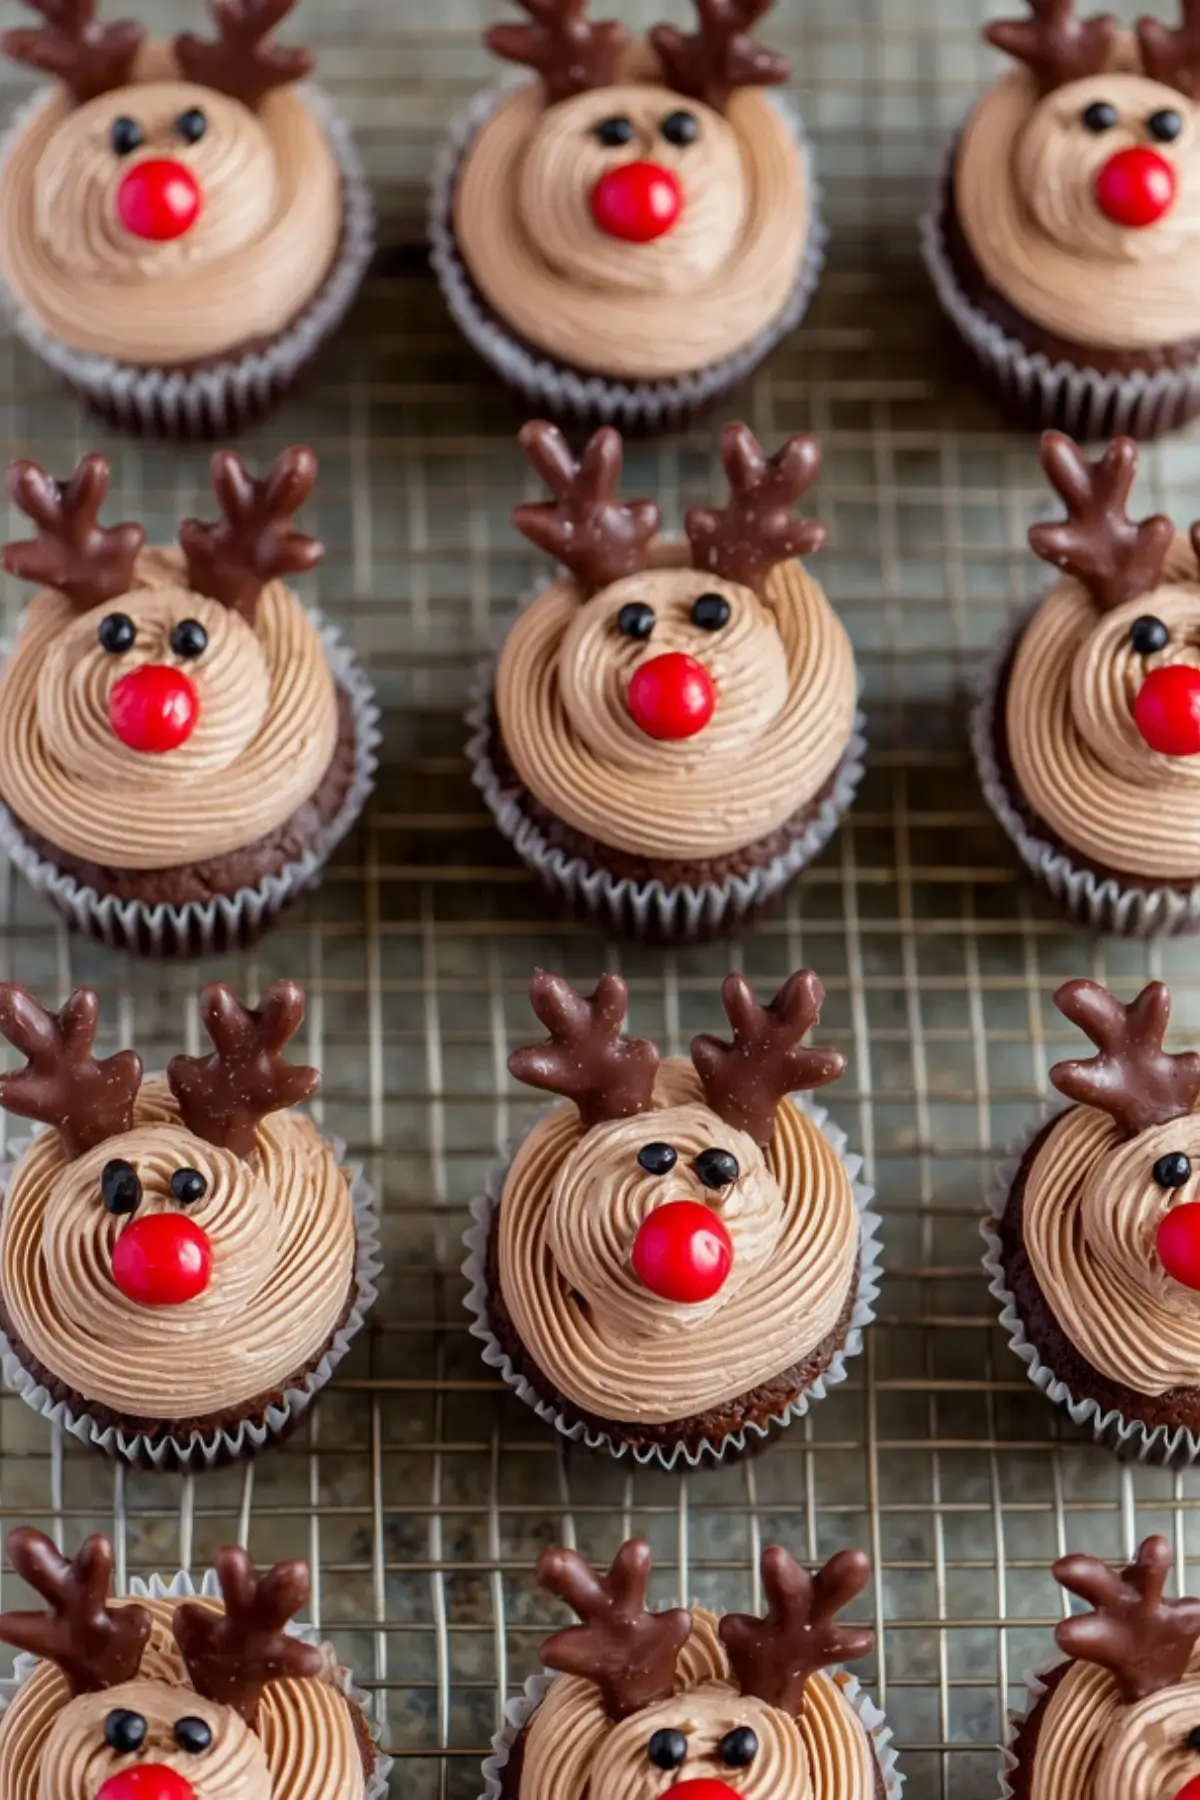
2. Create the Chocolate Antlers
While your cupcakes are cooling, move on to making the decorative antlers.
- Melt candy melts in a microwave-safe bowl at 30% power, 30 seconds at a time, stirring between intervals
- Transfer melted chocolate into a piping bag fitted with a #4 tip
- Lay parchment paper flat and pipe “Y” shapes — these will be your reindeer antlers
- Make extra in case of breakage
- Allow them to set and harden at room temperature
These chocolate antlers are not only cute, they add texture and dimension to the final presentation.
3. Pipe the Frosting
Once your cupcakes have cooled completely, it’s time to decorate.
- Fit one piping bag with a #10 tip and fill it with brown icing
- Pipe a swirl of brown icing on each cupcake, starting from the outer edge and spiraling inward
- Insert two chocolate antlers into the top of the icing
Now the reindeer face is taking shape.
4. Add the Reindeer Features
To complete the reindeer look:
- Use black icing (fitted with a #4 tip) to create small eyes, or stick on edible eyeball sprinkles
- Pipe a red nose in the center using red icing, or press a red M&M into place
Step back and admire your edible herd of festive reindeer. Each cupcake may have its own personality — some with googly eyes slightly askew or noses a bit off-center. That’s part of the charm.
Creative Variations and Decorating Tips
Looking to add a personal touch or adapt based on what’s in your pantry? Try these ideas:
- Flavor Fun: Use red velvet or peppermint cake for a seasonal twist
- Edible Eyes: Candy eyeballs add a cartoonish look and are easier for kids to place
- Nose Swap: Red cinnamon candies or jelly beans also work as noses
- DIY Party Station: Set up a cupcake decorating station at your holiday gathering — kids and adults will both love it
Don’t be afraid to mix it up. These cupcakes are meant to be fun, not perfect.
Nutritional Information (Per Cupcake Approximate)
- Serving Size: 1 cupcake
- Calories: 270
- Sugar: 25g
- Sodium: 180mg
- Fat: 12g
- Saturated Fat: 6g
- Unsaturated Fat: 5g
- Trans Fat: 0g
- Carbohydrates: 36g
- Fiber: 1g
- Protein: 2g
- Cholesterol: 35mg
These values will vary based on your choice of cupcake recipe and decorations.
Frequently Asked Questions About Reindeer Cupcakes
What type of cupcakes are best for making Reindeer Cupcakes?
You can use almost any cupcake flavor you like, but chocolate and vanilla are classics that pair well with festive decorations. Red velvet is also a great choice for a holiday feel. If using a boxed mix, adding a small box of instant pudding and an extra egg can improve moisture and texture.
Can you make Reindeer Cupcakes ahead of time?
Yes, you can prepare the cupcakes a day or two in advance and store them in an airtight container. Decorate them closer to the event to ensure the antlers and frosting hold their shape. You can also freeze undecorated cupcakes for up to two weeks.
How should I store decorated Reindeer Cupcakes?
Store them in a single layer inside an airtight container at room temperature for up to two days. If your kitchen is warm or humid, refrigeration is recommended. Just make sure to let them return to room temperature before serving for best taste and texture.
Conclusion
The joy of holiday baking lies not just in the final product, but in the shared moments it creates. These Easy Reindeer Cupcakes embody everything that’s wonderful about the season — creativity, family, and a touch of magic. They’re more than a dessert; they’re an experience you’ll want to recreate year after year.
Whether you’re making them with your children, gifting them to neighbors, or simply adding them to your Christmas spread, these cupcakes deliver a dose of holiday cheer in every bite. So preheat your oven, gather your decorations, and start building your reindeer herd — because memories like these are meant to be made, shared, and savored.
More Tasty Ideas
- Strawberry Santas: These adorable no-bake treats are perfect for holiday gatherings and just as playful as reindeer cupcakes. Made with fresh strawberries and whipped cream, they’re a festive and healthier option that kids will love helping to assemble.
- Christmas Monster Cookies: Packed with colorful candies and plenty of holiday cheer, these cookies are fun, festive, and great for baking with children. They bring the same whimsical flair as Reindeer Cupcakes with an easy, crowd-pleasing cookie twist.
- Christmas Tree Cupcakes: Another creative decorating idea, these cupcakes feature piped green frosting in the shape of mini trees. They share the same cupcake base as the reindeer cupcakes but offer a different design that’s equally delightful for holiday tables.
Easy Reindeer Cupcakes

These easy Reindeer Cupcakes are a festive holiday treat perfect for Christmas parties, school events, or baking with kids. Decorated with chocolate antlers, red noses, and candy eyes, they’re both fun to make and delicious to eat.
- Prep Time: 25 minutes
- Cook Time: 17 minutes
- Total Time: 42 minutes
- Yield: 12 cupcakes
- Category: Dessert
- Method: Baking
- Cuisine: American
- Diet: Vegetarian
Ingredients
- 1 box cake mix (any flavor)
- 1 small box instant pudding mix (optional, same flavor as cake)
- 4 large eggs (1 more than box directions)
- 1 cup water (per box instructions)
- 1/2 cup vegetable oil (per box instructions)
- 1/2 cup chocolate candy melts
- 1/4 cup Wilton red icing
- 1/4 cup Wilton brown icing
- 1/4 cup Wilton black decorator icing
- 12 red M&Ms (optional)
- 24 edible eyeball sprinkles
- 12 festive cupcake liners
- Parchment paper
Instructions
- Preheat oven to 350°F (or as directed on cake mix box).
- Line cupcake pan with festive liners.
- Prepare cake batter according to package directions, adding pudding mix and extra egg if desired.
- Use a cookie scoop to fill liners evenly with batter.
- Bake for 17 minutes or until a toothpick comes out clean.
- Let cupcakes cool on a wire rack for 20 minutes.
- While cupcakes bake, melt chocolate candy melts in microwave at 30% power in 30-second increments, stirring each time until smooth.
- Transfer melted chocolate to a piping bag fitted with a Wilton #4 tip.
- Pipe “Y” shaped antlers onto parchment paper; make extras in case of breakage. Let them dry.
- Fit piping bags with Wilton #10 tips; fill one with red icing, one with brown icing. Fit another bag with a #4 tip and fill with black icing.
- Pipe a swirl of brown icing onto each cooled cupcake starting from the outer edge inward.
- Insert two chocolate antlers into the top of each cupcake.
- Add two small dots of black icing or place edible eyes for eyes.
- Add a red icing dot or red M&M for the nose.
Notes
- Use your favorite homemade cupcake recipe as a base if preferred.
- Red M&Ms make a great alternative for noses.
- Make extra antlers as they are fragile and may break.
- These cupcakes are perfect for a decorating party or kids’ holiday activity.