A kitchen that smells like warm butter and baking bread can turn any morning around. Those lazy weekends when you let the chill linger and put off the day’s demands? That’s the perfect time to make a batch of Irish Scones—pillowy, golden, and just begging to be split open and loaded with jam or clotted cream. They don’t need fancy steps or complicated ingredients. Just some hands-on, cozy baking that ends in something that tastes like it took hours (it totally didn’t).
The magic of these scones comes from a few simple tricks and plenty of cold butter. You get that amazing tender-crumb texture plus a buttery depth that nothing from a box can match. If you love a breakfast or brunch treat that’s equal parts comfort and tradition—something that makes you feel like you’re gathered around an Irish kitchen table—this is the recipe you’ll come back to again and again.
What Makes These Irish Scones Special
When you take that first warm bite, you’ll know why these Irish Scones are in a league of their own. The edges are crispy and golden, but inside they’re pure fluff—a cross between a rich biscuit and a delicate tea-time cake. The secret isn’t a long list of extras but the right technique and the richness of real butter.
Whether you’re making Sunday breakfast, showing off for brunch guests, or sneaking one as an afternoon pick-me-up, these scones never disappoint. They’re endlessly adaptable—plain, or with a twist of jam, or cream, or whatever your favorite topping might be. In under an hour, you can have a tray full of home-baked Irish comfort with minimal prep and maximum payoff.
The Ingredients That Shape Classic Irish Scones
- Flour: the backbone of every scone, giving it structure and that tender crumb.
- Unsalted butter: keeps each bite layered, rich, and perfectly soft; cold is key for flakiness.
- Granulated sugar: just enough to add a gentle sweetness without making things dessert-sweet.
- Baking powder: brings lift and softness, so your scones come out sky-high.
- Salt: balances flavors and enhances everything from the butter to the creamy notes.
- Large egg: adds a subtle richness, helping bind and enrich the dough.
- Buttermilk: gives a gentle tang and enough moisture for a soft, slightly crumbly bite, plus a gorgeous golden top when brushed on before baking.
See the recipe card below for the full list of ingredients and measurements.
Easy Swaps & Fun Flavors for Your Scones
Irish Scones are super forgiving, and you can customize them without fear. No buttermilk? Try natural yogurt with a splash of milk or even soured milk in a pinch. If you’re out of unsalted butter, salted works—just decrease or skip the added salt. Want to go dairy-free? Swap in a quality plant-based butter and use a dairy-free yogurt instead of buttermilk.
For fun twists, add a handful of dried currants, chopped dates, or even a sprinkle of lemon zest for brightness. If you love savory, a little grated cheese and chopped chives turn these scones into a snack that everyone devours!
How to Make Irish Scones, Step by Step
- Get your oven good and hot, and line your baking sheet for easy cleanup.
- Stir together the dry goods—flour, sugar, baking powder, and salt—right in a big bowl. Don’t overthink it.
- Take cold butter and work it into the dry mix with your hands or a pastry cutter. You want small, buttery pebbles scattered throughout—this bit makes the scones tender and flaky.
- In a separate bowl, lightly beat an egg into the buttermilk. Pour that creamy mix over your dry ingredients and gently bring everything together. Switch to your hands when things get shaggy; go slow, and don’t overwork it.
- If the dough still seems dry, drizzle in a touch more buttermilk until it holds but isn’t sticky. The goal is a soft, workable mound, not a mushy mess.
- Sprinkle flour on your work surface and gently pat the dough into a circle. Keep it thick for classic, high scones—no need to roll hard or squish it flat.
- Using a round cutter, punch out scones and place them on your prepped tray. Gather up the scraggly dough left behind, press it together, and cut a few more.
- Brush the tops of each with a little extra buttermilk for a burnished, glossy finish in the oven.
- Bake until tops are deep golden and the kitchen smells absurdly inviting. Let them cool just enough that you don’t burn your fingers when you tear one open.
Cozy Baker Tips for Perfect Scones Every Time
Keep your butter cold and your mixing gentle—that’s the secret handshake of all great scone makers. Mixing too much develops gluten, and suddenly you’re eating dense bread, not a tender scone. Handle the dough as little as possible, and don’t be afraid of a few rough edges when shaping; rustic is better.
When it comes to cutting, don’t twist the cutter in the dough. Just press straight down for a lofty rise. Always brush with extra buttermilk for a toasty, golden finish. Want scones later in the week? Store any extras in an airtight container at room temperature for a day or two, or freeze them after baking. Reheat in the oven to get that fresh-from-the-bakery texture back.
Pairings and Scone Variations Worth Trying
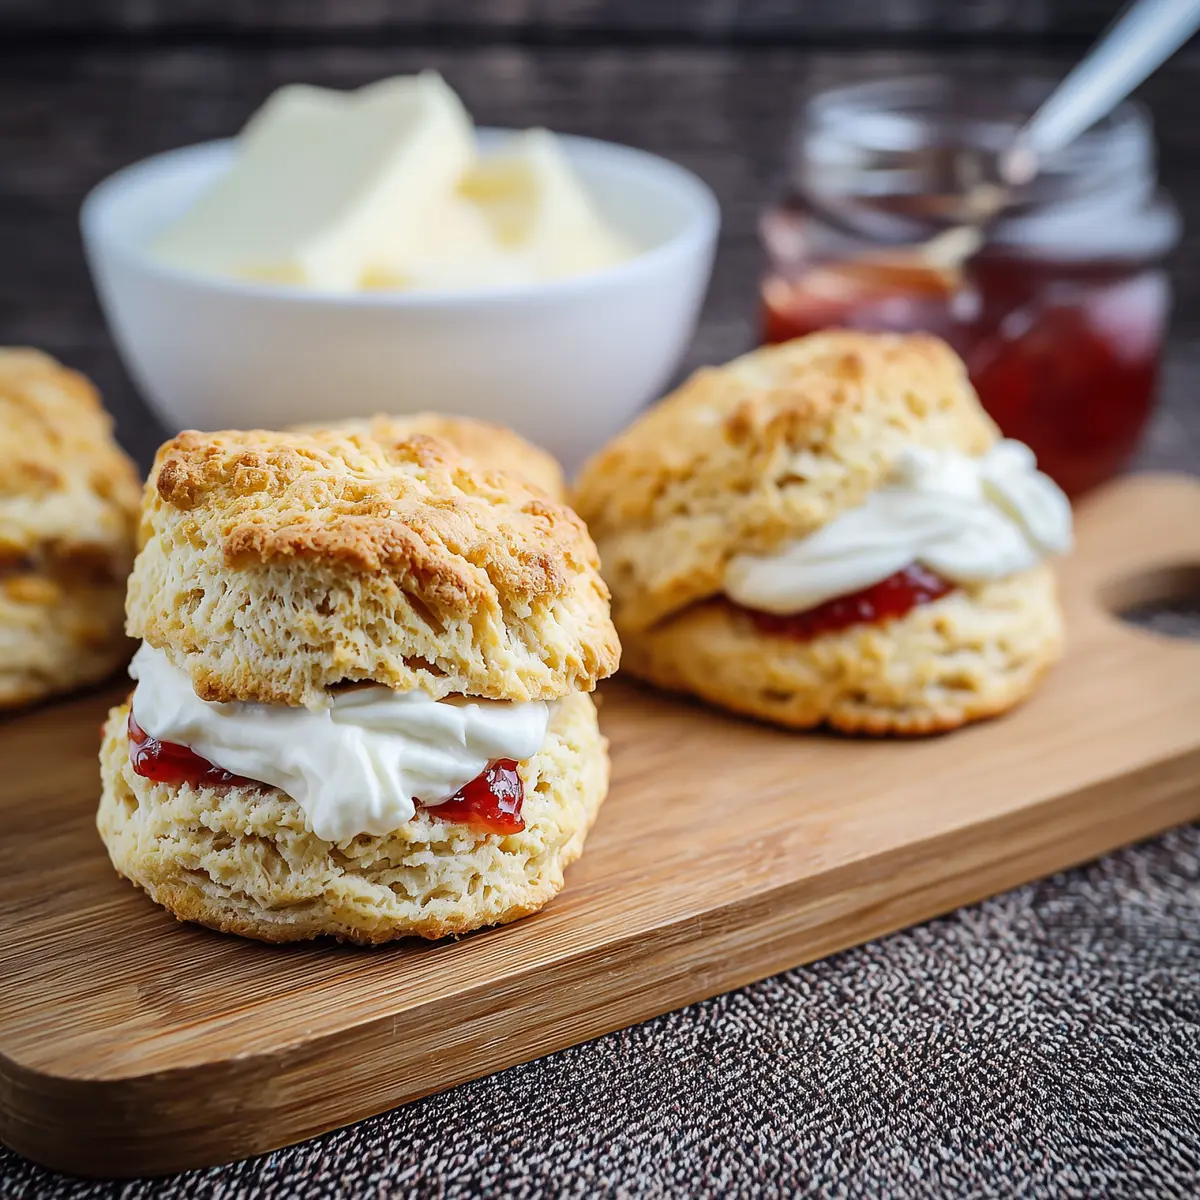
Classic Irish Scones shine with simple toppings: salted butter, chunky fruit preserves, or a dollop of thick whipped cream. If you can find clotted cream, it’s pure luxury. Try your scones with marmalade for a citrus snap or berry jam for vibrant sweetness.
For a bigger spread, serve these scones as part of a brunch board with cheeses, cured meats, and fruit. You can even go savory—work in aged cheddar and diced herbs, and pair them with a soft-poached egg and smoked salmon. If you love making ahead, shape and freeze unbaked scones and bake them straight from the freezer, adding just a couple of extra minutes.
FAQs about Irish Scones
What’s the difference between Irish Scones and other scones?
Irish Scones are typically lighter and less sweet than American or British-style scones. They focus on a tender, fluffy interior and subtle flavor, making them perfect for both sweet and savory accompaniments.
Can I use plain milk instead of buttermilk?
Yes, you can use plain milk if buttermilk isn’t available, but your scones will be less tangy and possibly a little less tender. For a closer substitute, add a splash of lemon juice or vinegar to your milk and let it sit before using.
How do I keep Irish Scones fresh?
Keep your Irish Scones in an airtight tin or container at room temperature for the first day or two. For longer storage, freeze them and reheat in the oven to revive their texture and warmth.
Why are my scones tough and crumbly?
Tough or crumbly scones usually mean the dough was overmixed or too dry. Mix gently and add just enough liquid to hold the dough together with soft, barely sticky edges.
Bringing It All Together
Homemade Irish Scones are a simple pleasure that can turn even the quietest morning or afternoon into something a bit more special. Their buttery, soft crumb and golden tops are an invitation to slow down and savor.
Once you’ve made these scones a few times, you’ll find yourself layering in your own twists, loading them up with jam, or keeping them plain to pair with tea. However you serve them, you’ll always find a reason to make these Irish Scones again.
More Delicious Recipes
- Chocolate Chip Scones: These scones provide a delightful twist with the addition of chocolate chips, enhancing the buttery flavor of the original Irish scones.
- St. Patrick’s Day Irish Soda Bread: This classic Irish bread complements the scone experience with its traditional flavors and simple preparation.
- St. Patrick’s Day Chocolate Guinness Bundt Cake with Stout Glaze: This rich chocolate cake is a perfect finish for a cozy Irish-themed brunch featuring scones.

Irish Scones
Equipment
- baking sheet
- bowl
- dough blade
Ingredients
Ingredients
- 3 1/2 cups all-purpose flour (440 grams)
- 1/4 cup granulated sugar (50 grams)
- 1 1/2 tablespoons baking powder (16 grams)
- 1/4 teaspoon salt
- 8 tablespoons unsalted butter (cold and diced, 113 grams)
- 1 large egg
- 3/4-1 cup buttermilk (cold, plus more for brushing)
Instructions
Instructions
- Preheat oven to 400˚F (200˚C). Line a large baking sheet with parchment or lightly flour.
- In a large bowl, combine the flour, sugar, baking powder, and salt.
- Cut in the cold butter using a dough blade, forks, or your fingers until texture becomes coarse and no pieces are larger than a pea.
- In a small bowl, beat together egg and 3/4 cup (177 milliliters) buttermilk. Pour into the flour mixture and gently mix using your hands or a wooden spoon.
- Slowly add the remaining 1/4 cup (60 milliliters) buttermilk only as needed to bring the dough together.
- On a lightly floured surface, gently pat the dough into a circle about 1 inch (2.5 centimeters) thick.
- Use a 2 1/2 inch (6 centimeter) round or biscuit cutter to cut out circles of dough. Gently bring together the leftover scraps of dough to cut out more circles.
- Transfer to prepared baking sheet. Brush the tops with additional buttermilk.
- Bake in preheated oven until golden, 15-20 minutes.