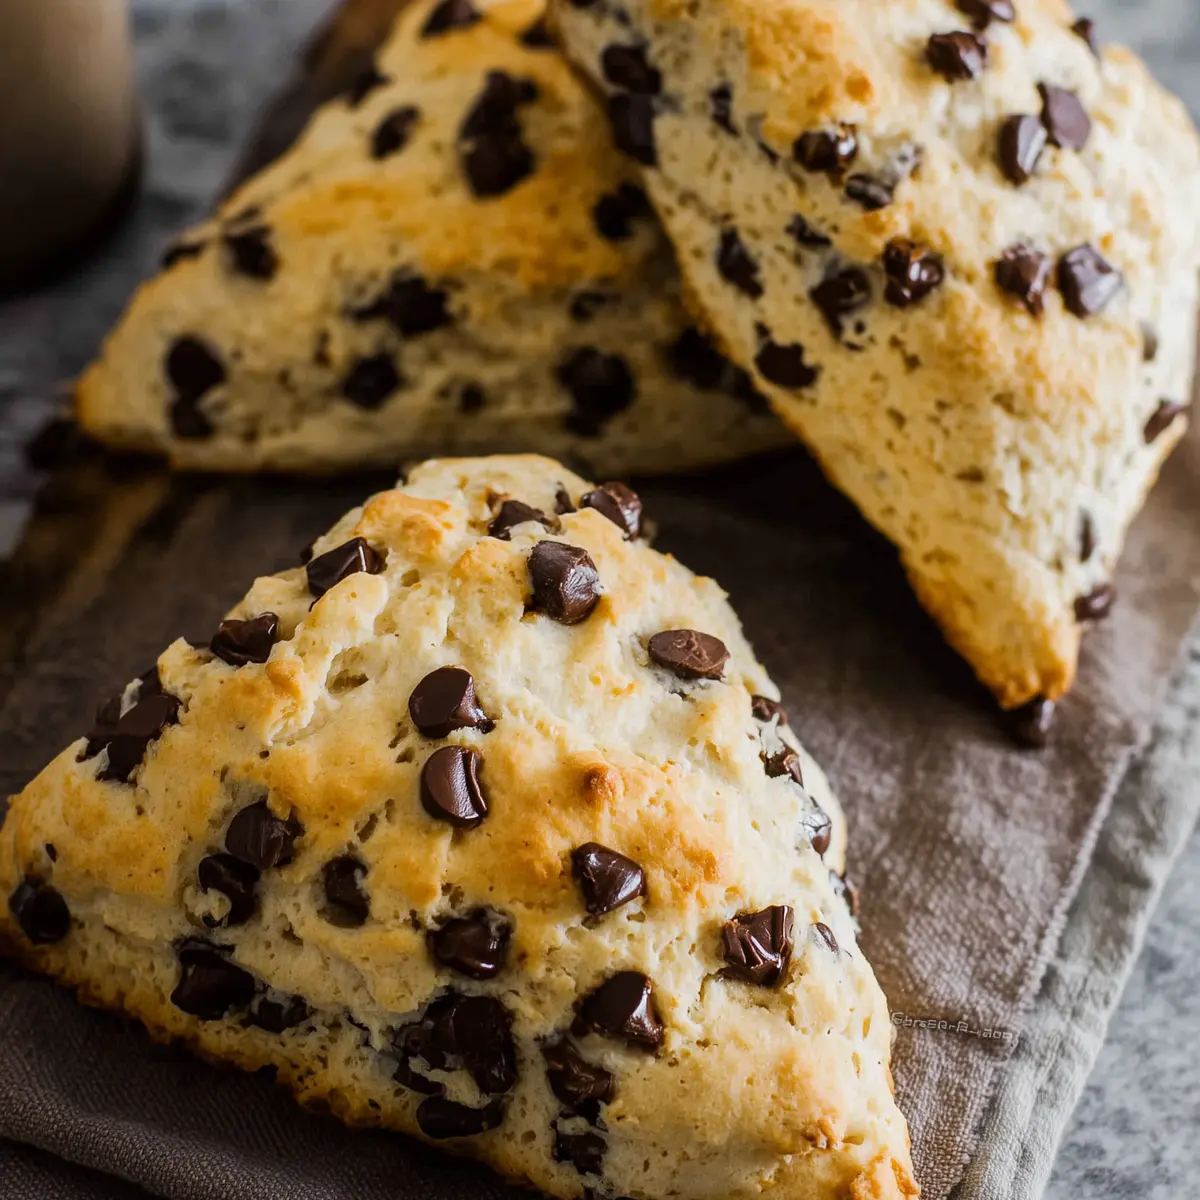
There’s just something about a freshly baked scone that feels like comfort and celebration at the same time. These Chocolate Chip Scones strike the perfect chord between bakery-style indulgence and homemade warmth—fluffy, tender, and speckled with melty chocolate chips in every bite. If you’re craving a quick, cozy treat for breakfast, brunch, or a sweet snack, you’ll fall hard for these golden triangles. The dough comes together in minutes and doesn’t need any fancy equipment, meaning you can go from zero to chocolate chip bliss before your coffee even cools.
Bring on the Cozy: What You Need for Perfect Scones
One of my favorite things about these Chocolate Chip Scones is that you don’t need any fancy gadgets, just a few kitchen basics. Here’s what you’ll want ready before you get started:
- Large mixing bowl – For combining your dry and wet ingredients with ease.
- Whisk – To evenly blend your dry ingredients and aerate the mixture.
- Pastry cutter or your hands – Both work to cut in cold butter for that signature flaky crumb.
- Baking sheet – Lined with parchment paper for golden-brown bottoms and easy cleanup.
- Sharp knife – To slice your dough circle into perfectly portioned triangles.
- Cooling rack – So your scones cool evenly without getting soggy underneath.
Simple, right? That’s the kind of kitchen setup I love—minimal fuss, maximum reward!
The Essential Ingredients That Make Chocolate Chip Scones Special
- flour – Forms the soft, pillowy backbone of your scone and creates structure. All-purpose is classic, but you can try a 50/50 blend with whole wheat for a nuttier vibe.
- Granulated sugar – Just enough to sweeten the dough and bring out the flavor of those chocolate chips.
- Baking powder – Makes the scones rise into light, fluffy clouds.
- Baking soda – Works alongside the baking powder to help the scones puff up and brown evenly.
- Salted butter (cold, cut into small cubes) – This is what makes the crumb famously tender and beautifully layered. Cold butter is your shortcut to bakery-style texture.
- Buttermilk milk (or regular milk) – Adds just the right amount of moisture and a subtle tang that balances the sweetness. No buttermilk? Regular milk is totally fine.
- Vanilla extract – A little lift of warmth and depth that amplifies everything else.
- Chocolate chips – The whole point! Sweet, melty bursts of chocolate tucked in every bite. Use your favorite—semi-sweet, milk, or even mini chips if you want chocolate in every nook and cranny.
See the recipe card below for the full list of ingredients and measurements.
How to Make Chocolate Chip Scones Step by Step
- Preheat and prep: Start by preheating your oven to 190°C. Line a baking sheet with parchment paper so nothing sticks and set it aside.
- Mix the dry ingredients: In a large bowl, whisk together the flour, granulated sugar, baking powder, and baking soda until everything looks evenly combined and the mixture is light and fluffy.
- Cut in the butter: Add your cold, cubed butter. Using a pastry cutter or your fingertips, quickly blend the butter into the dry mix. You’re aiming for coarse, pea-sized crumbs—they should look a bit sandy but still hold together when squeezed gently.
- Stir in the liquids: Pour in the milk and vanilla extract. Gently mix with a spoon until the dough starts to come together—you’ll see some dry patches and lumps. Switch to using your hands and very gently knead just until a rough dough forms. The dough will still look a little shaggy, and that’s exactly what you want for a tender crumb.
- Fold in chocolate chips: Sprinkle in the chocolate chips and, using your hands, fold them into the dough until they’re well distributed. Handle the dough as little as possible so you don’t melt the butter or make the scones tough.
- Shape and slice: Turn the dough out onto the lined baking sheet. With your hands, shape it into a round disc about 20 cm in diameter. Use a sharp knife to slice the disc into 8 triangles, like pizza slices. Carefully pull each triangle so there’s about 5 cm between them for even baking.
- Bake to golden perfection: Slide the tray into the oven and bake for 15-18 minutes (or up to 25 if your scones are thick), until the edges are golden brown and you get a whiff of sweet, toasty chocolate. Transfer your scones to a cooling rack so the bottoms stay crisp while the centers finish setting.
Take a moment to peek at those chocolate chips peeking through the cracks—the best sign you’re moments away from scone bliss.
Tips, Troubleshooting, and Common Mistakes to Avoid
- Don’t overwork your dough: The less you handle it, the more tender and flaky your scones will be. If you knead or stir too much, your scones could turn out dense instead of crumbly.
- Use cold butter: This is the not-so-secret trick for those gorgeous layers. If your kitchen is warm, pop the dough in the fridge for a few minutes before baking.
- Spacing matters: After slicing, make sure to move the scones apart a bit. Crowded scones will steam and spread rather than bake up crisp and tall.
- Watch baking time: Every oven is a little different. Check at 15 minutes— you want golden edges and a lightly set middle. Overbaking dries them out, but underbaking leaves the center doughy.
- Chocolate distribution: Fold chocolate chips in right at the end to avoid streaks or melting before baking; overmixing will toughen your scones and blend chocolate throughout the dough, losing that perfect pocket texture.
If your dough feels too sticky to shape, try dusting your hands with a little flour—but don’t add much or the scones will turn dry. If it’s dry and crumbly, add a splash more milk, one teaspoon at a time.
Pairing Ideas and Fun Variations for Chocolate Chip Scones
There’s a special kind of joy in sitting down with a warm scone and your favorite drink. Here are some classic and creative pairings to make your Chocolate Chip Scones shine:
- Pour-over coffee or a milky latte: The bittersweetness plays beautifully with sweet chocolate chips.
- Fruit preserves or citrus curd: Spread on top for a sweet-tart zing to balance the rich dough.
- Greek yogurt with berries: If you want to build a simple brunch, serve with a bowl of tangy yogurt and fresh seasonal fruit.
- Warm milk or hot chocolate: For the ultimate cozy treat, perfect for kids and grown-ups alike.
Looking for a twist? Here are a few friendly swaps and upgrades for your next batch:
- Fruit mix-ins: Swap half the chocolate chips for dried cranberries, or fold in fresh blueberries or raspberries for juicy bursts.
- Nutty addition: A handful of chopped pecans or walnuts adds a crunchy texture.
- Mini chocolate chips: For chocolate in every single bite, use minis instead of regular-sized chips.
- Dairy-free option: Use plant-based butter and your favorite non-dairy milk (just double-check your chocolate chips are dairy-free too).
- Classic glaze: Drizzle with a simple icing sugar glaze for bakery-style flair.
Every batch invites new creativity—don’t be afraid to riff with what’s in your pantry.
FAQs about Chocolate Chip Scones
Can I freeze Chocolate Chip Scones for later?
Absolutely! Let your scones cool completely on a wire rack. Place them in a freezer-safe bag or container, and freeze for up to three months. When you’re ready to eat, thaw at room temperature or gently rewarm in a low oven for that fresh-baked texture.
What’s the best way to store leftover Chocolate Chip Scones?
Keep leftovers in an airtight container at room temperature for up to two days. For longer storage, pop them in the fridge for up to a week or freeze as described above. A quick 5-minute warm-up in a moderate oven helps restore their crispness if needed.
How do I make these scones dairy-free or vegan?
To make dairy-free scones, simply substitute the butter and milk for plant-based alternatives and be sure your chocolate chips are dairy-free. These scones also don’t contain eggs, so they’re naturally simpler to adapt for allergy-friendly baking.
One Last Bite: The Chocolate Chip Scones Experience
Each bite of these Chocolate Chip Scones is a little celebration—flaky edges, pillowy center, and ribbons of melted chocolate making every mouthful special. There’s something so satisfying about breaking apart a warm scone and seeing the steam rise, the chips still soft and glossy. It’s comfort you can hold in your hand. Save a cozy morning for these and enjoy every warm, crumbly, chocolate-packed bite right from your own kitchen.
More Tasty Ideas
- Easy Homemade Bread: If you love warm treats, this simple bread recipe will fill your home with comforting aromas.
- Cinnamon Swirl Banana Bread: This delightful banana bread is perfect for breakfast or an afternoon snack, just like the scones.
- Eggnog Bread with Rum Glaze: This festive bread offers a sweet twist that pairs well with cozy winter vibes, much like your scones.

Chocolate Chip Scones
Equipment
- Large mixing bowl
- Whisk
- Pastry cutter or hands
- baking sheet
- Sharp knife
- Cooling rack
Ingredients
Ingredients
- 2 cups all purpose flour
- ⅓ cup granulated sugar
- 1.5 tsp baking powder
- 1/4 tsp baking soda
- ½ cup salted butter (cold - cut into small cubes)
- 1/2 cup buttermilk milk (or regular milk)
- 1 tsp vanilla extract
- 1 cup chocolate chips
Instructions
Instructions
- Preheat oven to 375 F. Line a baking sheet with parchment paper and set aside.
- In a large bowl, whisk together the all purpose flour, granulated sugar, baking powder and baking soda.
- Add in the butter and use a pastry cutter or your fingers to break apart the pieces until they form small crumbs.
- Add in the milk and vanilla extract. First it will come together but still be crumbly and clumps. Next, use your hands to gently form into a dough. Gently mix together just until combined.
- Fold the chocolate chips gently into the dough using your hands. Be gentle and do not overmix here!
- Now add the dough onto the baking sheet. Form it into an 8” circle with your hands. Cut it into 8 triangles and spread each piece 2” apart from eachother.
- Bake for 15-18 minutes, or until edges begin to turn golden brown. Transfer to a cooling rack to cool completely.