The first time I made candy cane cookies, I was ten years old and determined to impress my grandma. I swapped red food coloring for blue (I called them “frost canes”), forgot the peppermint, and shaped them more like worms than candy. Still, she called them perfect. That moment stuck. Now, every December, I recreate that feeling with a refined version—soft, buttery, peppermint-swirled candy cane cookies that look festive and taste like nostalgia. These are made for sharing, gifting, and building memories—messy twists and all.
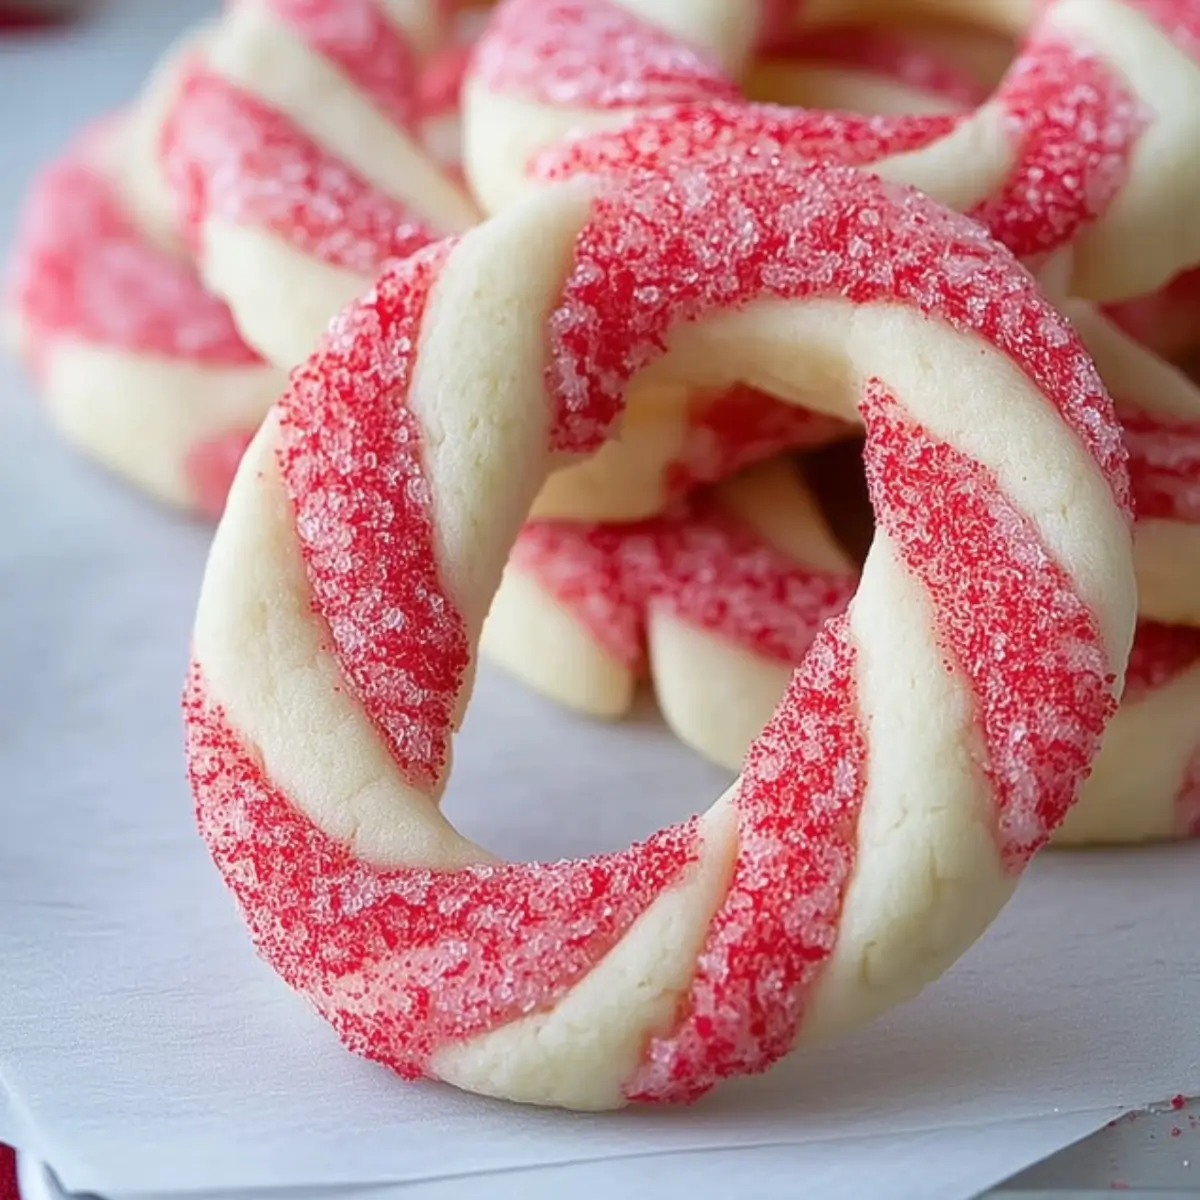
Table of Contents
Recipe Overview & Why You’ll Love It
These candy cane cookies are soft with crisp edges, delicately sweet, and perfectly pepperminty. They’re shaped into playful red-and-white twists that bring a festive touch to any dessert tray. Ideal for beginners and seasoned bakers alike, they hold their shape in the oven and look bakery-worthy without any fancy piping.
Whether you’re baking with kids, prepping for a cookie exchange, or wrapping up edible gifts, this recipe delivers holiday magic without the stress. You’ll love how easily these come together—and how quickly they disappear.
Ingredients & Substitutions
This candy cane cookies recipe uses pantry staples and a few flavor boosters. Here’s everything you need, plus smart substitution tips.
Wet Ingredients
- 1 cup unsalted butter, softened
Unsalted gives you control over flavor. If using salted, skip the added salt. - 1 cup powdered sugar
This creates that melt-in-your-mouth texture. Sift if you want extra smooth dough. - 1 large egg (room temperature)
Room temp eggs mix better and help maintain the dough’s structure. - 1 tsp vanilla extract
Adds warmth. Swap with almond extract for a subtle nutty undertone. - ½ tsp peppermint extract
Essential for that iconic flavor. For stronger mint, increase by ¼ tsp. Reduce slightly for a kid-friendly version.
Dry Ingredients
- 2½ cups all-purpose flour
Spoon and level for accuracy. Want gluten-free? Use a 1:1 GF flour blend and add ¼ tsp xanthan gum. - ½ tsp salt
Enhances all the other flavors. Sprinkle sea salt on top post-bake for a gourmet touch.
Coloring
- Red gel food coloring
Gel yields vibrant color with minimal moisture—crucial for clean, bold swirls. Prefer natural? Use beet powder mixed with 1 tsp water.
Equipment You’ll Need
No specialized gear is needed for these candy cane cookies—just a few basics.
- Large and medium mixing bowls
- Stand or hand mixer (or a strong whisk and elbow grease)
- Measuring cups and spoons
- Spatula (silicone works best for clean scraping)
- Baking sheets lined with parchment paper or silicone mats
- Wire cooling rack
- Gloves (optional, for mess-free coloring)
- Optional: mason jars or holiday tins for gifting
Step-by-Step Instructions
Follow these easy steps for consistent, picture-perfect candy cane cookies. Sensory cues and timing are key to success.
Step 1 – Preheat and Prep
Preheat your oven to 375°F (190°C). Line two baking sheets with parchment paper or silicone baking mats to prevent sticking and ensure even browning.
Step 2 – Cream Butter and Sugar
In a large bowl, beat 1 cup softened butter and 1 cup powdered sugar for 3–4 minutes, until pale and fluffy. This builds air into the dough, creating tender cookies. Scrape the sides and bottom halfway through.
Step 3 – Mix in Egg and Extracts
Add 1 large egg, 1 tsp vanilla extract, and ½ tsp peppermint extract. Mix until just combined—avoid overbeating, which can make cookies tough.
Step 4 – Add Flour and Salt
In a separate bowl, whisk 2½ cups all-purpose flour with ½ tsp salt. Gradually add this to the wet mixture, mixing on low speed until a soft, cohesive dough forms. If the dough feels dry, add 1 tsp milk. If sticky, add flour 1 Tbsp at a time.
Step 5 – Divide and Color
Split the dough in half. Leave one half plain; to the other, add 5–8 drops red gel food coloring and mix until evenly tinted. Wear gloves to avoid stained hands. Chill both portions for 10 minutes if soft or sticky.
Step 6 – Shape the Cookies
Take 1 teaspoon of each dough color and roll each into 4-inch ropes. Gently twist the ropes together and curve one end into a cane shape. Place on prepared sheets about 1 inch apart.
Step 7 – Bake and Cool
Bake for 8–10 minutes, until the bottoms are just lightly golden. The tops should remain pale. Let cookies cool on the sheet for 5 minutes before transferring to a wire rack.
Why This Recipe Works
Using powdered sugar instead of granulated makes a noticeable difference—your candy cane cookies come out soft, smooth, and tender. Chilling the dough briefly keeps the ropes from breaking while shaping and prevents spreading in the oven. The flavor balance of vanilla and peppermint adds warmth and freshness without overpowering the palate.
Each technique serves a purpose: creaming builds structure, gel food coloring keeps colors from bleeding, and careful mixing avoids gluten overdevelopment. These cookies hold their shape, taste fantastic, and look festive without fussy decorations.
Pro Tips & Variations
- Chill dough ropes if they’re too soft to shape. Even 10 minutes helps.
- For bolder mint flavor, increase peppermint extract by ¼ tsp.
- Use almond extract instead of peppermint for a different twist.
- Add ½ cup mini chocolate chips or chopped cherries for extra flair.
- For a more dramatic look, dip half of each cookie in melted white or dark chocolate and sprinkle with crushed candy canes.
- Want to scale up? This recipe doubles cleanly. Freeze shaped dough on trays, then transfer to bags for baking on demand.
Make-Ahead, Storage & Freezing
You can make the dough ahead and refrigerate it for up to 3 days. Shaped, unbaked cookies freeze well for up to 3 months—just thaw slightly before baking.
Baked candy cane cookies stay fresh for 5–7 days in an airtight container. To refresh them, warm briefly in a 300°F (150°C) oven for 2–3 minutes. Avoid storing with strongly scented cookies (like gingerbread), as the peppermint can absorb other flavors.
Serving Suggestions & Pairings
These cookies pair beautifully with cozy beverages. Try them with hot chocolate, peppermint mochas, or chai lattes. For presentation, dust cooled cookies with powdered sugar for a snowy effect or serve them on a vintage holiday platter for added charm.
Gift them in mason jars tied with ribbon or nestle them in parchment inside a festive tin. They also make a whimsical addition to holiday charcuterie boards alongside candied nuts and chocolate bark.
Dietary Notes & Allergen Considerations
- Gluten-Free: Use a 1:1 gluten-free flour blend plus ¼ tsp xanthan gum.
- Vegan: Use vegan butter and a flax egg (1 Tbsp flaxseed + 3 Tbsp water) as a binder.
- Nut-Free: This recipe is naturally nut-free unless you swap in almond extract.
- Dye-Free: Opt for beet powder or pomegranate juice concentrate to color the dough naturally.
Always check labels if you’re baking for someone with allergies—some food colorings and flavorings can contain trace allergens.
Troubleshooting & Common Mistakes
- Dough too crumbly? Add a splash of milk or let rest for 10 minutes to relax the gluten.
- Color bleeding during baking? Use gel coloring, not liquid. Avoid overhandling.
- Cookies spreading too much? Dough may be too warm or overmixed. Chill before shaping.
- Uneven twists or breakage? Roll dough ropes evenly and twist gently. Don’t overwork.
- Dry texture? Likely overbaked. Pull cookies when bottoms are just golden.
Nutritional Information
- Serving Size: 1 cookie
- Calories: 110 (estimate)
- Sugar: 5g
- Sodium: 50mg
- Fat: 6g
- Saturated Fat: 4g
- Unsaturated Fat: 2g
- Trans Fat: 0g
- Carbohydrates: 13g
- Fiber: <1g
- Protein: 1g
- Cholesterol: 20mg
Note: Nutrition estimates vary with ingredient brands and cookie size.
FAQs
How do I keep candy cane cookies from spreading?
Chill your dough before shaping, and be sure not to overbeat the butter. Using parchment also helps maintain their shape.
Can I make candy cane cookies without food coloring?
Yes. While red swirl is classic, you can skip coloring altogether or use a natural option like beet powder for a subtle tint.
How long do candy cane cookies stay fresh?
Stored in an airtight container, they last 5–7 days. For longer storage, freeze for up to 2 months.
Can I make candy cane cookies gluten-free?
Absolutely. Use a 1:1 gluten-free flour blend and add ¼ tsp xanthan gum to help bind the dough.
What’s the best way to scale this recipe?
You can double or triple the batch easily. Just divide the dough before coloring to keep the swirls balanced.
Conclusion
Candy cane cookies are more than just a pretty addition to your dessert table—they’re an invitation to slow down and savor the season. From shaping whimsical swirls to catching that first whiff of peppermint from the oven, every part of the process feels like holiday magic in motion.
So put on your coziest sweater, dust off the baking trays, and make space in your kitchen (and your heart) for a tradition worth sharing. Whether your canes curve perfectly or wobble like a toddler’s first drawing, these cookies are the kind of imperfect joy we all need a little more of this season.
More Tasty Ideas
- Peppermint Chocolate Chip Cookies: These cookies are a perfect flavor companion to candy cane cookies. They combine cool peppermint with the richness of chocolate chips for a classic holiday bite that brings freshness and nostalgia in one chewy cookie.
- Christmas Spritz Cookies: Buttery and decorative, these spritz cookies offer the same festive appeal and melt-in-your-mouth texture as candy cane cookies. Great for cookie trays and sharing with family during the holidays.
- Whipped Shortbread Cookies: Light and buttery with a classic flavor, these cookies share a similar tender texture and are easy to customize for the season—think peppermint dust or red and white sprinkles for a matching theme.
Candy Cane Cookies

These festive candy cane cookies are buttery and tender, with a subtle peppermint flavor and signature red-and-white twist. Perfect for holiday baking, they’re as fun to shape as they are to eat.
- Prep Time: 20 minutes
- Cook Time: 10 minutes
- Total Time: 30 minutes
- Yield: 30 cookies
- Category: Dessert
- Method: Baking
- Cuisine: American
- Diet: Vegetarian
Ingredients
- 1 cup unsalted butter, softened
- 1 cup powdered sugar
- 1 large egg (room temperature)
- 1 tsp vanilla extract
- 1/2 tsp peppermint extract
- 2 1/2 cups all-purpose flour
- 1/2 tsp salt
- Red gel food coloring
Instructions
- Preheat oven to 375°F (190°C) and line baking sheets with parchment paper.
- In a large bowl, cream together the softened butter and powdered sugar for 3–4 minutes until light and fluffy.
- Add the egg, vanilla extract, and peppermint extract, and mix until just combined.
- Gradually add the flour and salt, mixing on low speed until a soft dough forms. Adjust with 1 tsp milk if too dry or 1 tbsp flour if too sticky.
- Divide the dough in half. Leave one half plain and color the other half with 5–8 drops red gel food coloring.
- Chill both dough halves for 10 minutes if too soft to handle.
- Take 1 tsp of each dough color, roll into 4-inch ropes, twist together, and bend to form candy cane shapes.
- Place cookies on baking sheets, spacing them about 1 inch apart.
- Bake for 10 minutes, until bottoms are lightly golden. Let cool on the baking sheet for 5 minutes before transferring to a wire rack.
Notes
- Use gel food coloring to prevent bleeding.
- Chill dough ropes before shaping if they become too soft.
- For a stronger mint flavor, add an extra 1/4 tsp peppermint extract.
- Freeze unbaked dough for up to 3 months.
- Swap peppermint for almond extract for a different twist.