There’s something special about the way certain cookies make you feel. Maybe it’s the aroma that fills your kitchen as they bake, or the way the first bite practically dissolves on your tongue. Whipped shortbread cookies fall into that unforgettable category. With just a few simple ingredients, you can create a treat that feels indulgent yet comforting, luxurious yet easy. Whether you’re baking for Christmas, a baby shower, or just a cozy afternoon, these cookies deliver the kind of warmth that turns ordinary moments into sweet memories.
Unlike traditional shortbread, this whipped version is lighter, softer, and designed to melt effortlessly in your mouth. You don’t need complicated steps or hard-to-find ingredients—just quality staples, a little patience, and the right technique. This guide will walk you through every step, show you common pitfalls to avoid, and even offer creative ideas for customizing your cookies.
Let’s dive in and get baking.
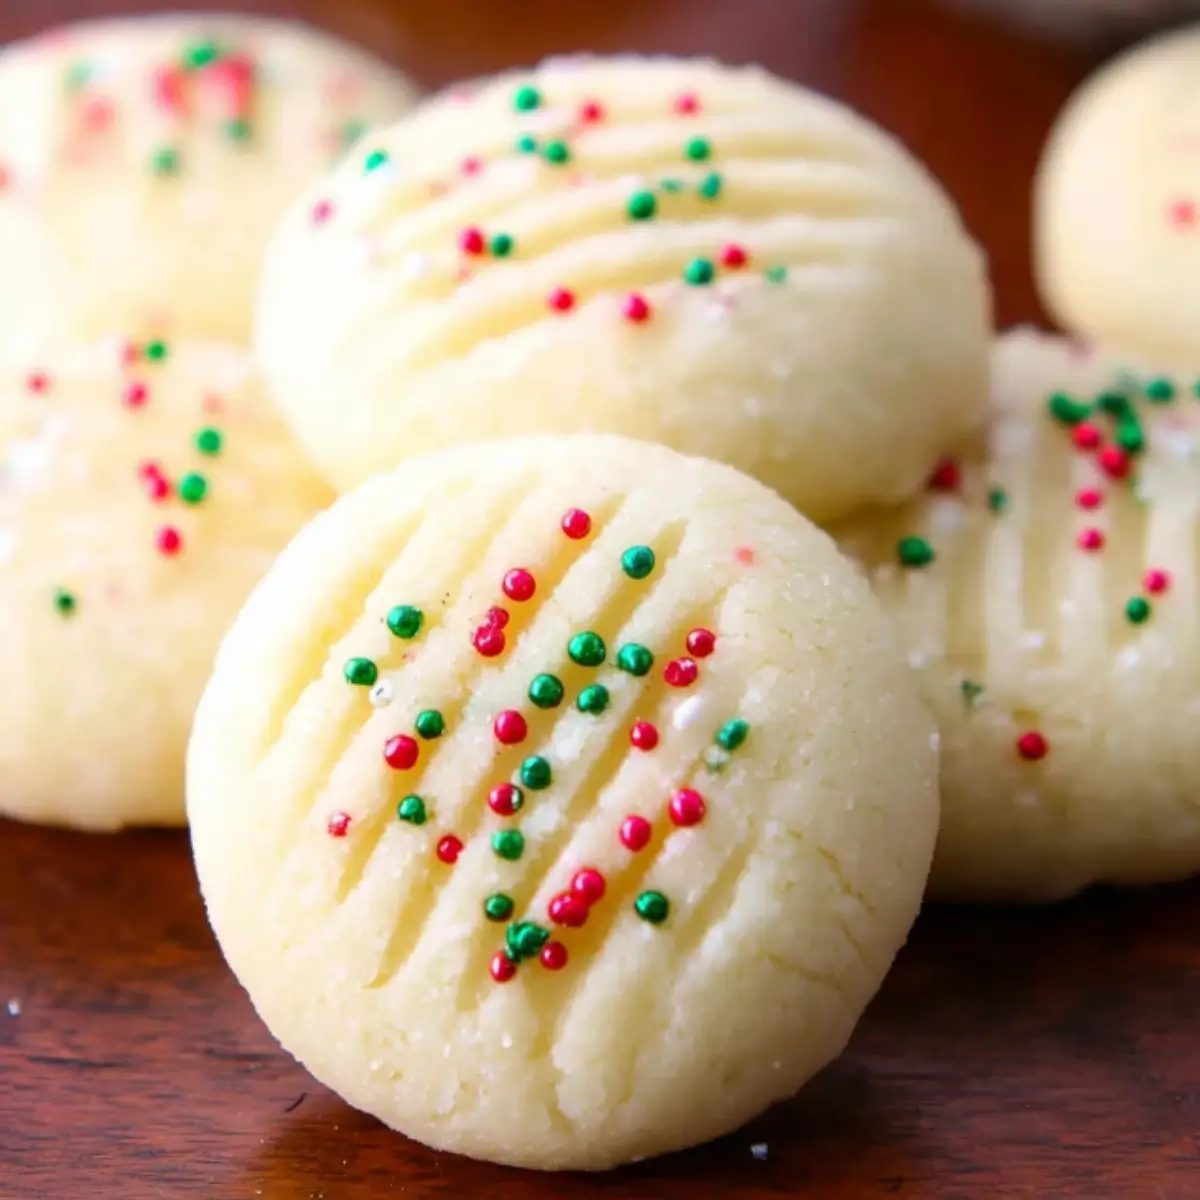
Table of Contents
Whipped Shortbread Cookies Ingredients (Simple & Essential)
These cookies are all about simplicity, but don’t let that fool you—each ingredient plays a critical role in achieving the delicate texture and perfect flavor. Here’s what you need:
Main Ingredients
- Butter (1½ cups, salted) – Use room temperature butter that is soft but not melted. This is crucial. Melted butter will make your cookies spread too much and turn greasy.
- Confectioners’ sugar (¾ cup) – Also known as powdered sugar, it’s lighter than granulated sugar and helps create that melt-in-your-mouth texture.
- All-purpose flour (2¼ cups) – Measure carefully. Use the spoon-and-level method or, even better, weigh it on a kitchen scale to avoid adding too much.
- Cornstarch (¾ cup) – This is your secret weapon. It gives the cookies their light, soft texture and helps prevent them from spreading too much in the oven.
Optional Add-ins
- Vanilla, almond, lemon, or orange extract (2 teaspoons) – Customize the flavor based on the occasion or your personal taste.
- Sprinkles, jam, Hershey’s Kisses, chocolate drizzle – These additions transform your cookies from everyday treats to festive showstoppers.
How to Make Whipped Shortbread Cookies Step-by-Step
These cookies are beginner-friendly, but technique matters. Take your time with the creaming step and be mindful of dough temperature before baking. Here’s how to do it right.
Step 1 – Cream the Butter and Sugar
Start by beating the butter and confectioners’ sugar together for 4 to 5 minutes on medium-high speed. Don’t cut this step short. This isn’t just about mixing—it’s about aerating the butter to create that soft, whipped texture that defines these cookies.
If you’re using a hand mixer, you may need an extra minute or two to get the right consistency. The mixture should be fluffy and pale in color. This is when you can add your extract of choice if you’re using one.
Step 2 – Mix in the Dry Ingredients
In a separate bowl, sift together the flour and cornstarch. Slowly add the dry mixture to the butter-sugar mixture, with the mixer on low speed. Mix only until combined and no flour streaks remain. Do not overwork the dough—you want to preserve that tender texture.
Step 3 – Shape the Dough
Using a cookie scoop or spoon, form the dough into small balls—about 1 inch in diameter. If the dough feels too soft or sticky to roll, refrigerate it for 10–15 minutes to firm it up. Roll into smooth balls with your hands and place them on a baking sheet lined with parchment paper.
Step 4 – Add Designs and Toppings
Flatten each dough ball gently with a fork dipped in flour or cornstarch to prevent sticking. This gives your cookies a classic pattern. Top them with sprinkles, a tiny dollop of jam, or leave them plain. This step must be done before chilling, so your decorations stick.
Step 5 – Chill the Dough Balls
Place your cookie tray in the fridge for at least 2 hours or in the freezer for a quicker firm-up. Chilling is non-negotiable—this step ensures the cookies don’t spread during baking and helps maintain their light, puffy shape.
Step 6 – Bake Slowly and Gently
Preheat your oven to 300°F (150°C). Bake the cookies for 19–20 minutes, until the tops look set and the bottoms are just beginning to turn golden. They won’t brown much on top, and that’s okay. Let them cool on the baking sheet before moving.
Serving, Storing & Freezing Tips
These cookies are made for sharing, gifting, and saving—if you can resist eating them all right away.
Storing
- Keep cookies in an airtight container at room temperature for up to 1 week.
- You can also refrigerate them for another week to extend freshness.
Freezing Instructions
- Unbaked dough balls: Freeze on a tray until solid, then transfer to a zip-top freezer bag. Bake directly from frozen—just add a minute to the baking time.
- Baked cookies: Freeze in an airtight container for up to 2 months. Let them thaw at room temperature before serving.
Pro Tips to Perfect Your Shortbread Every Time
To get the most out of this simple recipe, here’s what you need to know:
- Use softened, not melted butter – The right consistency of butter is the difference between fluffy cookies and greasy puddles.
- Beat the butter and sugar long enough – Since there are no leaveners like baking soda, incorporating air during this step is vital for texture.
- Avoid overmixing – Once you add the flour and cornstarch, stop as soon as the mixture is combined.
- Chill the dough – This ensures your cookies hold their shape and have that signature puffy look.
Customize Your Cookies for Any Occasion
Whipped shortbread is a blank canvas. Try these flavor and topping ideas:
- For Christmas: Use red and green sprinkles or candy cane bits
- For baby showers: Add pastel sprinkles or colored sugar
- For Valentine’s Day: Press a frozen chocolate kiss into the center of each cookie right after baking
- For tea time: Add a hint of lemon extract and top with lemon zest
You can also fill the centers with jam before baking to create thumbprint-style cookies. Raspberry, apricot, or strawberry work beautifully.
Taste & Texture of Whipped Shortbread Cookies
What sets these cookies apart is their light, airy texture and delicate flavor. They’re:
- Not overly sweet – making them perfect for pairing with toppings
- Soft and tender – without being chewy or cakey
- Melt-in-your-mouth light – thanks to the whipped butter and cornstarch combo
They’re the kind of cookie that disappears from a holiday platter in minutes.
Nutritional Information (Per Cookie)
- Serving Size: 1 cookie
- Calories: 66
- Carbohydrates: 4g
- Protein: 1g
- Fat: 6g
- Saturated Fat: 3.8g
- Unsaturated Fat: 2g
- Trans Fat: 0g
- Sodium: 50mg
- Sugar: 2g
- Fiber: 0g
- Cholesterol: 15mg
FAQ About Whipped Shortbread Cookies
Why did my whipped shortbread cookies spread too much?
This usually means the dough wasn’t chilled long enough, or your butter was too soft or partially melted when you started. Measuring the flour properly also helps reduce spreading.
Can I make whipped shortbread cookies without cornstarch?
While you can technically make them without cornstarch by replacing it with additional flour, you won’t get the same melt-in-your-mouth texture. Cornstarch is what gives these cookies their uniquely soft and delicate bite. Without it, the cookies become denser and more like traditional shortbread. If you’re after that pillowy feel, don’t skip the cornstarch.
How long do whipped shortbread cookies stay fresh?
When stored properly in an airtight container at room temperature, your cookies will stay fresh for about a week. If you refrigerate them, they can last another 5–7 days. For long-term storage, freezing is ideal—both baked and unbaked cookies freeze exceptionally well for up to two months. Just be sure to bring them back to room temperature before serving to enjoy their full flavor and texture.
Conclusion
You don’t need an occasion to bake whipped shortbread cookies, but when you do, they always feel like a celebration. There’s an elegance to their simplicity—a buttery richness without heaviness, a sweetness that doesn’t overwhelm, and a texture so soft it barely resists your bite. These cookies invite you to slow down and savor, whether you’re baking for a crowd or just yourself.
By following the steps outlined here, you’ll be able to create consistent, bakery-quality cookies every time. The best part? They’re endlessly adaptable. Want to add a citrus twist, a jam center, or a festive flair? Go for it. These cookies are your blank canvas, waiting for a creative touch.
So go ahead—gather your ingredients, clear your countertop, and whip up a batch. And when those warm, golden cookies come out of the oven, take a moment to appreciate what you’ve made. Then share them with someone, or don’t. They’re your reward, after all.
More Tasty Ideas
- Gingerbread Crinkle Cookies: These festive cookies share a similar soft, delicate texture to whipped shortbread and are perfect for holiday baking. Their warm spices and crinkled sugar exterior add a nostalgic touch to your dessert tray.
- Chocolate Thumbprint Cookies: These classic cookies offer a rich, buttery base like shortbread with a center of indulgent chocolate. They make a beautiful addition to a Christmas cookie platter and are simple to customize with different fillings.
- Peppermint Oreo Balls: While no-bake, these treats share the festive appeal and smooth, melt-in-your-mouth experience of whipped shortbread. With a blend of peppermint and creamy chocolate, they’re a delightful option for holiday gift trays or parties.
Whipped Shortbread Cookies
These whipped shortbread cookies are light, buttery, and delicately soft. They melt in your mouth and make a perfect treat for holidays or cozy gatherings.
- Prep Time: 15 minutes
- Cook Time: 20 minutes
- Total Time: 35 minutes
- Yield: 36 cookies
- Category: Dessert
- Method: Baking
- Cuisine: American
- Diet: Vegetarian
Ingredients
- 1½ cups salted butter, at room temperature
- ¾ cup confectioners’ sugar
- 2¼ cups all-purpose flour
- ¾ cup cornstarch
- 2 teaspoons pure vanilla extract (optional)
- ¼ cup sprinkles (optional)
Instructions
- In a large mixing bowl, beat the butter and confectioners’ sugar on medium-high speed for 5 minutes until light and fluffy. Add vanilla extract if using.
- In a separate bowl, sift together the flour and cornstarch. Gradually add the dry mixture to the butter mixture on low speed. Mix just until combined and no flour streaks remain.
- Using a cookie scoop or spoon, form dough into 36 equal-sized balls. If the dough is too soft, chill for 15 minutes before shaping.
- Place cookie dough balls on a parchment-lined baking sheet. Flatten each with a fork dipped in flour or cornstarch and top with sprinkles if desired.
- Chill the shaped cookie dough balls in the fridge for 120 minutes or until firm. Alternatively, freeze until very firm.
- Preheat oven to 300°F (150°C). Bake for 20 minutes or until tops are set and bottoms are slightly golden.
- Let cookies cool on the baking sheet before serving or storing.
Notes
- Use only softened (not melted) butter for best texture and structure.
- Don’t skip the chilling step; it prevents spreading and keeps cookies puffy.
- Customize flavors with lemon, almond, or orange extract.
- Add jam centers, chocolate drizzle, or Hershey’s Kisses after baking for variations.
- Store baked cookies in an airtight container at room temperature for 1 week or freeze for up to 2 months.