There’s nothing like biting into a homemade Cheese Danish—the kind of pastry that fills your kitchen with an irresistible buttery aroma and leaves your fingers just a little sticky from sweet glaze. Making one from scratch rewards you with golden, flaky layers, and a silky cream cheese center that’s the stuff of breakfast legend. If you’ve ever strolled past a bakery window and dreamed of pulling a fresh Cheese Danish from your own oven, you’re in the right spot.
You’re about to discover a recipe that walks the perfect line between bakery-worthy indulgence and reliable, achievable steps for home cooks. This version puts that zip of real lemon, rich cream cheese, and optional fruity toppings front and center, all cradled in tender, laminated dough. Your morning coffee will never look at you the same way again.

Bakery magic at home: the tools to bake Cheese Danish success
When you set out to create this Cheese Danish, you’ll only need a handful of kitchen basics. Each one makes prepping, shaping, and baking smoother—so you’re never left with sticky fingers or deflated pastry.
- Large mixing bowls – For mixing the dough and combining fillings.
- Whisk – Ensures even blending of egg, milk, and yeast.
- Rolling pin – Rolls the dough into those necessary thin, even sheets for lamination.
- Parchment paper – Keeps the butter block neat, and helps with easy cleanup on baking trays.
- Baking sheets – Provides a flat surface to proof and bake pastries evenly.
- Sharp knife or pastry cutter – For cutting dough squares and prepping butter blocks.
- Spatula or small offset spatula – Spreads the luscious cream cheese filling.
No fancy equipment required—just a little patience and these trusty kitchen staples.
Ingredient essentials for the perfect Cheese Danish flavor
- Flour – Provides the sturdy but tender structure for these layered pastries.
- Granulated sugar – Adds just the right sweetness to both dough and cheese filling.
- Salt – Balances out the sweetness and sharpens flavors.
- Active dry yeast – Gives the dough its rise, resulting in those signature fluffy layers.
- Whole milk – Lends richness and moisture, creating a soft, light crumb.
- Egg – Binds the dough together and ensures a golden finish when brushed on top.
- Cold unsalted butter – Key for the lamination process, making each bite flaky and indulgent.
- Cream cheese – Creates a creamy, tangy filling that’s the heart of any true Cheese Danish.
- Vanilla extract – Brings out aromatic notes in both the dough and glaze.
- Lemon zest (optional) – Brightens the filling with a touch of fresh citrus flavor.
- Powdered sugar – The base for the simple icing drizzle.
- Milk or lemon juice – Loosens the glaze for easy drizzling, with a hint of tanginess if you like.
- Fruit preserves, fresh berries, or sliced almonds (optional) – Extra toppings for finishing flair and added texture.
See the recipe card below for the full list of ingredients and measurements.
From dough to glaze: your Cheese Danish journey step by step
- Mix and knead the dough: In a large bowl, combine your flour, sugar, and salt. In a separate bowl, gently whisk together the warm milk and yeast and let it sit until foamy—about 5–10 minutes. Add the egg and then pour the wet mixture into the dry ingredients. Mix and knead until the dough feels smooth and elastic to the touch, usually after 6–8 minutes. Cover the dough and chill it for 30 minutes—this helps the gluten relax and makes rolling easier later.
- Prep the butter block: Place the cold butter between two sheets of parchment paper. Using your rolling pin or the heel of your hand, pound and shape the butter into an 8-inch square. The butter should be firm but pliable, not melting. Slip it back into the fridge briefly if you need to keep it cold.
- Laminating the dough: Roll your chilled dough into a 40cm square. Place the butter block in the center on a diagonal, like a diamond. Fold the dough corners up and over the butter to encase it (sealing the buttery treasure inside). Roll out into a long rectangle (about 20 x 60cm), then fold into thirds, like you’re folding a letter. Chill for 30 minutes. Repeat the rolling and folding process two more times, always chilling the dough between turns. With each round, you’ll see the dough get smoother and those flaky Danish layers build up.
- Shape the Danish: Roll your dough out to 0.6cm thickness. Cut into 10cm squares. Spoon a generous tablespoon of cream cheese filling into the center of each square. Fold the corners in or shape them as you like—a twist or pinwheel is classic. If you’re feeling playful, top with a spoon of fruit preserves or a few berries at this stage.
- Proof and bake: Arrange pastries on a parchment-lined baking sheet, leaving room between each for proper rising. Let them proof at room temperature for about an hour—they should look slightly puffed and supple when ready. Preheat your oven to 200°C. If you want a glossy finish, brush the tops gently with egg wash or a splash of milk. Bake for 15–20 minutes, until the Danish are deeply golden and your kitchen smells incredible.
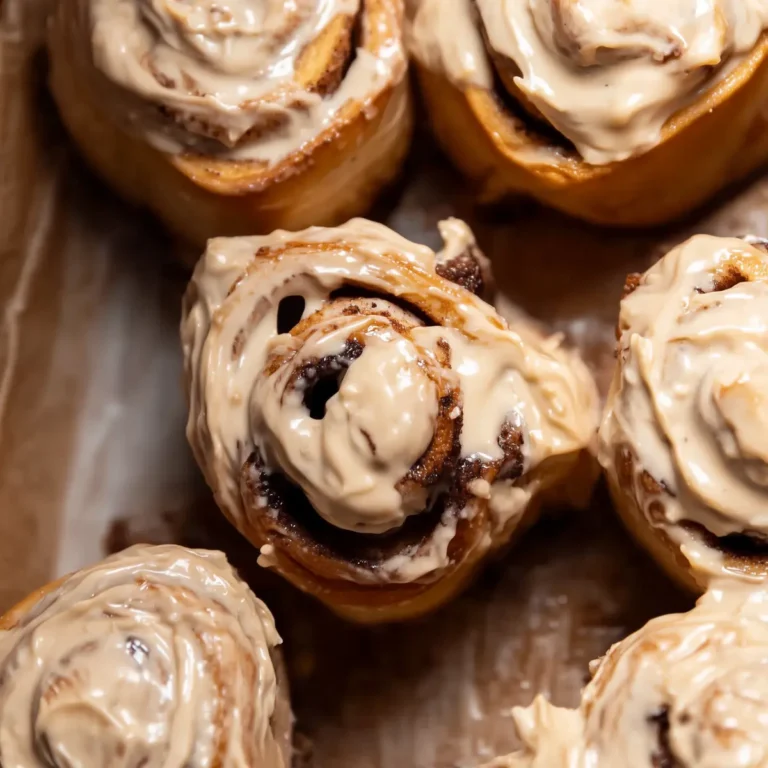
- Glaze and serve: As they cool completely on a rack, whip up your glaze by mixing powdered sugar, your choice of milk or lemon juice, and a dash of vanilla. Drizzle over the cooled Danish with a fork or spoon, making pretty stripes or a lattice if you’re in the mood. Serve and enjoy while the pastry is at peak freshness.
Tips and troubleshooting: how to master flaky Danish pastry
Even the most seasoned bakers need a few guardrails for pastry success. Here are the common speed bumps—and how to glide over them:
- Butter melting out: If your kitchen is warm, work swiftly and chill often. If butter is peeking through the dough at any stage, patch gently with a dusting of flour and get the dough back in the fridge.
- Tough dough or tearing: Don’t skip the chilling between folds. Cold rest means relaxed gluten, which keeps the dough stretchy and easy to shape without tearing.
- Dense, flat pastries: If your yeast is old or if the proofing room is cold, the dough might not rise properly. Trust your eyes as much as the clock—the pastries need to look puffed and soft before baking.
- Soggy bottoms: Remove the Danish from the baking sheet once baked and transfer to a wire rack promptly. Lingering on the hot tray causes moisture to build underneath.
- Glaze disaster: Glaze will run and vanish on hot pastries. Always cool completely, then drizzle to keep those pretty stripes visible and intact.
With a little patience, even a first-timer can turn out flaky Cheese Danish with bakery pride.
Cozy pairings and twisty variations for Cheese Danish lovers
A warm Cheese Danish is a true breakfast centerpiece, but it shines alongside:
- Fresh fruit salad – Adds lightness and bright flavor contrast to the rich pastry.
- Coffee or chai – The comforting bitterness balances the Cheese Danish’s sweet, tangy filling.
- Scrambled eggs or smoked salmon – For a savory, satisfying brunch spread.
- Hot chocolate – Pure indulgence for a winter morning or dessert treat.
Want to change it up? Try these irresistible twists:
- Berry burst: Drop a dollop of raspberry, strawberry, or blueberry preserves into the cheese filling before folding and baking.
- Nutty crunch: Sprinkle sliced almonds over the glaze or filling for texture and flavor depth.
- Citrus zing: Use extra lemon zest or add a dash of orange zest in the filling for a brighter bite.
- Almond or chocolate swirl: Mix a teaspoon of almond extract or a handful of mini chocolate chips into the cream cheese base for a new flavor note.
The Cheese Danish is a blank canvas—a little creativity goes a long way.
FAQs about Cheese Danish
Can Cheese Danish be made ahead and frozen?
Absolutely! You can freeze unbaked, shaped Danish on a tray until solid, then transfer to a freezer bag. When ready to bake, let thaw and rise at room temperature before baking as usual. Baked and cooled Cheese Danish also freeze well—just reheat briefly in a warm oven for best results.
How long does homemade Cheese Danish stay fresh?
Homemade Cheese Danish are best enjoyed the day they’re baked, but you can store leftovers in an airtight container at room temperature for 1 day, or in the fridge for up to 3 days. For crispness, reheat in the oven at 150°C for a few minutes before serving.
Can I swap the cream cheese filling for something else?
Yes! You can substitute with ricotta for a lighter texture, or try fruit preserves, chocolate spread, or even a nut butter for something different. Just ensure any substitute isn’t too runny to avoid soggy pastry.
Bring the bakery home with this classic Cheese Danish
There’s a quiet, joyful pride in pulling a tray of golden Cheese Danish from your oven—the gentle crackle as you break one open, the creamy filling giving way to sweet, pillowy crumb. Every homemade bite is nothing short of a small celebration, warmed by the layered effort and the simple pleasure it brings. So let your kitchen fill with those irresistible notes of butter and sugar, and treat yourself (and anyone lucky enough to be nearby) to a cozy, just-baked Cheese Danish moment.
More Delicious Recipes
- Easy Homemade Bread: This bread recipe shares similar baking techniques that can pair well with a Cheese Danish for a delightful breakfast spread.
- Bacon Cream Cheese Bagels: These bagels offer a creamy filling reminiscent of the Cheese Danish, perfect for brunch or breakfast gatherings.
- Cinnamon Swirl Banana Bread: Just like the Danish, this banana bread features a delightful sweet flavor and warmth that makes it an excellent companion for morning coffee.

Deliciously Flaky Cheese Danish Recipe for Perfect Mornings
Equipment
- Large mixing bowls
- Whisk
- Rolling Pin
- Parchment paper
- Baking sheets
- Sharp knife or pastry cutter
- Spatula or small offset spatula
Ingredients
Ingredients
- 4 cups all-purpose flour
- 1/3 cup granulated sugar
- 1 tsp salt
- 1 tbsp active dry yeast
- 1 cup whole milk, warm
- 1 large egg, room temperature
- 1 cup + 2 tbsp cold unsalted butter, for laminating
- 7 oz cream cheese, softened
- 1/4 cup granulated sugar
- 1 tsp vanilla extract
- Zest of 1 lemon (optional)
- 1 cup powdered sugar
- 1–2 tbsp milk or lemon juice
- 1/2 tsp vanilla extract
- Optional: Fruit preserves, fresh berries, or sliced almonds for topping
Instructions
Instructions
- Make the DoughIn a large bowl, mix flour, sugar, and salt. In another bowl, combine warm milk and yeast, let sit for 5–10 minutes until foamy. Add egg and yeast mixture to dry ingredients. Mix and knead until smooth (about 6–8 minutes). Cover and chill for 30 minutes.
- Prepare Butter BlockPlace cold butter between parchment sheets. Pound and shape into an 8-inch square. Chill until firm yet pliable.
- Laminate the DoughRoll dough into a 16-inch square. Place butter in center like a diamond. Fold corners over to seal. Roll into a long rectangle (8×24 inches). Fold into thirds like a letter. Chill 30 mins. Repeat rolling and folding 2 more times, chilling in between.
- Shape the DanishRoll dough to 1/4-inch thickness. Cut into 4-inch squares. Add a tablespoon of cream cheese filling to the center. Fold corners or shape as desired. Add berries or jam if using.
- Proof and BakePlace on parchment-lined baking sheets. Let rise at room temp for 1 hour. Preheat oven to 390°F (200°C). Brush with egg wash or milk. Bake 15–20 minutes until golden brown.
- Glaze and ServeCool completely. Mix powdered sugar, milk/lemon juice, and vanilla for glaze. Drizzle and serve!