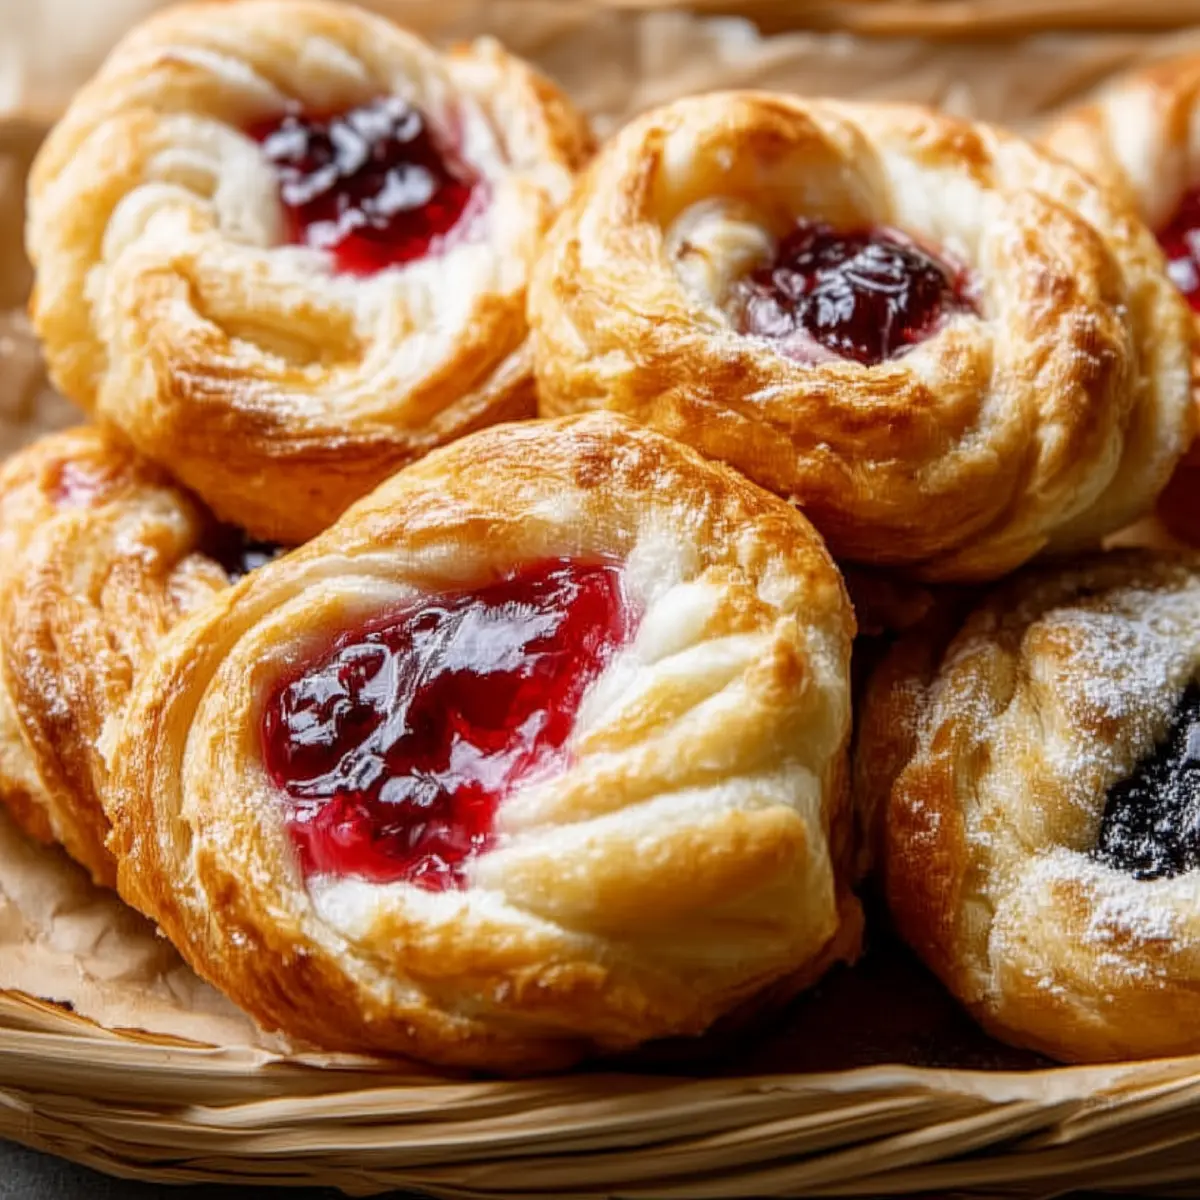
If there’s one thing that can flip a sleepy morning into something close to magical, it’s the smell of breakfast Danish pastries wafting through your kitchen as the sun creeps up. I grew up thinking Danish pastries were something you only bought from polished bakery cases—never something a real person could make at home, let alone before noon. But after tackling these with plenty of flour on my hands and a bit of trial and error, I promise you: it’s absolutely possible, and wildly rewarding. Butter melts into plush layers, the scent of baking dough mixes with hints of vanilla and fruit, and that first bite—flaky, creamy, sweet—is pure comfort in pastry form.
There’s nothing fussy about the enjoyment here. You’ll want to linger with a cup of coffee, maybe grab a pastry when nobody’s looking, and marvel at the fact that you made these yourself. The crackle as you tear into the golden outside, the shine of the glaze, the swirl of fruit and cream—every detail feels like a small celebration, even if it’s just breakfast at your kitchen table.
When Breakfast Danish Pastries Steal the Morning
There are those rare mornings when the air is just the right kind of chilly and you find a burst of energy (or maybe just a craving) that inspires you to make something extraordinary before the day unfolds. That’s how breakfast Danish pastries became a staple in my kitchen for chilly weekends, long brunches with friends, and even those days when I want to treat myself—no occasion necessary. Maybe it’s the ritual of rolling out dough and sneaking tastes of the filling, or maybe it’s the little thrill of transforming a rough, butter-flecked slab into delicate, swirled pastries that look straight out of an old European bakery window.
Honestly, the moment you take these out of the oven—when the tops are glossy, the edges crisp, and the scent hangs heavy with sweet, yeasted notes—you know you’ve made something special. Breakfast Danish pastries have a way of pressing pause on the morning rush; suddenly, you’re reaching for a warm plate, ignoring your phone, and giving in to that first glorious, messy bite.
The Ingredients That Bring Breakfast Danish Pastries to Life
Getting these pastries just right means starting with a few honest pantry staples and a couple of indulgent treats. Here’s what goes into making breakfast Danish pastries that feel every bit as dreamy as they taste:
- Flour – provides the backbone for your dough, creating the structure and light chew of each pastry layer.
- Granulated sugar – adds a gentle sweetness to the dough and helps feed the yeast for that signature rise.
- Active dry yeast – the real star for creating billowy, airy layers that bloom in the oven.
- Salt – a tiny pinch that makes every other flavor sing just a bit brighter; never skip it!
- Warm milk – brings tenderness to the dough and ties everything together with a subtle creaminess.
- Large eggs – give body, color, and a touch of richness that you’ll taste in every bite.
- Unsalted butter – the essential ingredient for that classic Danish pastry flake; keep it cold for perfect lamination.
- Cream cheese – soft, tangy, and subtly sweet, it anchors the filling with a lush creaminess.
- Powdered sugar – used in both the cream cheese blend and the glaze, it melts away with the first bite.
- Raspberry jam (or fruit preserve) – brings bright, slightly tart layers of fruit to balance the richness; swap with any thick jam you adore.
- Egg (for egg wash) – creates that beautiful golden gloss you see peeking through the glaze.
- Milk (for glaze) – loosens the glaze just enough to create lovely drips down the sides.
- Vanilla extract – a fragrant touch that rounds out the sugariness, almost warming the whole pastry.
See the recipe card below for the full list of ingredients and measurements.
Making Breakfast Danish Pastries: From Dough to Glaze
There’s something satisfying about making laminated dough by hand—especially for breakfast Danish pastries. The steps sound intimidating, but once you’ve dusted the counter and put on some music, you’ll lose yourself in it.
Start by whisking together the flour, sugar, yeast, and salt right in a big bowl—you want every dry ingredient mixed evenly from the start. Pour in warm milk and crack in your eggs; resist the urge to over-stir, but be patient as the dough slowly comes together. At this stage, it’s a little sticky, a little shaggy, and that’s perfectly fine. Knead until everything smooths out—your arms might complain, but the payoff is in the pastry.
Once your dough feels supple, wrap it up and let it rest in the fridge. While it chills, you’ll prep a cold slab of butter—this is crucial for those shattery, bakery-style layers. Rolling out the dough and sandwiching the butter inside is a little like putting a surprise gift right into the middle. Fold the dough like an envelope, sealing every edge so the butter doesn’t escape.
Lamination is all about rolling and folding; you’ll roll the dough out, fold it in thirds, spin, and chill. Repeat this a couple more times. If the dough resists or tries to shrink, step away for a minute—gluten needs breaks, too. By the final fold, you’ll see what looks almost like puff pastry, flecked with ribbons of butter, and smelling faintly of yeast and sugar.
Cut the dough into squares, and on each one, spoon a little cream cheese mixed with powdered sugar and a dollop of fruit jam into the center. Whether you twist, fold, or shape them into pinwheels or bows, just aim for a bit of filling peeking through—imperfections taste just as good.
Line them up on a baking sheet and whisk up an egg for the glossy wash that ensures golden tops. They’ll puff and color beautifully in a hot oven, sending a swirl of buttery, sweet aroma through the house. As they cool, whip up a simple glaze from powdered sugar, milk, and vanilla extract. Drizzle with abandon and just try not to sneak a bite before they finish setting.
The Texture and Flavor Experience of Homemade Danish Pastries
The appeal of these breakfast Danish pastries is as much about texture as taste. Crackly and golden on the outside—the edges catch just enough to shatter beneath your teeth—while inside, a pillowy crumb gives way to the softest, creamiest center, chased by fragrant vanilla and the tang of cream cheese. Every pastry is its own little adventure: some bites begin with sweetness from the jam, others bring that salty, buttery dough front and center, and once the sugar glaze hits your tongue, the whole thing melts down rich and smooth.
It’s this balance that keeps you coming back for “just one more.” There’s a faint nostalgia in every chew—the taste of special Sunday mornings, the softness of bakery boxes carried home, the pleasure of sticky fingers after a second (or third) helping. You don’t need perfection for perfect flavor; the slightly misshapen pastries, the drips of glaze that run off the side, even the little cracks all add to the charm.
Details and Variations You’ll Want to Know Before Baking
Let’s talk about making the process your own. If lamination feels overwhelming, remember you don’t need to be flawless—keep everything cold, don’t let the butter seep out, and don’t panic if you see streaks or bits sticking out. For a gentler start, use a marble rolling pin or chill your countertop—cold is your best friend when it comes to flaky pastry.
Have fun with the filling. Raspberry jam is a go-to for its tartness, but apricot, blueberry, or a thick marmalade also work beautifully. Swap out the cream cheese for ricotta or mascarpone if that’s what’s in the fridge. For something nutty, tuck in a bit of almond paste before adding the fruit.
Don’t be afraid to prep these the night before! Shape your pastries, pop the trays in the fridge tightly covered, and let them come to room temperature before baking in the morning. They freeze well, too: let them cool, wrap tightly, and reheat in a low oven for a taste of fresh-baked pastry any day of the week. Just avoid icing them before freezing—add the glaze after reheating so it drips just right.
How to Serve Breakfast Danish Pastries for Any Occasion
These pastries really shine when you put them alongside freshly brewed coffee or a pot of tea—especially on lazy mornings when you want a slow, generous start. Stack them on a big plate, let people choose their favorite shape or filling, or serve warm with a bowl of extra fruit preserves to spoon over each bite.
For brunch spreads, breakfast Danish pastries pair perfectly with savory options—eggs, crisp bacon, or even a simple green salad. Their richness means you don’t need much to fill out a meal, but if you’re feeling decadent, try a dusting of extra powdered sugar or a drizzle of honey before serving.
Holiday mornings, birthdays, or anytime you welcome family and friends are perfect occasions. Honestly, though, they’re also the answer to a rough week or an ordinary Thursday. There’s no wrong time for a warm, flaky, fruit-filled pastry.
FAQs about Breakfast Danish Pastries
Can I make breakfast Danish pastries ahead of time?
Absolutely—you can shape the pastries the night before, cover them tightly, and keep them in the fridge. Let them come to room temperature while the oven heats up, then bake fresh in the morning for the best texture and flavor.
What’s the best way to store leftover breakfast Danish pastries?
Let the pastries cool completely, then store them in an airtight container at room temperature for up to two days. If you want them to last longer, keep them in the fridge and reheat briefly in the oven before eating.
Can I freeze Danish pastries, and if so, how should I reheat them?
Yes, Danish pastries freeze beautifully. After baking and cooling, wrap them well and freeze for up to one month. To reheat, place them in a low oven until warmed through—add the glaze after reheating for that just-baked effect.
Are there good substitutions for the cream cheese or fruit filling in breakfast Danish pastries?
Definitely. Swap cream cheese for mascarpone, ricotta, or even a lightly sweetened cottage cheese. For the fruit filling, use whatever thick preserves or jam you love—apricot, cherry, blueberry, or even lemon curd all shine here.
The simple truth is, breakfast Danish pastries will always feel a little extraordinary, no matter when you make them. There’s something about the combination of flaky layers, creamy center, and fresh-baked aroma that turns a regular morning into a small, delicious celebration. Whether you serve them up for company, family, or just yourself, these pastries invite you to pause, savor, and smile over the small victories—like pulling a tray of golden-brown perfection from your own oven. Don’t wait for a special reason—let breakfast be the occasion that’s worth a bit of pastry-making magic.
More Delicious Recipes
- Cheese Danish: This treat features a creamy cheese filling that complements the flaky pastry perfectly.
- Puff Pastry Chocolate Croissants: Similar to Danish, these croissants are buttery and flaky with a delightful chocolate center.
- St. Joseph’s Pastries: These delightful pastries offer a rich cream filling that pairs wonderfully with a sweet glaze, just like your breakfast Danish.

Homemade Breakfast Danish Pastries
Ingredients
Ingredients
- 3 cups all-purpose flour (plus extra for dusting)
- 0.25 cup granulated sugar
- 2.25 tsp active dry yeast
- 0.5 tsp salt
- 0.5 cup warm milk (110°F)
- 2 large eggs (room temperature)
- 1 cup unsalted butter (cold, for laminating)
- 0.5 cup cream cheese (softened)
- 2 tbsp powdered sugar (for cream cheese mixture)
- 0.5 cup raspberry jam (or any thick fruit preserve)
- 1 egg (beaten, for egg wash)
- 0.5 cup powdered sugar (for glaze)
- 2 tbsp milk
- 0.5 tsp vanilla extract
Instructions
Instructions
- In a large bowl, combine flour, sugar, yeast, and salt.
- Add warm milk and eggs. Mix to form dough and knead until smooth.
- Wrap dough and chill for 30 minutes. Prepare a slab of cold butter.
- Roll out dough, place butter in center, fold like an envelope and seal edges.
- Roll dough and fold into thirds. Chill. Repeat lamination 2 more times.
- Roll out and cut into squares. Add cream cheese and jam to center.
- Fold into desired shape. Transfer to baking sheet lined with parchment.
- Brush with egg wash. Bake at 375°F (190°C) for 15–20 minutes until golden.
- Mix powdered sugar, milk, and vanilla for glaze. Drizzle over cooled pastries.