There is something undeniably magical about walking into a warm kitchen after being out in the biting cold, greeting the aroma of simmering milk and chocolate. That distinct scent of hot chocolate, complete with the sweet, vanilla-tinged fragrance of melting marshmallows, is the essence of winter comfort. I wanted to capture that exact sensory experience—the warmth, the rich cocoa, and the sticky, sweet foam—and transform it into a handheld dessert.
This recipe does exactly that by incorporating actual hot cocoa mix into the filling and frosting. These Cocoa Marshmallow Cupcakes are not just chocolate cake with a garnish; they are a triple-layered tribute to your favorite winter beverage, offering a moist crumb, a gooey surprise center, and a cloud-like buttercream that holds its shape without losing that nostalgic marshmallow texture.

Table of Contents
Recipe Overview & Why You’ll Love It
These Cocoa Marshmallow Cupcakes deliver a triple dose of comfort by infusing the nostalgic flavor of hot cocoa into every layer of the dessert. The base is a deeply chocolatey, oil-based cake that remains tender for days, providing the perfect dark canvas for the lighter, sweeter elements. Inside, you will find a hidden pocket of marshmallow creme spiked with hot cocoa mix, mimicking that gooey layer at the bottom of a mug. To finish, the frosting is whipped to an airy consistency that dissolves on the tongue just like foam.
Unlike generic recipes that simply place a dry marshmallow on top of a standard cupcake, this method integrates the hot cocoa flavor profile throughout the entire build. These Cocoa Marshmallow Cupcakes are the ultimate centerpiece for holiday parties, winter birthdays, or simply a cozy weekend baking project when you need a little extra warmth.
Ingredients & Substitutions
To create the ultimate Cocoa Marshmallow Cupcakes, you will need standard pantry staples along with a few specific items to achieve that signature hot chocolate taste. For the Cupcakes:
- 1 1/2 cups cake flour (provides a lighter crumb)
- 1/3 cup cocoa powder (natural or Dutch-processed)
- 1 tsp baking soda
- 1/4 tsp baking powder
- 1/4 tsp salt
- 1/2 cup granulated sugar
- 1/2 cup vegetable oil
- 1/2 cup whole milk
- 1 large egg
- 1 1/2 tsp vanilla extract
- 1/2 cup hot water (essential for blooming the cocoa) For the Marshmallow Filling:
- 3/4 cup marshmallow fluff
- 1 packet hot cocoa mix
- 1 tbsp milk For the Marshmallow Frosting:
- 1/2 cup unsalted butter, softened to room temperature
- 2 cups powdered sugar
- 2 tsp vanilla extract
- 1 tbsp heavy whipping cream or milk
- 1 packet hot cocoa mix
- 3/4 cup marshmallow fluff If you cannot find cake flour, you can make a substitute by removing two tablespoons of all-purpose flour from a measured cup and replacing them with cornstarch, sifting well. If packets of hot cocoa mix are unavailable, you can substitute each packet with 2 tablespoons of cocoa powder mixed with 2 tablespoons of powdered sugar.
Equipment You’ll Need
You don’t need professional gear to bake these Cocoa Marshmallow Cupcakes, but a few specific tools will make the filling process much neater. You will need a standard 12-well muffin or cupcake tin and paper liners to keep things tidy. A whisk and two mixing bowls are sufficient for the batter, as you don’t want to overmix. To create the hollow centers, an apple corer is the most efficient tool, though a small paring knife works perfectly well if you have a steady hand.
Piping bags are essential for this recipe; you will need one for injecting the sticky filling and another for swirling the frosting beautifully on top. Finally, an electric mixer—either a hand-held version or a stand mixer—is necessary for whipping the marshmallow frosting to full volume, as manual whisking won’t achieve the necessary aeration.
Step-by-Step Instructions
Follow this guide to bake, fill, and frost your Cocoa Marshmallow Cupcakes for a bakery-quality result that looks as good as it tastes.
Step 1: Prep and Mix Dry Ingredients
Preheat your oven to 350°F (175°C) and line your cupcake tin with 12 paper liners. In a medium bowl, whisk together the 1 1/2 cups cake flour, 1 teaspoon baking soda, 1/4 teaspoon baking powder, 1/3 cup cocoa powder, and 1/4 teaspoon salt. Whisking vigorously helps remove any hard lumps of cocoa and aerates the flour, which contributes to a lighter final texture.
Step 2: Create the Cocoa Batter
In a separate large bowl, blend the 1/2 cup vegetable oil, large egg, 1/2 cup granulated sugar, 1/2 cup whole milk, and 1 1/2 teaspoons vanilla extract until fully combined. Gradually stir the dry flour mixture into the wet ingredients, mixing only until just incorporated. The key step here is to pour in the 1/2 cup hot water last. Whisk this gently until the batter is smooth. Do not be alarmed; the batter will be very thin and liquid, almost like a soup. This is normal and ensures a moist result.
Step 3: Bake and Cool
Pour the batter into the prepared liners, filling them about 3/4 full to allow for a nice dome without overflowing. Bake in the preheated oven for 20 to 23 minutes. You can test for doneness by inserting a toothpick into the center; it should come out clean or with just a few moist crumbs attached. Remove the tin from the oven and let the cupcakes cool for 5 minutes before transferring them to a wire rack to cool completely. They must be room temperature before filling.
Step 4: Whip the Filling
While the cakes cool, prepare the filling. In a small bowl, blend 3/4 cup marshmallow fluff, one packet of hot cocoa mix, and 1 tablespoon milk. Stir until the mixture is smooth, cohesive, and gooey. Transfer this sticky mixture to a piping bag or a ziplock bag with the corner snipped off for easy handling.
Step 5: Make the Cloud Frosting
In a large bowl using an electric mixer, cream the 1/2 cup room-temperature butter until it is pale and smooth. Gradually beat in the 2 cups of powdered sugar, 2 teaspoons vanilla, and 1 tablespoon cream until the mixture is fluffy. Fold in the second hot cocoa packet and the remaining 3/4 cup marshmallow fluff. Beat on high speed for 1–2 minutes until the frosting is airy and light.
Step 6: Assemble and Decorate
Once the cupcakes are cool, use an apple corer or knife to remove the center of each cupcake (feel free to snack on the cake plugs). Pipe the marshmallow filling into the hollow center until it is level with the top of the cake. Pipe the frosting generously over the filling and top of the cupcakes. For a final touch, you can top them with mini marshmallows and a light dusting of cocoa powder.
Why This Recipe Works (Technique Notes)
The science behind these Cocoa Marshmallow Cupcakes ensures they stay moist for days while delivering a punch of authentic chocolate flavor. One of the most critical techniques used here is “blooming” the cocoa. By adding hot water to the batter at the very end, you dissolve the cocoa powder’s solids more effectively than cold milk or eggs could. This releases flavor compounds that are typically locked away, resulting in a deeper, fudgier taste profile without needing melted chocolate bars.
Additionally, the choice of oil over butter for the cake base is intentional. Oil remains liquid at room temperature and coats the flour proteins more thoroughly than butter fats. This prevents excessive gluten development and ensures the Cocoa Marshmallow Cupcakes remain soft and tender even if you store them in the refrigerator.
Finally, using marshmallow fluff rather than melted marshmallows for the filling provides stability. Melted marshmallows tend to turn rubbery or grainy as they cool and set, whereas commercial fluff contains stabilizers that keep the texture creamy and gooey inside the cake.
Pro Tips & Variations
Customize your batch of Cocoa Marshmallow Cupcakes with these professional tips and flavor twists to suit any palate. First, ensure your butter for the frosting is truly soft room temperature. If the butter is too cold, it will not emulsify with the marshmallow fluff, leading to a lumpy, separated frosting that feels greasy on the palate.
If you want to elevate the flavor profile, try a Peppermint Hot Cocoa variation by adding 1/2 teaspoon of peppermint extract to the frosting mixture. for a Mexican Hot Chocolate twist, whisk a pinch of cinnamon and a tiny dash of cayenne pepper into the dry cake ingredients for a warming kick. If you are a coffee lover, you can make a Mocha version by replacing the hot water in the batter with hot, strong brewed coffee.
This recipe yields about 12 to 14 standard Cocoa Marshmallow Cupcakes, but it can easily be doubled for larger crowds. Just ensure you have enough mixing bowl space to handle the increased volume of liquid batter.
Make-Ahead, Storage & Freezing
Because of the dairy in the filling, you will need to store these Cocoa Marshmallow Cupcakes carefully to maintain their cloud-like texture. Once frosted, the cupcakes should be stored in an airtight container in the refrigerator, where they will keep fresh for 3 to 4 days. While the cake uses oil and stays moist in the cold, the marshmallow fluff in the frosting can become sticky and lose its structure if left out in a warm kitchen for too long.
However, cold frosting is less flavorful, so always remove the cupcakes from the fridge about 30 minutes before serving to bring them back to room temperature. This softens the butter in the frosting and restores the creamy texture. If you want to freeze them, it is best to do so unfrosted. Wrap the baked, cooled cakes individually in plastic wrap and freeze for up to 3 months. If you must freeze them fully decorated, flash freeze them on a baking sheet until hard, then wrap them individually. Thaw them in the fridge overnight before serving your Cocoa Marshmallow Cupcakes.
Serving Suggestions & Pairings
Elevate the experience of eating these Cocoa Marshmallow Cupcakes by pairing them with complementary beverages and garnishes. Since these treats are quite sweet due to the marshmallow components, they pair beautifully with a steaming mug of unsweetened black coffee or an espresso to cut through the richness. For a classic approach, a tall glass of cold milk mirrors the creamy filling perfectly.
If you really want to lean into the theme, serve them alongside a cup of actual hot chocolate, perhaps with a candy cane stirrer. When plating, use a stark white plate to let the dark cocoa color of the cake pop visually. You can garnish the plate with chocolate shavings or a drizzle of dark chocolate ganache to add an extra layer of decadence to the presentation of your Cocoa Marshmallow Cupcakes.
Dietary Notes & Allergen Considerations
While this recipe for Cocoa Marshmallow Cupcakes is indulgent, here are ways to adapt it for specific dietary needs. To make this recipe dairy-free, you can substitute the whole milk in the batter with almond milk, oat milk, or soy milk. For the filling and frosting, use a high-quality dairy-free butter alternative and ensure your hot cocoa mix packet is dairy-free (many dark chocolate mixes are). Double-check your marshmallow fluff label while standard fluff is usually dairy-free, it relies on egg whites for structure. This makes the recipe vegetarian but not vegan. Additionally, be aware that while standard marshmallows contain gelatin (often pork-derived), jarred marshmallow crème or fluff is frequently gelatin-free and relies solely on egg whites.
If you are serving strict vegetarians who avoid gelatin, stick to the fluff-based filling and frosting as written, but skip the mini marshmallow garnish unless you buy specific vegan marshmallows. These Cocoa Marshmallow Cupcakes are naturally nut-free, provided you verify that all packaged ingredients were processed in a nut-free facility.
Troubleshooting & Common Mistakes
Avoid common baking pitfalls to ensure your Cocoa Marshmallow Cupcakes come out perfect every single time. One common issue is sinking centers. This usually happens if the cupcakes are underbaked or if the oven door was opened too early during the baking process, causing the structure to collapse. Trust the toothpick test and ensure the center is set before removing them. If your frosting turns out grainy, it usually means the butter was too cold or the powdered sugar wasn’t sifted. You can fix this by beating the frosting on high speed for a few extra minutes to help dissolve the sugar crystals.
If you find the filling is too runny to pipe, simply stir in another teaspoon of marshmallow fluff to stiffen it up. Conversely, if it is too thick to push through the piping bag, add a tiny drop more milk. The filling for your Cocoa Marshmallow Cupcakes needs to be pipeable but not liquid, or it will soak into the cake crumb and disappear.
Nutritional Information
Here is an estimate of the nutritional profile for one serving of these Cocoa Marshmallow Cupcakes.
- Serving Size: 1 Cupcake
- Calories: ~350 kcal
- Sugar: ~38g
- Sodium: ~180mg
- Fat: ~14g
- Saturated Fat: ~5g
- Unsaturated Fat: ~8g
- Trans Fat: 0g
- Carbohydrates: ~55g
- Fiber: ~1g
- Protein: ~3g
- Cholesterol: ~30mg
FAQs
Can I use regular marshmallows inside the Cocoa Marshmallow Cupcakes?
It is not recommended. If you bake a whole marshmallow inside the batter, it will melt into a hollow, sticky cavity and often disappear entirely into the cake. The marshmallow fluff filling method described here ensures a consistent, creamy center that stays gooey even after the cupcake has cooled.
Why is the batter so liquidy?
The addition of hot water thins the batter significantly, making it much runnier than a standard butter-creamed cake batter. This is intentional and ensures a very moist, steamed-cake texture. Do not add extra flour to thicken it, or your cupcakes will turn out dry and dense.
Can I make these into mini cupcakes?
Yes, this batter works well for minis. You will need to reduce the baking time to approximately 10–12 minutes. Be aware that filling mini cupcakes can be tricky due to their size, so you might opt to skip the filling step and simply frost them generously.
What brand of hot cocoa mix works best?
Any standard packet mix works well for this recipe, such as Swiss Miss or Nestle. However, avoid “sugar-free” or “diet” varieties for baking, as the artificial sweeteners can alter the texture and aftertaste of your frostings and fillings.
Conclusion
Creating these treats is a rewarding journey, from the moment you whisk the hot water into the dark batter to the final dusting of cocoa powder on the frosting. The process of coring and filling the cakes adds a professional touch that turns a simple kitchen project into a bakery-worthy dessert. When you bite into one of these Cocoa Marshmallow Cupcakes, the combination of textures—the tender crumb, the sticky filling, and the airy frosting—creates a moment of pure bliss. Baking is ultimately a form of care, and sharing a batch of these is like giving a warm hug to your friends and family.
I encourage you to pin this recipe for your next snow day, rate it if you loved the results, and tag me in your photos to show off your beautiful, decadent Cocoa Marshmallow Cupcakes.
More Tasty Ideas
- Chocolate Chip Christmas Cookies for Cozy Holiday Baking
- Salted Chocolate Caramel Pretzel Bars for Easy Holiday Treats
- Christmas Toffee Recipe with Chocolate and Pecans
Hot Cocoa Marshmallow Cupcakes
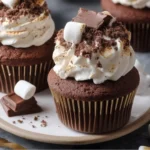
These Cocoa Marshmallow Cupcakes are a triple-layered tribute to hot chocolate, featuring a moist oil-based chocolate cake, a gooey marshmallow cream filling spiked with hot cocoa mix, and an airy marshmallow buttercream frosting. They capture the nostalgic warmth of a winter mug in a decadent, handheld dessert perfect for holiday gatherings.
- Prep Time: 25 minutes
- Cook Time: 23 minutes
- Total Time: 48 minutes
- Yield: 12-14 Cupcakes
- Category: Dessert
- Method: Baking
- Cuisine: American
- Diet: Vegetarian
Ingredients
- 1 1/2 cups cake flour
- 1/3 cup cocoa powder (natural or Dutch-processed)
- 1 tsp baking soda
- 1/4 tsp baking powder
- 1/4 tsp salt
- 1/2 cup granulated sugar
- 1/2 cup vegetable oil
- 1/2 cup whole milk
- 1 large egg
- 1 1/2 tsp vanilla extract
- 1/2 cup hot water
- 3/4 cup marshmallow fluff (for filling)
- 1 packet hot cocoa mix (for filling)
- 1 tbsp milk (for filling)
- 1/2 cup unsalted butter, softened to room temperature
- 2 cups powdered sugar
- 2 tsp vanilla extract (for frosting)
- 1 tbsp heavy whipping cream or milk (for frosting)
- 1 packet hot cocoa mix (for frosting)
- 3/4 cup marshmallow fluff (for frosting)
- Optional: Mini marshmallows and cocoa powder for garnish
Instructions
- Preheat oven to 350°F (175°C) and line a 12-well cupcake tin with paper liners.
- In a medium bowl, whisk together the cake flour, baking soda, baking powder, cocoa powder, and salt to remove lumps and aerate.
- In a large bowl, blend the vegetable oil, egg, sugar, whole milk, and 1 1/2 tsp vanilla extract until combined.
- Gradually stir the dry mixture into the wet ingredients until just incorporated.
- Pour in the hot water and whisk gently until the batter is smooth and thin.
- Fill cupcake liners 3/4 full and bake for 20 to 23 minutes, or until a toothpick inserted into the center comes out clean.
- Let cupcakes cool in the tin for 5 minutes, then transfer to a wire rack to cool completely.
- To make the filling, mix 3/4 cup marshmallow fluff, one packet of hot cocoa mix, and 1 tbsp milk in a small bowl until smooth; transfer to a piping bag.
- To make the frosting, cream the softened butter, then beat in powdered sugar, 2 tsp vanilla, and cream until fluffy. Fold in the second cocoa packet and remaining 3/4 cup marshmallow fluff, whipping on high for 1–2 minutes.
- Core the center of each cooled cupcake, pipe in the filling, frost generously, and garnish as desired.
Notes
- Butter Temperature: Ensure butter is truly soft (room temperature) for the frosting to prevent lumps and separation when mixing with the fluff.
- Batter Consistency: The batter will be very thin and liquid after adding the hot water; this is normal and ensures a moist crumb.
- Storage: Store frosted cupcakes in an airtight container in the refrigerator for up to 3–4 days; bring to room temperature before serving.
- Variation: Add 1/2 tsp peppermint extract to the frosting for a Peppermint Hot Cocoa twist.