The holidays bring a special kind of magic that fills your home with warmth, laughter, and the unmistakable aroma of seasonal goodies. If you’re searching for a treat that captures all of that magic without requiring hours in the kitchen, Grinch Oreo Balls might just become your new holiday tradition. These whimsical, no-bake bites are inspired by the classic tale How the Grinch Stole Christmas, bringing a playful pop of color and charm to your dessert table.
With just a few simple ingredients and minimal effort, you can whip up a batch of these cheerful treats that everyone—from picky kids to sweet-toothed adults—will love. Whether you’re hosting a festive get-together, making edible gifts, or looking for an activity to enjoy with your family, Grinch Oreo Balls are a foolproof crowd-pleaser.
Let’s unwrap the magic behind this no-bake holiday gem.
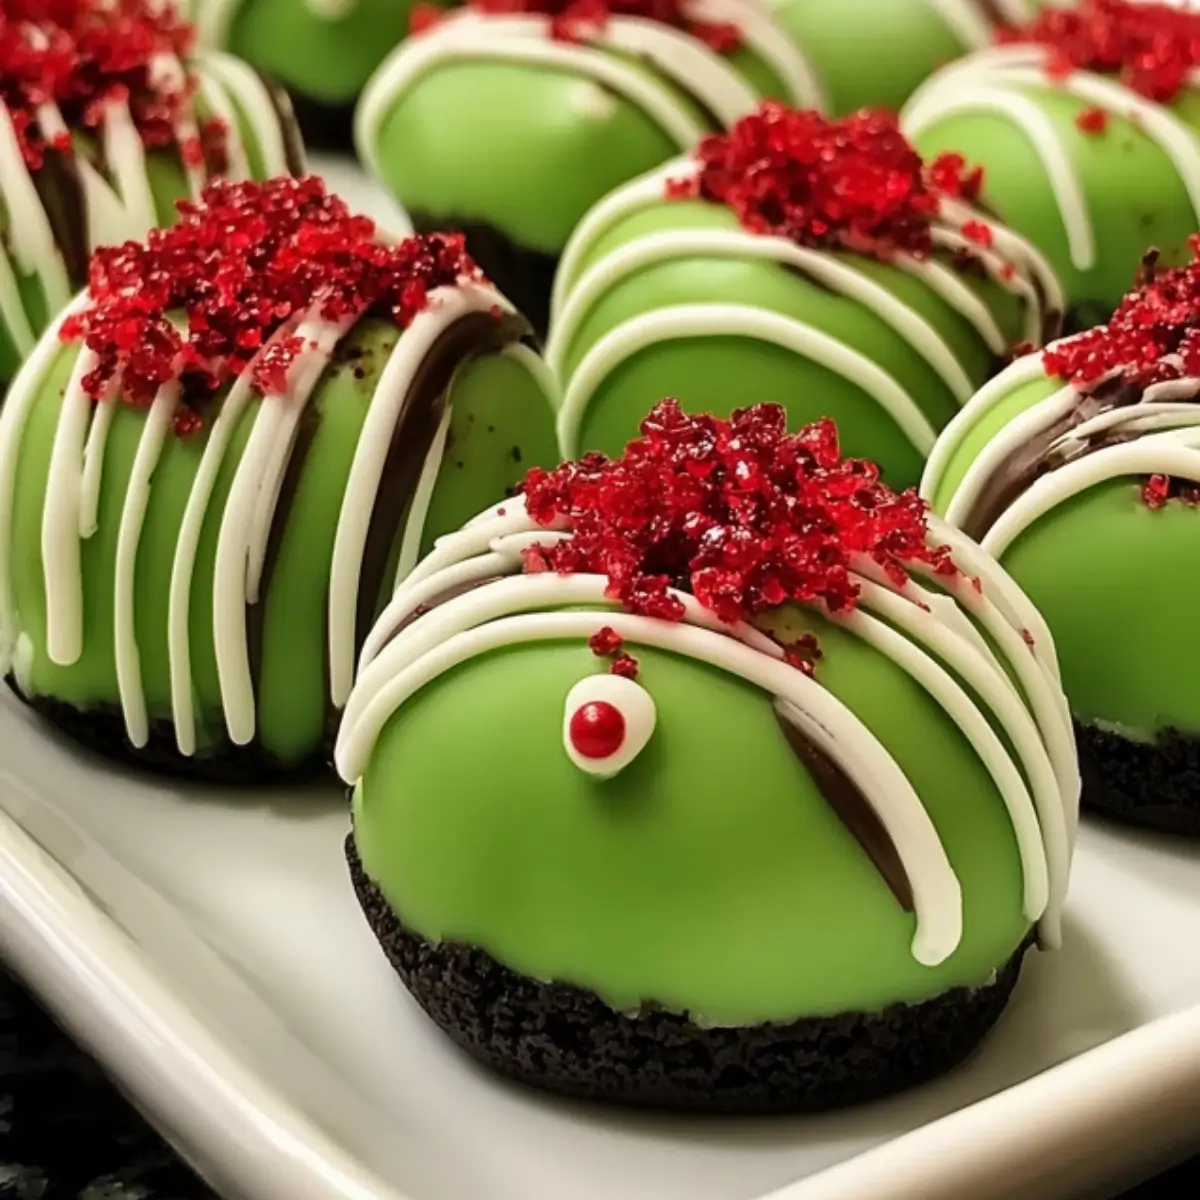
Table of Contents
What Are Grinch Oreo Balls?
Grinch Oreo Balls are bite-sized, festive treats made from crushed Oreo cookies and cream cheese, dipped in a vibrant green candy coating, and topped with a red heart sprinkle. They’re as visually striking as they are delicious, with their signature green color and heart detail referencing the moment the Grinch’s heart grew “three sizes.”
These no-bake truffles deliver a rich, creamy texture and a sweet, chocolatey flavor. They’re simple to prepare, making them perfect for beginner bakers and seasoned home chefs alike. The process is straightforward enough that your kids can join in too, making it a great holiday bonding activity.
What makes them extra special is the flexibility—there are endless ways to customize the flavor, coating, and toppings to suit your style or dietary needs.
Why You’ll Love Making These Grinch Oreo Balls
There’s no shortage of holiday dessert recipes out there, but few are as easy, fun, and universally loved as these Oreo-based gems. Here’s why you’ll want to add them to your seasonal baking list:
- No Baking Required: You don’t need to fire up your oven or worry about precise baking times. These treats come together with just mixing, rolling, and chilling.
- Fast & Easy: From prep to plate in under an hour (including chill time).
- Kid-Friendly: Your little helpers will love crushing cookies and decorating with red hearts.
- Festive & Eye-Catching: Their bright color and themed design instantly add holiday flair to any table.
- Giftable: Pop a few in a decorative box or bag and you’ve got a homemade gift that’s sweet and thoughtful.
Ingredients You’ll Need
You won’t need a mile-long grocery list to make these. Here are the basics to gather before you get started:
Main Ingredients:
- 1 package of Oreos (36 cookies) – Classic works best, but you can get creative.
- 8 oz cream cheese, softened – This brings the richness and helps the mixture bind.
- 12 oz green candy melts – These create the Grinch’s iconic green hue.
- 1 tablespoon coconut oil (optional) – Helps thin out the candy melts for smoother coating.
- Red heart sprinkles – A simple touch that ties it all together.
Optional Add-Ins:
- Peppermint extract – For a cool, minty twist.
- White chocolate chips + green food coloring – Use this combo if you can’t find candy melts.
How to Make Grinch Oreo Balls
Ready to make your own? Follow this step-by-step method and you’ll have a batch of Grinch Oreo Balls ready to go in no time.
1. Crush the Oreos
Start by placing the entire package of Oreo cookies—cream filling included—into a food processor. Pulse until the cookies turn into fine crumbs.
No processor? No problem. Place the cookies in a zip-top bag and crush them with a rolling pin. Just be sure the texture is fine enough to mix easily with cream cheese.
2. Mix with Cream Cheese
In a large mixing bowl, combine the Oreo crumbs with the softened cream cheese. Mix until fully combined and smooth. You’re looking for a dough-like texture that holds together well.
Let the cream cheese sit at room temperature for a while before mixing—it’ll make the job much easier.
3. Roll into Balls
Use a small cookie scoop or your hands to roll the mixture into 1-inch balls. Place them on a parchment-lined baking sheet.
Once all the balls are shaped, refrigerate them for at least 30 minutes. This chill time helps them stay firm during the dipping process.
4. Melt the Candy Coating
While the balls are chilling, melt your green candy melts in a microwave-safe bowl. Heat in 30-second intervals, stirring between each until smooth.
If the coating is too thick, stir in a tablespoon of coconut oil. This helps with consistency and makes for a glossy finish.
5. Dip and Decorate
Remove the chilled balls from the fridge. Using a fork or dipping tool, submerge each one into the melted coating, ensuring it’s fully covered. Let any excess drip off before placing the coated ball back on the parchment paper.
Quickly press a red heart sprinkle on top before the coating sets.
6. Chill to Set
Refrigerate the finished Oreo balls for 15–20 minutes or until the coating is firm. Once set, they’re ready to enjoy or gift.
Tips for Perfect Grinch Oreo Balls
Getting the ideal texture and finish isn’t hard, but these expert tips will take your results to the next level:
- Always chill the rolled balls before dipping to prevent them from falling apart.
- Don’t freeze the balls right before dipping—frozen centers can cause the coating to crack.
- Thin out thick candy melts with coconut oil or shortening.
- Use a fork and gently tap it on the bowl edge to remove excess coating.
- Add a second red sprinkle on top if one shifts—no one will complain.
Fun Variations to Try
Grinch Oreo Balls are endlessly customizable. Here are a few twists you can try to make them your own:
Red Velvet Oreo Balls:
Swap in red velvet Oreos for a colorful surprise inside and a slightly tangy flavor.
Peppermint Twist:
Add a drop or two of peppermint extract to the Oreo and cream cheese mixture. Garnish with crushed candy canes instead of heart sprinkles.
Gluten-Free Version:
Use gluten-free Oreos and ensure your candy melts are certified gluten-free.
Dark Chocolate Grinch Balls:
Dip the balls in dark chocolate candy melts with green food coloring for a richer, slightly less sweet version.
Double-Stuffed Delight:
Opt for double-stuffed Oreos to make the filling even creamier and more decadent.
Sprinkle Surprise:
Mix rainbow sprinkles into the dough or use them on top to add a pop of color and extra crunch.
How to Store Grinch Oreo Balls
Your Oreo balls will stay delicious with proper storage. Here’s how to keep them fresh:
Refrigerator:
Store them in an airtight container in the fridge for up to five days. Use parchment paper between layers to avoid sticking.
Freezer:
For longer storage, freeze them in a single layer on a baking sheet. Once solid, transfer them to a freezer-safe bag. They’ll keep for up to two months. Let them thaw in the fridge before serving.
Serving Ideas
These Oreo balls aren’t just for your dessert plate—they’re perfect for:
- Adding to a holiday dessert board
- Gifting in clear bags tied with ribbon
- Serving with hot cocoa at a winter gathering
- Displaying with other no-bake treats for variety
They’re compact, festive, and practically beg to be shared.
Nutritional Information
Understanding what goes into each treat can help you plan your indulgence. Per 1 ball serving:
- Serving Size: 1 ball
- Calories: 120
- Sugar: 10g
- Sodium: 75mg
- Fat: 7g
- Saturated Fat: 4g
- Unsaturated Fat: 2g
- Trans Fat: 0g
- Carbohydrates: 14g
- Fiber: 0.5g
- Protein: 1g
- Cholesterol: 10mg
FAQ – Grinch Oreo Balls
Can I make Grinch Oreo Balls ahead of time?
Absolutely. You can prepare them up to three days in advance and store them in the refrigerator. They also freeze well for make-ahead gifting or parties.
What can I use instead of candy melts?
If candy melts aren’t available, white chocolate chips combined with a few drops of green food coloring make a great alternative. Just be sure to stir in a bit of oil for a smoother coating.
Are Grinch Oreo Balls gluten-free?
They can be! Just substitute standard Oreos with a gluten-free version. Most grocery stores carry gluten-free sandwich cookies that work perfectly.
Conclusion
You don’t need to be a master baker—or even turn on the oven—to spread some serious holiday cheer. Grinch Oreo Balls are proof that simple ingredients and a bit of creativity can deliver big festive flavor. These charming little bites capture the joy and color of the season, and the best part? They come together in under an hour.
So whether you’re hosting a holiday bash, putting together homemade gifts, or looking for a joyful way to spend time with your family, give these Grinch Oreo Balls a try. You’ll make something delicious, create some memories, and maybe even feel your own heart grow a little in the process.
More Tasty Ideas
- Peppermint Oreo Truffle Balls: If you’re a fan of the Grinch Oreo Balls, you’ll love this festive peppermint variation. These truffle balls combine crushed Oreos and cream cheese, but add a refreshing peppermint flavor that’s perfect for the holiday season.
- Christmas Tree Cupcakes: These adorable cupcakes are a whimsical and colorful dessert that brings holiday cheer to any dessert table. Similar in fun and festive spirit to Grinch Oreo Balls, they’re great for parties and kid-friendly activities.
- Oreo Cookie Balls: The classic version of the no-bake treat that inspired the Grinch variation. These Oreo balls are dipped in chocolate and can be dressed up for any occasion, offering the same creamy, indulgent bite with endless customization options.
Grinch Oreo Balls

Grinch Oreo Balls are festive, no-bake holiday treats made with crushed Oreos, cream cheese, and green candy melts. These bite-sized desserts are perfect for Christmas gatherings and gifts, featuring a red heart sprinkle that symbolizes the Grinch’s growing heart.
- Prep Time: 30 minutes
- Cook Time: 20 minutes
- Total Time: 50 minutes
- Yield: 30–35 balls
- Category: Dessert
- Method: No-Bake
- Cuisine: American
- Diet: Vegetarian
Ingredients
- 1 package Oreos (36 cookies)
- 8 oz cream cheese, softened
- 12 oz green candy melts
- 1 tablespoon coconut oil (optional)
- Red heart sprinkles
- Optional: 1/2 teaspoon peppermint extract
- Optional: 1 cup white chocolate chips + green food coloring (as substitute for candy melts)
Instructions
- Place Oreos in a food processor and crush into fine crumbs. Alternatively, use a zip-top bag and rolling pin.
- In a large bowl, mix the Oreo crumbs with softened cream cheese until smooth and fully combined.
- Roll the mixture into 1-inch balls and place them on a parchment-lined baking sheet.
- Refrigerate the balls for at least 30 minutes to firm them up.
- Melt green candy melts in a microwave-safe bowl in 30-second intervals, stirring in between. Add coconut oil if the mixture is too thick.
- Dip each chilled Oreo ball into the melted candy coating using a fork or dipping tool. Let excess coating drip off.
- Place the dipped balls back on parchment paper and immediately top with a red heart sprinkle.
- Refrigerate for another 15–20 minutes until the coating is set.
Notes
- Chill the Oreo balls before dipping to prevent them from falling apart.
- Add coconut oil to candy melts for smoother coating.
- Store in an airtight container in the refrigerator for up to 5 days.
- Freeze for up to 2 months; thaw in refrigerator before serving.
- Use gluten-free Oreos for a gluten-free version.