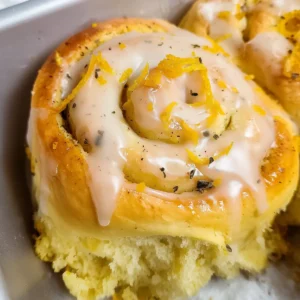
If you’ve ever stared at a batch of classic cinnamon rolls and thought, “These need a punch of summer,” you’re in exactly the right place. Lemon rolls check every box for me when it comes to brunch: the dough turns out unbelievably pillowy, the filling is bursting with citrus, and that glossy lemon icing tastes like sunshine. Even better, you get those coveted gooey centers without fuss or overnight prep.
These are the rolls I bake on long weekends when a craving hits and I want something show-stopping but not fussy—just a mixing bowl, some zest, and the satisfying smell of sweet, tangy, rising dough wafting through the kitchen. If you love a bright, zippy twist on a classic, these lemon rolls might just become your new obsession.

Why These Lemon Rolls Are a Brunch Dream
If you’re searching for a recipe that breaks the rules of “special occasion only,” lemon rolls deliver every time. They’re the kind of treat that makes people linger at the table a little longer. Forget dry store-bought pastries—these rolls stay soft and lush from edge to center, thanks to a dough that bakes up airy and a filling that melts right into every swirl.
The flavor is what I crave on bright, sun-drenched mornings: sharp, refreshing lemon in every single bite, topped with a perfectly drippy lemon glaze. And here’s the magic—they’re actually pretty fast to pull off, with no overnight rise or advanced pastry tricks needed. Lemon rolls are the crowd-pleasing, hands-down winner of any brunch spread. Serve them up with fresh fruit, strong coffee, or just alone, still warm and steamy from the oven.
What’s In These Zesty Lemon Rolls
Here’s a peek at what goes into these lemon rolls, and why each ingredient makes a difference:
- flour – This is the backbone of the dough and gives it structure and that cloud-like texture.
- Instant dry yeast – Gives the rolls their rise and signature fluffiness. No proofing needed—just toss it straight in.
- Poppy seeds – Totally optional, but they add a pop of crunch and an old-school bakery vibe.
- Fine salt – Balances sweetness and sharpens the lemon flavor beautifully.
- Buttermilk – Makes the dough extra tender and adds a subtle tang that keeps things interesting.
- Granulated sugar – Sweetens both the dough and the filling, helping the rolls caramelize just right.
- Unsalted butter – Imparts richness and keeps each layer moist and indulgent.
- Eggs – Bind everything together and give the dough a little lift and color.
- Fresh lemon zest – Zest is where that big lemon punch comes from; it perfumes the dough and the filling.
- Light brown sugar – Deepens the sweetness and helps make that gooey, sticky center in every roll.
- Powdered sugar – For the icing, it dissolves smoothly and brings just the right amount of sweetness.
- Fresh lemon juice – Brings the icing to life and keeps the flavor super vibrant.
- Fresh lemon zest (extra for topping) – For those little flecks of color and a final burst of citrus right before serving.
- Parchment paper and a baking pan – Ensures the rolls come out easily and bake evenly.
- Dental floss – Secret weapon for cutting the soft, filled dough without smashing the spirals.
See the recipe card below for the full list of ingredients and measurements.
Making Lemon Rolls Step by Step
Here’s how I make these lemon rolls from scratch, with a focus on the steps that make all the difference:
- Start the dough. Preheat your oven gently, just to get things cozy for a quick rise later. In a big mixing bowl (or your stand mixer), mix together the dry ingredients—flour, yeast, a sprinkle of poppy seeds if you want them, and a pinch of salt.
- Bring everything together. In another bowl, combine buttermilk, sugar, and butter. Warm this in the microwave until the butter is mostly melted and the mixture feels pleasantly warm (not hot—you want to keep the yeast alive). Pour it into the dry mix and stir until it starts coming together into a sticky dough.
- Add the eggs and zest. Mix in the eggs one at a time—this takes a little patience but results in a wonderfully elastic, rich dough. Stir in those fragrant heaps of lemon zest. If the dough’s still clinging to the bowl, add a bit more flour until it feels tacky but not sticky to the touch.
- Let the dough rest. Cover the bowl and give it a nice rest. This short pause helps relax the dough, making it so much easier to roll out without tearing.
- Prep the filling. While the dough is resting, take a bowl and mix granulated sugar, brown sugar, and fresh lemon zest. Rub everything together with your fingertips—this part smells like a summer garden. Stir in the softened butter until you’ve got a spreadable paste.
- Roll and fill. On a floured countertop, roll out the dough into a big rectangle. Smear all that lemony filling across it, but leave a narrow strip bare along one long edge (this helps you seal the roll).
- Shape and cut. Roll up the dough, starting from the filled edge and working towards the bare strip. Use dental floss (or a super sharp knife) to slice even, fat rolls—if you go with floss, you get beautiful, undistorted spirals.
- Rise and bake. Snuggle the rolls into a lined or greased baking pan. Here’s my trick: briefly place them in the warm (but turned off) oven for a “cheat” rise that helps them puff up quickly, then remove, preheat the oven to baking temperature, and bake until golden and risen. Your kitchen will smell so good it’ll be hard to wait.
- Ice and finish. Whisk together powdered sugar, lemon juice, and melted butter for a tart-sweet drizzle. Spoon it over the warm rolls so it soaks into all the nooks and crannies, then top with a last shower of fresh zest. That first bite—tender, gooey, creamy, tangy—will have you hooked.
Secrets for Soft, Fluffy Lemon Rolls
If you want those bakery-style lemon rolls with light, airy crumb and a gooey center, here are a few tips you won’t want to skip:
Let the dough be a little sticky at first—resist the urge to add too much extra flour. The dough should be tacky, not dry, and will smooth out as it rests.
Pay attention to the temperature of your liquids. If your buttermilk and butter mixture is too hot, it’ll zap the yeast before it gets a chance to work. Warm is great; hot is not.
When you roll out the dough, keep it even—not too thin. An uneven roll means some spirals will bake up dry while others are undercooked.
Dental floss might sound wild, but it’s genuinely the best tool for slick, clean slices. A knife can sometimes pinch the spirals closed, but floss slices right through, keeping those layers beautiful.
Don’t overbake! Pull the lemon rolls when they’re just golden on top and still a little soft in the middle—they’ll finish cooking as they cool, and you’ll get that signature plush texture.
If you have leftovers (not likely, but it happens), tuck them into an airtight container. A quick warm-up in the microwave returns them to their fresh-out-of-the-oven magic.
Creative Ways to Serve Lemon Rolls
Lemon rolls are so versatile they’re almost a meal by themselves, but here are a few ideas for taking them over the top:
- Pile them on a breakfast platter beside fresh berries and a bowl of Greek yogurt for dipping the warm, sticky spirals.
- For a citrus overload, serve with a pitcher of homemade lemonade or a zesty orange mimosa.
- Switch out the poppy seeds for a swirl of raspberry or blueberry jam in the filling. The color and flavor add a new twist.
- Top each roll with a scoop of vanilla ice cream for dessert—trust me, when the rolls are still a little warm, it’s pure decadence.
- For brunch, serve them alongside fluffy scrambled eggs or crisp bacon, so you get a little sweet and savory in every bite.
- Hosting a holiday or baby shower? Frost with a thicker cream cheese icing and sprinkle with candied lemon peel.
You can even prep these lemon rolls the night before and let them take a cold rise in the fridge. In the morning, just bring them to room temperature, give them a quick rise, and bake—you’ll have bakery-worthy brunch with no scrambling.
FAQs about Lemon Rolls
Can I make lemon rolls ahead of time?
Absolutely! You can assemble the lemon rolls up to the slicing step the night before. Place them in the pan, cover tightly, and let them rise in the fridge overnight. In the morning, allow them to come to room temperature before baking for the best texture.
What’s the best way to store leftover lemon rolls?
Once cooled, store your lemon rolls in an airtight container at room temperature for a couple of days, or in the fridge if you want them to last longer. They stay soft for several days and reheat beautifully in the microwave for that warm, just-baked feel.
Can I freeze lemon rolls after baking?
Definitely—you can freeze baked, unfrosted lemon rolls wrapped tightly. When you’re ready to eat them, thaw right on the counter, then rewarm in the oven or microwave and add the icing just before serving. This makes them a handy treat to have on standby!
Do I have to use buttermilk in this lemon rolls recipe?
Buttermilk gives the dough its extra-soft texture and subtle tang, but if you don’t have any, you can use regular milk with a splash of lemon juice in a pinch. The rolls will still be soft and delicious, just with a milder tang.
When summer’s calling and you want something extra special for the breakfast table, these lemon rolls really deliver. They come out of the oven soft and pillowy, with that irresistible citrus zing soaking every swirl. Between the silky lemon icing and those gooey centers, each bite feels like the happiest kind of indulgence. Brew a big pot of coffee, slice up some fresh fruit, and enjoy these rolls while they’re still warm—the perfect bright spot in any morning.
More Delicious Recipes
- Irish Scones: These buttery scones are a delightful treat for brunch, similar in comfort to lemon rolls.
- Cheese Danish: This sweet pastry is perfect for brunch, offering a lovely creamy filling that pairs well with zesty flavors.
- Baked Oatmeal Bars: A great option for a healthy brunch that can be made ahead, just like your lemon rolls.
Lemon Rolls
Equipment
- Stand Mixer w/ Dough Hook or Danish Dough Whisk
- Ruler
- Dental Floss
- 9 x13-inch Pan
- Parchment paper
Ingredients
Ingredients
- 4 1/4 cups all-purpose flour + addition flour added later in the process (530g)
- 4 1/2 tsp instant dry yeast (14g, 1/2 oz.)
- 1 Tbsp + 1 tsp poppy seeds - optional
- 1 tsp fine salt (6g)
- 1 cup buttermilk , room temperature (240g)
- 1/2 cup granulated sugar (100g)
- 1/2 cup unsalted butter , room temperature (113g)
- 2 large eggs , room temperature (112g)
- 2 Tbsp fresh lemon zest , or the zest of 2 large lemons (6g)
- 1/2 cup packed light brown sugar (100g)
- 2 cups powdered sugar (250g)
- 1/4 cup fresh lemon juice (60g)
- 2 Tbsp unsalted butter , melted (28g)
- Fresh Lemon Zest
Instructions
Instructions
- Preheat your oven to 200 F / 95 C. In a large bowl or the bowl of a stand mixer, combine 4 1/4 cups flour, 4 1/2 tsp or 2 packets of instant dry yeast, 1 Tbsp + 1 tsp poppy seeds, and 1 tsp salt.
- In a separate bowl, combine 1 cup buttermilk, 1/2 cup granulated sugar, and 1/2 cup butter (cut into Tbsp-sized pieces). Heat for 1 minute in the microwave, then stir to combine the ingredients. The butter should be mostly melted, and the mixture should feel warm but not hot to the touch. If it's too hot, it can kill the yeast!
- Slowly pour the warm buttermilk mixture into the dry ingredients and mix on medium speed with a dough hook or by hand with a dough whisk. If you don't have a dough whisk, you can use a large wooden spoon. The dough should be quite sticky at this point.
- Mix in 2 large eggs, one at a time, on a medium-low speed until a sticky dough ball forms. It will take a while for each egg to get incorporated, but keep mixing until they are fully combined. Then continue to mix on a medium-low speed for a couple of minutes until the dough becomes more elastic. Once combined, mix in the zest of 2 large lemons on a medium speed until incorporated.
- As the dough mixes, add additional flour 1 Tbsp at a time until the dough begins to leave the sides of the bowl. I usually add about 3 additional Tbsps of flour. My favorite way to know if my dough is ready is to poke it with my finger. It should feel tacky but not sticky. As you pull your finger away, there should be no residue on your finger.
- Cover the bowl with plastic wrap or a towel and set aside to let the dough rest for 10-20 minutes. This will make it easier to roll out.
- As the dough rests, make the lemon roll filling. In a medium-sized bowl, add 1/2 cup granulated sugar, 1/2 cup light brown sugar, and the zest of 2 large lemons. Massage the zest into the sugar with your fingertips to help release the oil from the zest. The mixture should be aromatic as you do this.
- Add 1/2 cup softened butter (the butter should be soft to the touch, and almost a bit melted) to the mixture. Whisk until combined, then set aside.
- Once the dough has rested, place it on a lightly floured surface and roll it into a large rectangle that's roughly 12 in x 18 in. It should be about 1/2 cm thick.
- Spread the lemon roll filling over the dough, leaving 1/2 inch of dough on the long side of the rectangle uncovered (this will help you seal off the roll and keep it tight).
- Then roll the dough horizontally, toward the uncovered strip and cut 12 equal pieces using dental floss. Place the rolls in a greased or lined 9x13-inch pan.
- Turn the oven off! I REPEAT, TURN THE OVEN OFF. Then cover the lemon rolls with foil and place them in the oven for about 30 minutes to give them an assisted rise. They should look puffier and have grown in size once they've risen.
- Remove them from the oven and take off the tinfoil. Turn the oven back on and heat it to 350 F / 175 C.
- Once the oven is preheated, bake the lemon rolls for 28-32 minutes or until the rolls are golden brown.
- The last step is to make the icing! Whisk 2 cups of powdered sugar, 1/4 cup of fresh lemon juice, and 2 Tbsp melted butter until combined.
- Let the rolls cool for 10-20 minutes, then spoon the icing over the rolls and top with fresh lemon zest.