If you’ve ever been caught with a pie craving but zero patience for complicated bakes, you know exactly where I was last autumn. A pile of glossy apples on the kitchen counter, those unmistakable sweet-spicy scents in the air—and baking just felt like too much work. That’s how this Stovetop Apple Pie Filling with Brown Sugar became my go-to for cozy, caramel-kissed desserts without the hours in the kitchen.
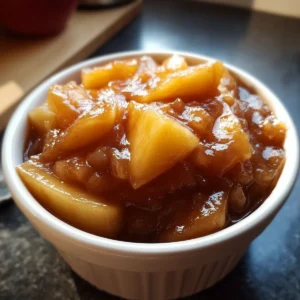
This filling is velvety, rich, and exactly what your apple pie dreams are made of. Forget bland, gluey store versions—this one bubbles away on the stove, turning apples into a thick, jammy, spiced mixture that’s perfect for pies, crisps, or spooning straight over vanilla ice cream. The hint of brown sugar in every bite makes all the difference.

Why This Stovetop Apple Pie Filling Stands Out
Ever had an apple pie filling that was somehow both bland and cloying—too soft in some places, too dry in others? This stovetop version rewrites the rules. The fruit stays tender with a little bite, the sauce is glossy and perfectly thickened, and you get deep, old-fashioned flavor without hovering next to the oven for an hour.
What I love most is how easily you can tweak the spices or sugar to fit your mood. This recipe is a quick fix for last-minute desserts or surprise guests. It’s also a life-saver for those of us who want all the pie filling drama but none of the fuss.
No more soggy bottoms, bland apples, or running out of filling halfway through—just delicious aroma, spoonful after spoonful.
Build Your Own Pot of Pie Filling Bliss
Ready to gather your ingredients for the ultimate stovetop apple pie filling? Let’s break down what makes each piece of the puzzle sing:
- Apples (Granny Smith or Honeycrisp): The backbone—firm, tangy, and never mushy. Pick a variety that holds up to heat.
- brown sugar: Adds depth and caramel notes for that old-school, comforting flavor.
- Granulated sugar: Rounds out the sweetness and makes the syrup glossy.
- Cornstarch: The secret for that luscious, perfectly silky texture—goodbye watery filling!
- Lemon juice: A pop of brightness that keeps things fresh, balancing all the richness.
- Cinnamon: For warmth and that unmistakable apple pie aroma.
- Nutmeg: Just a whisper for complexity and gentle spice.
- Allspice: Another layer of cozy, autumnal intrigue.
- Salt: Every dessert needs a hint to let the other flavors pop.
- Water: Helps everything melt and meld together.
- Unsalted butter: Swirled in at the end for shine, smoothness, and a little extra luxury.
See the recipe card below for the full list of ingredients and measurements.
Make It Your Own: Simple Ingredient Swaps
Out of Honeycrisp? Use Fuji, Braeburn, or Jonagold—just pick something crisp. If you need a dairy-free version, a knob of coconut oil works instead of butter (or just leave it out). No cornstarch? Arrowroot powder gives you a nearly identical texture.
For a new twist on apple pie filling with brown sugar, try swapping half the apples for pears or adding a big splash of vanilla extract at the finish. You can also sub in maple syrup for part of the brown sugar for a more woodsy, complex sweetness.
How to Make Stovetop Apple Pie Filling With Brown Sugar
This method is all about big flavor for minimal effort, and you only need one pot. Here’s how it comes together:
- Toss your sliced apples into a large, heavy-bottomed saucepan. Scatter in the brown sugar, granulated sugar, cornstarch, lemon juice, cinnamon, nutmeg, allspice, and a pinch of salt. Use your hands or a big spoon to gently turn everything, making sure those apple slices get evenly coated in all the sugar and spice—watch for the apples starting to glisten.
- Pour in just enough water to help things along. Stir again so that nothing sticks to the bottom, and so all the dry bits are moistened.
- Set the pan over medium heat. As things warm, keep stirring often. You’ll see the mixture loosen, then quickly start to bubble as the apples release their juices and the sauce thickens. The aroma is dreamy—lots of cinnamon and sweet apple steam.
- When the juices turn silky and start to cling to the apples, drop the heat to low. Add the butter, and stir until it disappears, making the filling shiny and extra smooth. The apples should still hold their shape but feel yielding when pressed with a spoon.
- Take the pan off the heat. The filling will thicken even more as it cools—don’t worry if it seems slightly runny when you stop, it’ll set up perfectly as it sits.
- Spoon the filling into your favorite pie crust, crisp topping, or let it cool for storing. It keeps well, so you can make it ahead with zero stress.
Kitchen Tips for Gorgeous Apple Filling
Don’t rush the bubbling stage—a little patience lets the apples soften without turning mushy, and the sauce needs time to thicken properly. Stir often to prevent sticking, especially right at the start.
For bigger flavor, use a mix of tart and sweet apples. That contrast really makes each bite pop. If you want a chunkier filling, slice apples a bit thicker; for a softer, spoonable filling, go thinner.
Storing leftovers? Let the filling cool completely, then pack into airtight jars or containers. You can keep it chilled for a few days, and it reheats well—just use gentle heat on the stove and splash in a little water if it’s too thick.
Pairings and Variations: Endless Cozy Options
This stovetop apple pie filling has so many uses your kitchen might never be the same. Spoon it into a baked pie shell for a classic finish, layer it under a crisp oat topping, or swirl over pancakes and waffles on lazy weekend mornings.
Pair with sharp cheddar cheese for a sweet-salty snack, or dollop warm filling over yogurt and granola for an autumn breakfast. Feeling adventurous? Use it in hand pies, fold into turnovers, or spoon over shortcakes with whipped cream.
Want to make it ahead? Absolutely—this filling freezes beautifully. Cool it completely first, store in a freezer-safe bag, and thaw in the fridge overnight before using. That’s cozy fall baking, solved.
FAQs about Stovetop Apple Pie Filling with Brown Sugar
Can I use any type of apple for this stovetop filling?
Yes, you can use most firm apple varieties, but Granny Smith, Honeycrisp, or Fuji work best. They keep their texture and create a nice sweet-tart balance. Avoid mealy apples like Red Delicious for better results.
How long will homemade apple pie filling keep in the fridge?
You can store homemade filling in an airtight container in the fridge for several days. The flavor actually deepens as it sits, making leftovers even tastier.
Can I freeze this stovetop apple pie filling?
Absolutely, the filling freezes well once cooled. Just store in a freezer bag or container, and thaw gently before using for pies, crisps, or dessert toppings.
My filling turned out too thick/thin. How do I fix it?
If it’s too thick, stir in a splash of water while it’s reheating. For a thin filling, cook a bit longer or add a tiny spoonful of cornstarch mixed with cold water.
Final Thoughts on Stovetop Apple Pie Filling with Brown Sugar
There’s just something unbeatable about having a jar of homemade stovetop apple pie filling with brown sugar in your fridge—ready to heap into pies, crisps, or even over breakfast toast. It’s simple, deeply flavorful, and makes weeknights or special occasions a little sweeter.
Give this method a try and you’ll probably find yourself skipping the cans for good. Cozy, caramel-rich apple pie flavor is only a pan away.
More Delicious Recipes
- Dutch Apple Crumble Pie: This pie combines the same delightful apple flavors with a crisp topping, perfect for fall desserts.
- Pecan Pie: A classic autumn dessert that offers a sweet contrast to the apple filling, adding richness to your holiday table.
- Bourbon Pecan Pie: This variation brings a warm, nutty flavor that’s ideal for cozy gatherings and pairs well with the apple pie theme.
The Best Easy Stovetop Apple Pie Filling with Brown Sugar
Equipment
- large saucepan
Ingredients
Ingredients
- 6 large apples (like Granny Smith or Honeycrisp), peeled, cored, and sliced 1/4-inch thick
- 3/4 cup packed light brown sugar
- 1/4 cup granulated sugar
- 1/4 cup cornstarch
- 1 tablespoon lemon juice
- 1 teaspoon ground cinnamon
- 1/4 teaspoon ground nutmeg
- 1/8 teaspoon ground allspice
- 1/4 teaspoon salt
- 3/4 cup water
- 2 tablespoons unsalted butter
Instructions
Instructions
- Combine the sliced apples, brown sugar, granulated sugar, cornstarch, lemon juice, cinnamon, nutmeg, allspice, and salt in a large saucepan. Toss gently to coat the apples evenly.
- Add the water to the saucepan.
- Place the saucepan over medium heat. Cook, stirring frequently, until the mixture thickens and begins to bubble. This usually takes about 10 minutes.
- Once the mixture is thick and glossy, reduce the heat to low. Stir in the butter until it melts completely.
- Remove the filling from the heat. The filling will thicken more as it cools.
- Use immediately in your favorite pie crust or allow it to cool completely before storing.