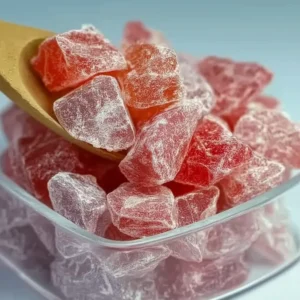
If you’ve ever found yourself standing in an old-time candy shop, wide-eyed at the sparkling trays of jewel-colored treats, you’ll know exactly what draws people to Old Fashioned Rock Candy. Maybe it takes you back to childhood holidays, pocketing a bag of crunchy crystals from the local fair. Or maybe you’re just looking for a sweet project that’s every bit as eye-catching as it is simple to make at home. Whatever your reason, making rock candy brings a dose of nostalgia—and a whole lot of colorful fun—right to your own kitchen.
As the sugar syrup bubbles on the stove and food coloring swirls into new, dazzling shades, you’ll get all those sweet-shop aromas wafting through your home. There’s something magical (and just a little rebellious) about breaking the finished candy into jagged chunks, dusting them with sugar, and stashing them away for sharing…or for secret nibbling with your afternoon coffee.

Why Old Fashioned Rock Candy Is Always Worth Making
Old Fashioned Rock Candy is one of those playful, hands-on recipes that turns your kitchen into a mini science lab—with a sweet payoff. Kids love seeing the alchemy as a basic syrup transforms into crunchy crystals, and adults are just as likely to sneak a piece (or three) when no one’s looking. It’s budget-friendly, wonderfully customizable, and a guaranteed crowd-pleaser at birthday parties or holiday gatherings.
The best part? Unlike fancier desserts, this candy isn’t about flawless technique, but enjoying the process—and licking sticky fingers when the job’s done. Whether you want to gift a bag or just relive those old candy-shop memories, rock candy always delivers a little feast for the eyes and a big hit of sugar satisfaction.
The Sweet Ingredients Behind Old Fashioned Rock Candy
Let’s talk about what actually goes into this show-stopping treat. Just a handful of pantry basics, plus optional flavor and color for fun.
- Sugar – The true star of the show, letting the crystals form those classic crunchy shards. Granulated works best.
- Light corn syrup – Helps prevent unwanted crystallization, so your rock candy turns out clear and glassy instead of gritty.
- Water – Acts as the dissolving medium to turn all that sugar into a thick, pourable syrup.
- Food coloring – Add a few drops for the classic eye-catching shades; you can go bold, pastel, or custom-mix your favorites.
- Flavored extract or oil – Watermelon is a winner, but you can try any flavor you love, from lemon to cinnamon.
- Confectioners’ sugar – Dusted over the cooled candy, it keeps pieces from sticking and adds that perfect soft finish.
See the recipe card below for the full list of ingredients and measurements.
How to Craft Old Fashioned Rock Candy Step by Step
Making old fashioned rock candy is a surprisingly hands-on, sensory experience—lots of bubbling, swirling, pouring, and (eventually) smashing. Here’s how it goes, from messy syrup to beautiful crystals:
- Start by greasing a couple of shallow pans (think baking sheets with sides). You want the candy to release easily once it sets, so don’t skimp on that swipe of oil or nonstick spray.
- Pour granulated sugar, light corn syrup, and water into a large, heavy saucepan. Turn on the heat, then give things a gentle stir until the sugar is fully dissolved and the mixture looks clear and smooth.
- Add your food coloring now if you crave bright color—just a drop or two goes a long way! As everything warms up and starts to bubble, you’ll see it turn glossy and thick.
- Once the syrup boils, stop stirring. Let it cook on its own, keeping a close eye on your candy thermometer. You want to reach a hard crack stage, which is when the syrup is hot enough to turn into glassy, snap-able candy as soon as it cools.
- As soon as you hit the magic temperature, carefully remove the pan from the heat. Now’s when you add your watermelon extract or other favorite flavorings—watch for a little burst of steam and aroma!
- Pour the hot syrup right away into your prepared pans. Don’t worry if it spreads in unexpected ways; just work fast and pour as evenly as you can.
- Let the syrup cool down completely in the pan. Once it’s solidified, dust the top with confectioners’ sugar—this helps keep the pieces from sticking together later.
- Now for the fun: use a mallet, the back of a heavy spoon, or even your hands (with care) to break the sheet of candy into jagged, irregular pieces. The sound is wildly satisfying.
- Pack up the shards in airtight containers once fully cool and dusted, and store them somewhere dry. Share, display, or hide them for yourself—no judgment here.
Rock Candy Success Secrets and Troubleshooting
After a few batches of Old Fashioned Rock Candy, you pick up tricks that keep the process fun (and your candy looking gorgeous). First, be patient with dissolving the sugar—if you rush it, you risk gritty syrup instead of clear, perfect crystals. Once your syrup starts to boil, hands off! Stirring after this point can cause unwanted crystallization on the side of your pan.
A sturdy candy thermometer is your best friend when chasing that crackly, breakable candy texture. If you don’t heat the syrup enough, the candy will be sticky and hard to break. Go just a bit over and you may get a slightly darker color, but nothing disastrous. For super smooth rock candy, make sure to dust each piece with confectioners’ sugar so they don’t stick together in storage.
If your candy seizes or turns cloudy, a tiny bit of corn syrup added early will usually rescue it in the next attempt. And on sticky days, use extra powdered sugar before packing pieces away. This treat is pretty forgiving—don’t stress about cracks or odd shapes. That’s all part of the old fashioned charm.
Endless Ways to Serve and Tweak Old Fashioned Rock Candy
Rock candy isn’t just for eating straight out of the jar—though no one will blame you for that approach. Want to jazz up the classic? Try mixing up food coloring for rainbow batches or swirling two colors together for a marbled effect. Changing the extract can give you a whole new flavor lineup: think peppermint for winter, citrus for summer parties, or classic vanilla for a gentle sweetness.
Crystal shards look beautiful in glass jars tied with ribbon, making perfect party favors or holiday gifts. Drop a piece into a cup of hot tea or lemonade for a bit of color and sweet flavor; they dissolve slowly and taste amazing. If you’re feeling whimsical, use pieces as edible decor for cakes or cupcakes—kids adore it. You can even make themed colors for birthday parties or match your holiday palette.
Planning ahead? Rock candy keeps well in airtight containers for weeks. It’s sturdy enough to make ahead for parties and is a hit on dessert buffets. However you serve them, these shiny crystals bring just the right amount of nostalgia and a whole lot of fun.
FAQs about Old Fashioned Rock Candy
How do I store Old Fashioned Rock Candy so it stays crunchy?
Keep your rock candy in an airtight container at room temperature and away from humidity. A sprinkle of extra confectioners’ sugar between layers helps prevent sticking. It’ll easily last several weeks if stored right.
Can I substitute honey or maple syrup for the corn syrup?
It’s best to stick with light corn syrup for classic rock candy, since it prevents premature crystallization and keeps the texture clear. Other syrups, like honey or maple, can add different flavors but might make the candy grainy or cloudy.
Why isn’t my Old Fashioned Rock Candy hardening or breaking easily?
If your candy ends up sticky or soft, it probably didn’t reach the correct temperature on the stove. Make sure you heat the syrup all the way to hard crack stage and let it cool thoroughly before breaking.
Is Old Fashioned Rock Candy freezer friendly?
Freezing isn’t recommended; moisture from thawing can make the crystals dissolve or clump together. Instead, stick to a dry, well-sealed container at room temperature for the best results.
Few treats turn an ordinary afternoon into something magical quite like Old Fashioned Rock Candy. The vivid colors, the sharp crack as you break the cooled candy, and that first taste of pure, sweet crunch—these are the things that make homemade candy-making so rewarding. Next time you need a crowd-pleasing gift or just a little trip down memory lane, let a jar of these glittering crystals bring a touch of sugar-shop wonder into your day.
More Tasty Ideas
- Butter Mints: These sweet, colorful mints will perfectly complement your homemade rock candy for an eye-catching treat display.
- Lemon Truffles: Sweet and tangy, these truffles are delightful goodies that pair wonderfully with the nostalgic flavors of rock candy.
- No-Bake Oreo Cheesecake Bites: A fun, crowd-pleasing dessert that adds variety and richness to your sweet offerings alongside rock candy.
Old Fashioned Rock Candy Recipe
Equipment
- heavy saucepan
- Baking sheets
Ingredients
Ingredients
- 3-3/4 cups Sugar
- 1-1/2 cups Light corn syrup
- 1 cup Water
- Red food colouring or colour of your choice (2 to 3 drops)
- 1/4 teaspoon Watermelon flavouring or flavouring of your choice
- 1/2 cup Confectioners' sugar
Instructions
Instructions
- Greased 2 (15x10x1-in)pans. Palace aside.
- Combine the sugar, water, corn syrup and food colouring In a large heavy saucepan. Cook over medium heat until sugar is dissolved.
- When it boils. Keep cooking it without stirring until a candy thermometer shows 300°.
- Take the mixture off the heat and add the flavouring. Quickly pour it into the pans you prepared earlier and let it cool.
- Sprinkle some confectioners' sugar on top and then break it into pieces. Keep the candy in airtight containers for storage.