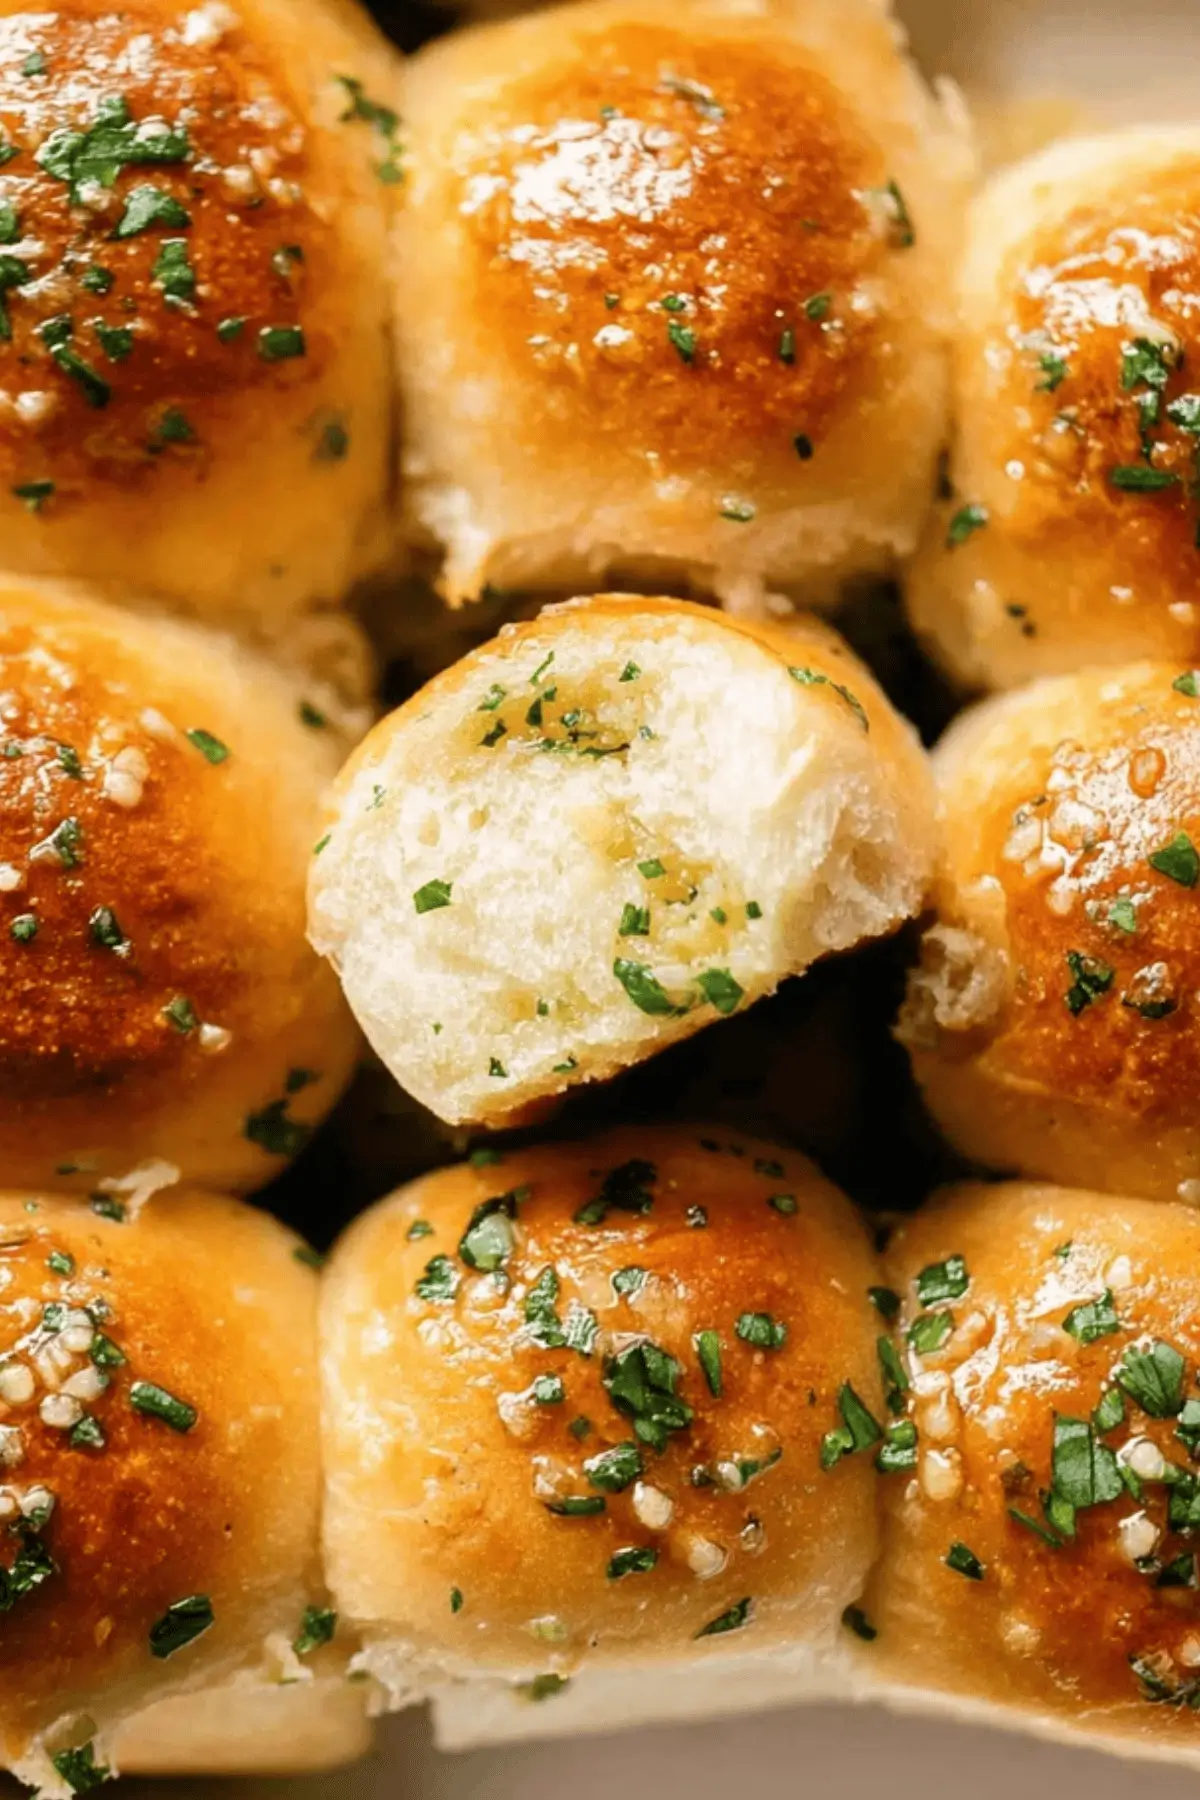
There’s a moment that happens when you’re in the kitchen and the scent of warm garlic butter hits the air. It’s subtle at first—then it wraps around you like a cozy blanket. If you’ve ever torn into a soft, golden roll with buttery garlic seeping into each fluffy layer, you already know the power of garlic bread rolls. They’re not just food; they’re a feeling. Whether you’re planning a holiday feast, an intimate dinner, or just need something to round out your weekday meal, these rolls deserve a place on your table. And the best part? You can make them entirely from scratch with ingredients you probably already have on hand.
Unlike store-bought versions that often fall short on flavor and texture, this homemade garlic bread roll recipe delivers everything you’re craving: pillowy softness, rich buttery garlic flavor, and just the right touch of fresh herbs. Let’s dive into how you can create these irresistible rolls right in your own kitchen.

Table of Contents
Why You’ll Love These Garlic Bread Rolls
You don’t have to be a seasoned baker to pull these off. These garlic bread rolls are designed with simplicity in mind, while still packing an impressive punch of flavor. Here’s why they’ll become a staple in your kitchen:
- Soft and fluffy texture: Perfected through two rises and a gentle kneading process.
- Infused with real garlic butter: No artificial flavors, just real ingredients.
- Flexible for any occasion: Whether it’s Thanksgiving, a dinner party, or Sunday supper.
- Freezer-friendly: Make ahead and enjoy later without losing quality.
- Beginner-friendly instructions: You don’t need a stand mixer or fancy tools.
Ingredients You’ll Need
For the Dough:
- 1 cup whole milk (warmed to 90–100°F)
- 2 tablespoons granulated sugar
- 2 ¼ teaspoons instant yeast (1 packet)
- 3 cups bread flour
- 4 tablespoons unsalted butter, softened
- 1 large egg, room temperature
- 1 ½ teaspoons kosher salt
For the Garlic Herb Butter:
- 4 tablespoons unsalted butter, melted
- 2 cloves garlic, minced
- 1 tablespoon fresh parsley, finely chopped
- Salt to taste
Tip: If you only have all-purpose flour, you can use it, but bread flour gives the rolls their signature chew and rise.
Step-by-Step Instructions
1. Make the Dough
Start by warming your milk. It should be warm to the touch but not hot—between 90–100°F is ideal. Combine the milk, sugar, and yeast in a mixing bowl. Let it sit for about 5–10 minutes until it starts to foam. This tells you your yeast is alive and ready.
Add the flour, softened butter, egg, and salt to the yeast mixture. Mix with a wooden spoon or dough hook attachment if using a stand mixer. Knead the dough for 8–10 minutes by hand, or 5–6 minutes in a mixer, until it becomes smooth and elastic.
Place the dough in a lightly greased bowl and cover it with plastic wrap or a clean towel. Let it rise in a warm place for 1 to 1.5 hours or until doubled in size.
2. Shape the Rolls
Once your dough has doubled, punch it down gently and turn it out onto a lightly floured surface. Divide the dough into 12 equal pieces. You can use a kitchen scale to be precise, but eyeballing it works fine too.
Roll each piece into a ball by cupping it under your palm and rolling in a circular motion. Arrange the rolls in a greased 9×13-inch baking dish, leaving some space between each for rising.
3. Let Them Rise Again
Cover the dish and let the rolls rise for another 45–60 minutes. They should become puffy and nearly double in size.
4. Bake the Rolls
Preheat your oven to 375°F (190°C). Once the rolls have risen, bake them for 18–22 minutes or until the tops are golden brown. Keep a close eye on them during the last few minutes to avoid over-baking.
5. Brush with Garlic Butter
While the rolls are baking, combine the melted butter, minced garlic, parsley, and a pinch of salt in a small bowl. As soon as the rolls come out of the oven, brush them generously with the garlic herb butter. Let the butter soak in—this is where the magic happens.
Baking Tips for Perfect Rolls
Getting the best results isn’t just about following instructions—it’s about understanding the why behind each step. Here’s how to ensure bakery-level rolls every time:
- Use warm—not hot—milk: Hot milk can kill your yeast, while cold milk won’t activate it properly.
- Don’t skip the second rise: This extra proof gives the rolls their airy texture.
- Weigh your flour: If you have a kitchen scale, use it. Measuring by weight is more accurate than by volume.
- Use room-temperature ingredients: They incorporate better into the dough.
Garlic Bread Roll Variations
Want to switch things up? Try these tasty customizations:
- Cheesy Garlic Rolls: Add a cube of mozzarella or cheddar to the center of each roll before shaping.
- Roasted Garlic: Replace fresh garlic with roasted garlic for a sweeter, more mellow flavor.
- Herb Blend: Mix rosemary, oregano, or thyme into your butter for a different herb profile.
- Spicy Kick: Add a pinch of red pepper flakes to the garlic butter for heat.
How to Store and Reheat
One of the best things about these rolls is that they’re just as good the next day—or even after a freeze.
Storage:
Store leftover rolls in an airtight container at room temperature for up to 2 days. If you’re planning to keep them longer, freeze them.
Freezing:
Freeze baked rolls in a zip-top freezer bag for up to 1 month. When ready to use, let them thaw at room temperature, then reheat.
Reheating:
- Oven: Wrap rolls in foil and heat at 300°F (150°C) for 7–10 minutes.
- Microwave: Wrap in a damp paper towel and microwave for 15–20 seconds.
Nutritional Information (Per Roll)
- Serving Size: 1 roll
- Calories: 210
- Sugar: 2g
- Sodium: 170mg
- Fat: 9g
- Saturated Fat: 5g
- Unsaturated Fat: 3g
- Trans Fat: 0g
- Carbohydrates: 28g
- Fiber: 1g
- Protein: 4g
- Cholesterol: 25mg
Frequently Asked Questions About Garlic Bread Rolls
Can I prepare garlic bread rolls ahead of time?
Absolutely. After the first rise, shape the dough into rolls and refrigerate overnight. The next day, let them come to room temperature and finish the second rise before baking.
Can I substitute all-purpose flour for bread flour?
Yes, you can. The rolls will still turn out delicious, but they may be slightly less chewy and not rise as high. Bread flour contains more protein, which helps with structure.
How do I make vegan garlic bread rolls?
Use a plant-based milk (like oat or almond), vegan butter, and replace the egg with a flax egg (1 tablespoon ground flaxseed + 3 tablespoons water). Be sure your sugar is vegan as well.
Conclusion
Garlic bread rolls aren’t just a side—they’re the kind of dish that makes a meal feel whole. The way the dough rises to meet the warmth of your oven, how the garlic butter seeps into every crevice, and the moment you tear into that first roll—these are the small joys that turn cooking into something more.
Now that you have everything you need, it’s your turn to bring these homemade garlic bread rolls to life in your own kitchen. Don’t be surprised if they become the most requested item at every dinner. Try them once, and you’ll find yourself reaching for this recipe again and again.
More Tasty Ideas
- Cheesy Garlic Bread: If you loved the flavor of garlic bread rolls, this recipe takes it up a notch with gooey melted cheese on a crispy, buttery loaf. It’s perfect as a side for pasta or soups and delivers a bold garlic flavor that’s hard to resist.
- Crusty Italian Bread: This rustic Italian loaf boasts a crispy crust and tender inside, ideal for those who enjoy artisan-style breads. It’s a great base for garlic butter spreads or dipping in olive oil and balsamic vinegar.
- Tandoori Chicken Garlic Bread: A flavorful fusion recipe combining the rich taste of garlic bread with spicy tandoori chicken. It’s a savory, satisfying twist on traditional garlic rolls, perfect for adventurous eaters.
Garlic Bread Rolls

Garlic bread rolls are soft, fluffy dinner rolls brushed with rich garlic herb butter. They are perfect as a side dish for any meal or holiday gathering.
- Prep Time: 150 minutes
- Cook Time: 22 minutes
- Total Time: 172 minutes
- Yield: 12 rolls
- Category: Side Dish
- Method: Baking
- Cuisine: American
- Diet: Vegetarian
Ingredients
- 1 cup whole milk (warmed to 90–100°F)
- 2 tablespoons granulated sugar
- 2 ¼ teaspoons instant yeast (1 packet)
- 3 cups bread flour
- 4 tablespoons unsalted butter, softened
- 1 large egg, room temperature
- 1 ½ teaspoons kosher salt
- 4 tablespoons unsalted butter, melted (for garlic butter)
- 2 cloves garlic, minced
- 1 tablespoon fresh parsley, finely chopped
- Salt to taste (for garlic butter)
Instructions
- Warm the milk to 90–100°F and combine with sugar and yeast. Let sit for 5–10 minutes until foamy.
- Add bread flour, softened butter, egg, and salt to the mixture and knead until smooth and elastic (8–10 minutes by hand or 5–6 minutes in a stand mixer).
- Place dough in a greased bowl, cover, and let rise in a warm place for 90 minutes until doubled in size.
- Punch down the dough, divide into 12 equal pieces, and roll each into a ball.
- Place rolls in a greased 9×13-inch baking dish, cover, and let rise again for 60 minutes until puffy.
- Preheat oven to 375°F and bake rolls for 22 minutes or until golden brown.
- Mix melted butter, minced garlic, parsley, and salt. Brush over warm rolls immediately after baking.
Notes
- For a cheesy variation, insert a cube of mozzarella or cheddar into each dough ball before baking.
- Roasted garlic can be used for a milder, sweeter flavor.
- Red pepper flakes can be added to the butter for a spicy twist.
- Store at room temperature for 2 days or freeze for up to 1 month.
- Reheat in the oven at 300°F for 7–10 minutes or microwave for 20 seconds wrapped in a damp towel.