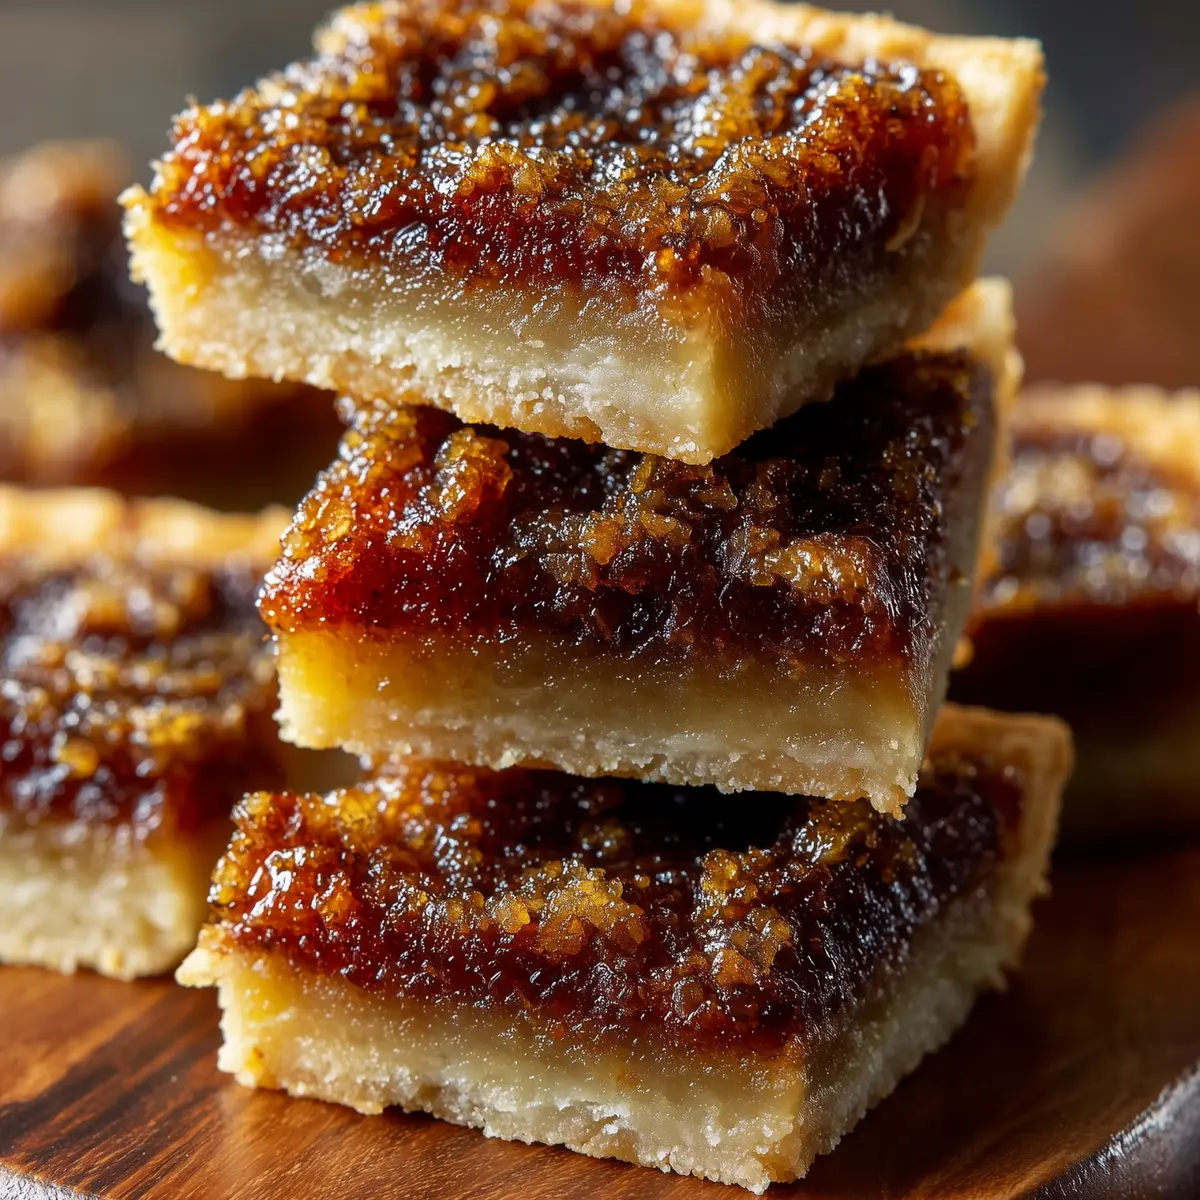
Some desserts just have a way of making an entire room pause—Canadian Butter Tart Squares are absolutely one of them. There’s something about the scent of buttery pastry and sweet, bubbling filling wafting from the oven that always gets my family lingering near the kitchen. Every time I pull out a pan, I’m reminded of cozy gatherings, sticky fingers, and those first perfect bites where the gooey center gives way to a tender, golden crust. These squares take everything beloved about classic Canadian butter tarts—the heritage, the nostalgia, the indulgent filling—and make it all easy to share.
What Makes These Canadian Butter Tart Squares So Irresistible
The secret to why these Canadian Butter Tart Squares never last long in my house is the balance of textures that keeps you coming back for one more bite. Imagine a base that’s almost shortbread-like—rich, buttery, and just sturdy enough to carry that signature, gooey filling. The filling itself is all velvety brown sugar, the hint of vanilla weaving through, and the option of toasted nuts for a little satisfying crunch.
I love how these bake up with just the slightest hint of caramelization at the edges, giving each piece its own unique chew. It’s a smart, shareable spin on the classic butter tart, so there’s no need to fuss with miniature pastry shells when you need something crowd-pleasing in a hurry. Every bite conjures a little of that classic Canadian nostalgia—a dessert that feels both homey and special, whether you’re offering them at a holiday table or sneaking a square with your afternoon coffee.
The Simple Ingredients That Bring These Squares to Life
- Flour – forms the backbone of the crust, lending the perfect structure and soft bite, and is perfectly suited to a tender, melt-in-your-mouth base.
- Granulated sugar – sweetens the crust just enough, balancing the buttery richness for that classic shortbread feel.
- Unsalted butter – you’ll use softened for the crust and melted for the filling, giving richness and helping everything set to the ideal texture.
- Brown sugar – brings deep notes of caramel and toffee to the gooey layer, making each bite taste cozy and utterly indulgent.
- Corn syrup – helps create that signature sticky, glossy filling and keeps the sweetness smooth without crystallizing.
- Eggs – bind the filling and help it set to the right consistency while baking, giving the squares their slightly custardy finish.
- Vanilla extract – adds aromatic warmth that lifts all the other flavors.
- Walnuts or pecans (optional) – tossed in for those who love a bit of nutty crunch, but feel free to leave them out for a classic version.
- Salt – just a touch, but it’s the subtle lift that makes all the flavors sing.
See the recipe card below for the full list of ingredients and measurements.
Bringing These Canadian Butter Tart Squares Together Step by Step
Baking a pan of Canadian Butter Tart Squares is surprisingly straightforward—no pastry rolling, no fiddly tart shells—just a series of easy steps that lead to a batch of pure comfort.
- Start by preheating your oven and lining a square baking pan with parchment, remembering to leave some overhang so you’ll be able to lift the squares out in one fell swoop.
- In a mixing bowl, combine the dry ingredients for the crust. Rub in the softened butter with your fingertips (or a pastry cutter, if you prefer) until you’re left with a crumbly, slightly sandy mixture. Press this firmly into the bottom of your prepared pan, making sure it’s even right to the corners.
- Bake the crust until just golden—it should smell toasty and look ever so lightly colored, like the top of a perfectly baked cookie.
- While the base is in the oven, whisk together everything for the filling: brown sugar, corn syrup, melted butter, eggs, vanilla, and salt. If you’re using nuts, stir them in now for an added layer of texture and flavor.
- Once the crust emerges piping hot, pour that glossy, fragrant filling straight over. There’s a little sizzle as it hits the pan—always a good sign.
- Return the pan to the oven and bake until the top is set and you see a soft, gentle bubbling around the edges. The center should have a slight jiggle but not look wet.
- Let the pan cool completely on a rack before slicing. (This is the hardest part—warm squares will fall apart, so patience truly pays off.) Once cool, use the parchment to lift out the slab, cut into neat squares, and try not to eat the entire row before serving!
Getting That Gooey Filling and Flaky Crust Just Right
There’s a fine line between perfectly set and slightly underdone for butter tart squares, and nailing that texture is the real magic. Watch for the edges to become deeply golden and the center to bubble just a little as it finishes. If you’re after that classic gooey texture, take care not to overbake. The filling will firm up as it cools, so pull the pan when things are just set and still have a bit of a wobble.
Don’t forget, pressing the crust in evenly means every bite gets that buttery bottom without being too thick or dry. I’ve found the best results come from letting the entire pan cool right down—room temperature is best for easily slicing tidy, tempting squares. A sharp, slightly damp knife can help keep those edges crisp and clean.
Tips, Serving Ideas, and Shortcuts for Butter Tart Squares
Butter tart squares are versatile little treats that fit just about any occasion. Here are a few practical tips and ideas to get the most out of every batch:
- If you like a little chew, try adding chopped pecans or walnuts to the filling for a nutty texture that pairs perfectly with the sticky, sweet center.
- Lining the pan well with parchment isn’t just about easy cleanup—it also helps you get those beautiful, bakery-style squares without any crumbling edges.
- Store any leftover squares in an airtight container at room temperature for a couple of days, or in the fridge for a longer shelf life. They’ll stay chewy and rich.
- These squares also freeze beautifully—just layer with parchment in a container and thaw at room temperature before serving.
- For serving, keep things simple: a dusting of powdered sugar, a scoop of vanilla ice cream, or even a drizzle of caramel can elevate them for special occasions.
- If you want a firmer square (great for picnics or lunchboxes), let them chill in the fridge before cutting and serving.
FAQs about Canadian Butter Tart Squares
Can I make Canadian Butter Tart Squares without nuts?
Absolutely! The nuts are completely optional—leaving them out will keep the squares more traditional and let the gooey filling center stage. The texture will be ultra-smooth and luxurious, just like classic butter tarts.
What’s the best way to store leftover Canadian Butter Tart Squares?
Keep any leftover squares in an airtight container either at room temperature for two to three days, or refrigerated for up to a week. They’ll stay fresh and the crust won’t get soggy. For longer storage, freezing works well.
Can these butter tart squares be frozen?
Yes, these bars freeze really well. Stack them between layers of parchment in a container and freeze for up to three months. Thaw at room temperature and they’ll taste just as chewy and delicious as the day you made them.
Is there a substitute for corn syrup in this recipe?
If you don’t have corn syrup, you can try using golden syrup or a mild honey for a slightly different flavor. The texture will be a bit less gooey, but the squares will still be sweet and satisfying.
Can I make Canadian Butter Tart Squares in advance for parties?
Definitely. These squares actually improve as they sit, so making them a day ahead can deepen the flavor and make slicing easier. Just store in the fridge and bring to room temperature before serving for maximum enjoyment.
A tray of Canadian Butter Tart Squares is just the thing for sharing—a slice of nostalgia with a sweet, sticky center and a buttery base you’ll want to savor. When you take that first bite, with that golden crust and caramel-rich filling, you’ll get why these are such a beloved Canadian treat. Make a batch, brew a pot of coffee, and enjoy that simple, old-fashioned indulgence that always brings people together.
More Delicious Recipes
- Bourbon Pecan Pie: This pie boasts a sweet and gooey filling similar to the butter tart squares, perfect for those who love indulgent desserts.
- Dutch Apple Crumble Pie: Combining a buttery crust with sweet apple filling, this pie offers a comforting dessert experience reminiscent of the cashew filling in butter tart squares.
- Pecan Pie: Just like the Canadian Butter Tart Squares, this pecan pie features a rich, gooey filling that is simply irresistible.

Canadian Butter Tart Squares
Equipment
- 8x8-inch baking pan
Ingredients
Ingredients
- 1 cup all-purpose flour
- ¼ cup granulated sugar
- ½ cup unsalted butter (softened)
- 1 cup packed brown sugar
- ½ cup corn syrup
- ¼ cup unsalted butter (melted)
- 2 large eggs
- 1 teaspoon vanilla extract
- ½ cup walnuts or pecans (chopped (optional))
- ¼ teaspoon salt
Instructions
Instructions
- Preheat oven to 350°F (175°C). Line an 8x8-inch baking pan with parchment paper, leaving an overhang for easy removal.
- In a mixing bowl, combine flour and granulated sugar. Add softened butter and mix until mixture forms coarse crumbs.
- Press the crumb mixture evenly into the bottom of the prepared pan. Bake for 15 minutes until lightly golden.
- While the crust bakes, whisk together brown sugar, corn syrup, melted butter, eggs, vanilla extract, and salt in another bowl.
- If using, fold chopped nuts into the filling mixture.
- Pour the filling evenly over the hot crust once removed from the oven.
- Return pan to the oven and bake for 15-20 minutes, until the filling is set and bubbling.
- Remove from oven and cool completely on a wire rack.
- Lift parchment paper to remove squares from the pan, cut into 12 pieces, and serve.