I made this dessert the night before a last-minute fall get-together when I realized I didn’t have time—or frankly, the energy—to bake a full pie. I needed something that captured all the spiced warmth of pumpkin pie but was quick, no-fuss, and served beautifully in individual portions. That night, pumpkin pie in a cup saved me. It’s now become one of those “where has this been all my life?” recipes—simple, elegant, and make-ahead friendly.
If you’re looking for something rich, comforting, and effortless this season, this pumpkin pie in a cup delivers all the cozy without the crust drama. No rolling pins. No soggy bottoms. Just creamy, spiced filling layered over a buttery graham base, chilled and ready when you are.
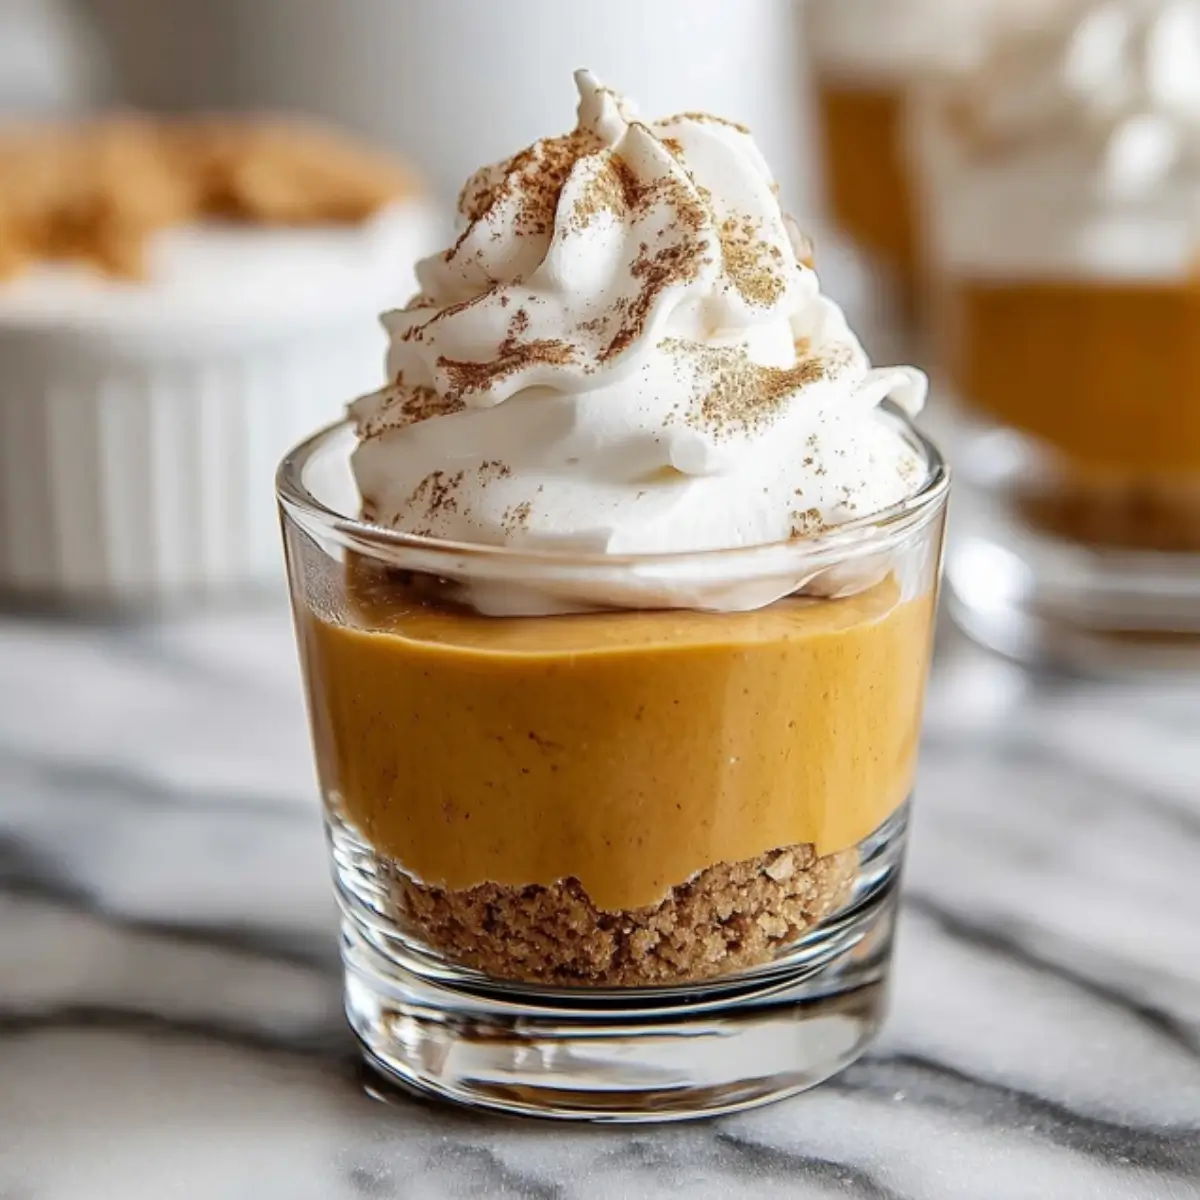
Table of Contents
Pumpkin Pie in a Cup: What Makes It Special?
This isn’t just pie without the pan. It’s a layered dessert that reimagines traditional pumpkin pie into something more accessible and arguably more fun to serve.
You get the familiar warmth of cinnamon, nutmeg, and pumpkin, but with a mousse-like filling that feels lighter on the palate. The graham cracker base adds crunch and contrast—no baking needed. Each cup sets up cleanly in the fridge, making this perfect for entertaining or pre-holiday prep.
Pumpkin pie in a cup works because it fits today’s kitchen: quick to make, easy to portion, endlessly adaptable, and satisfying in every spoonful.
Ingredients & Substitutions
Crust Layer
- 2 cups (240g) finely crushed graham crackers
- 5 tablespoons (70g) melted butter
Substitutions & Tips:
- For extra spice: Swap graham crackers for crushed gingersnaps.
- To make it dairy-free: Use melted coconut oil instead of butter.
- Gluten-free? Opt for certified gluten-free graham crackers.
Pumpkin Filling
- 15 oz (425g) canned pumpkin puree
- 1/8 cup (25g) granulated sugar
- 2 large eggs, beaten
- 1 cup (240ml) heavy cream
- 1 packet (about 2½ tsp) unflavored gelatin
- 1 teaspoon ground cinnamon
- 1/2 teaspoon ground nutmeg
- 1/2 teaspoon salt
Smart Swaps:
- Substitute brown sugar or maple syrup for a deeper sweetness.
- Use coconut cream for a dairy-free version.
- For a vegan option, use agar-agar in place of gelatin (see technique notes below).
Optional Topping
- Whipped cream (store-bought or homemade)
Equipment You’ll Need
You don’t need fancy equipment, just a few basics:
- Medium mixing bowl
- Zip-top bag + rolling pin (for crushing grahams)
- Medium saucepan (heavy-bottomed to prevent scorching)
- Whisk or silicone spatula
- Measuring cups and spoons
- 6 small clear dessert cups (4–6 oz capacity)
- Foil or plastic wrap for chilling
Optional Upgrades:
- Food processor for finer crumbs
- Mason jars or ramekins if you prefer lidded storage
Step-by-Step Instructions
Step 1 – Make the Graham Cracker Base
Place the graham crackers in a zip-top bag and crush them with a rolling pin until they resemble fine sand. In a bowl, mix the crumbs with the melted butter until evenly moistened.
Spoon about 3 tablespoons of the mixture into the bottom of each dessert cup. Press lightly with the back of a spoon or your fingers to create a flat base.
Visual Cue: The crust should hold together when pressed but not feel greasy.
Step 2 – Prepare the Pumpkin Pie Filling
In a saucepan, combine gelatin, cinnamon, nutmeg, and salt. Add the sugar, heavy cream, and beaten eggs. Whisk gently over low heat for about 10 minutes, stirring constantly.
The mixture should thicken slightly and steam gently, with no bubbling. Once the gelatin is fully dissolved, remove from heat and stir in the pumpkin puree until smooth.
Sensory Check: The filling should be warm and pourable—slightly thicker than heavy cream, but not set.
Step 3 – Assemble and Chill
Pour or spoon the pumpkin filling over the graham base in each cup. Fill nearly to the top, leaving room for whipped cream.
Cover each cup with foil or plastic wrap. Chill in the refrigerator for at least 2 hours, or until the filling is firm to the touch and jiggles slightly when tapped.
Tip: For the cleanest layers, assemble when both the crust and filling are at room temperature.
Step 4 – Top and Serve
Just before serving, add a swirl or dollop of whipped cream. Garnish with a sprinkle of cinnamon, crushed graham crumbs, or chopped candied pecans if desired.
Why This Recipe Works
This dessert relies on gelatin, not baking, to achieve a smooth, sliceable filling. That means no risk of undercooked centers or overbrowned crusts.
Using heavy cream instead of evaporated milk creates a richer, silkier mouthfeel. The gentle stovetop method ensures the eggs thicken the filling without scrambling.
Layering into individual cups means no slicing required—and no complaints about who got the bigger piece.
Pro Tips & Variations
- Toast the crumbs before assembling for extra depth of flavor.
- Fold in 4 oz softened cream cheese to the filling for a cheesecake-style upgrade.
- Add 1/2 tsp vanilla or a splash of bourbon for complexity.
- Make it kid-friendly with mini chocolate chips sprinkled over the whipped cream.
- Want it dairy-free? Use full-fat coconut cream and vegan whipped topping.
Scaling Tips:
- Halve the recipe for a small batch of 3 servings.
- Double it for a party-sized batch (use 12 cups and a larger saucepan).
Make-Ahead, Storage & Freezing
Make-Ahead:
You can prepare the entire dessert up to 48 hours in advance. Keep chilled and covered.
Storage:
Store in the refrigerator for up to 4 days. Add toppings just before serving to keep the texture crisp.
Freezing:
These cups freeze well without the whipped topping. Freeze uncovered until firm, then wrap individually. Thaw overnight in the fridge before serving.
Note: Freezing may slightly alter texture, making it firmer but still delicious.
Serving Suggestions & Pairings
Pair your pumpkin pie in a cup with:
- Hot drinks: Spiced chai, cinnamon lattes, or mulled cider
- Cocktails: Bourbon maple old-fashioned or apple brandy
- Savory contrast: Serve after a salty fall dish like roast chicken or pork tenderloin
For presentation, use clear cups to show off the layers. Add a gold spoon or rustic napkin for a festive touch.
Dietary Notes & Allergen Considerations
- Gluten-Free: Use gluten-free graham crackers
- Dairy-Free: Substitute coconut cream + plant-based butter
- Vegetarian: Use agar-agar instead of gelatin (1:1 swap by weight; follow package instructions for hydration)
- Nut-Free: Safe as written—just verify ingredient labels
Troubleshooting & Common Mistakes
- Filling didn’t set → Gelatin may not have dissolved fully or chill time was too short
- Crust crumbles too much → Not enough butter or not packed down firmly
- Filling is grainy → Heat was too high; eggs may have scrambled
- Weird flavor → Check for canned pumpkin vs. pumpkin pie filling confusion
Nutritional Information (Estimated Per Serving)
- Serving Size: 1 dessert cup
- Calories: ~320
- Sugar: ~12g
- Sodium: ~200mg
- Fat: ~22g
- Saturated Fat: ~13g
- Unsaturated Fat: ~8g
- Trans Fat: 0g
- Carbohydrates: ~24g
- Fiber: ~3g
- Protein: ~5g
- Cholesterol: ~75mg
Note: These are reasonable estimates based on standard ingredients.
FAQs About Pumpkin Pie in a Cup
Can I make pumpkin pie in a cup ahead of time?
Yes. It’s ideal for make-ahead prep. Assemble and chill up to two days before serving. Add whipped cream at the last minute.
What’s the best gelatin substitute for a vegetarian version?
Use agar-agar in a 1:1 ratio by weight. Be sure to follow its unique cooking instructions—it needs to be boiled briefly to activate.
How long will this dessert last in the fridge?
Stored properly, it stays fresh for 3–4 days. Cover well to avoid absorbing fridge odors.
Can I double the recipe?
Definitely. Just scale ingredients evenly and use a large enough saucepan. Chill in batches if needed.
Does it taste like regular pumpkin pie?
Yes, with the same familiar spices and pumpkin flavor—just lighter and creamier in texture.
Conclusion
Pumpkin pie in a cup is more than a shortcut—it’s a smart, stylish way to enjoy a classic with less effort and more versatility. Whether you’re hosting a crowd or carving out a quiet fall night for yourself, this dessert feels special without being complicated.
Once you make it, you’ll wonder why pie was ever served any other way. Try it your own way—add toppings, swap spices, or serve it with hot cider—and make this cozy little cup a new autumn ritual.
More Delicious Recipes
- Pumpkin Cheesecake Parfaits: A layered dessert featuring creamy pumpkin cheesecake filling and crunchy cookie crumbs, these no-bake parfaits echo the texture and flavor of pumpkin pie in a cup—perfect for fall gatherings and portion-controlled indulgence.
- No-Bake Pumpkin Cheesecake Bars: For those who love the rich flavor of pumpkin pie without turning on the oven, these bars offer a silky pumpkin layer over a spiced cookie crust—easy to make and share.
- Pumpkin Spice Cheesecake Bars: These baked bars blend the warm spices of fall with creamy cheesecake and a buttery crust, creating a dessert that’s both familiar and elevated in every bite.
Cozy Layers in a Cup

Pumpkin Pie in a Cup is a no-bake dessert that layers spiced pumpkin filling over a buttery graham cracker crust, all served in individual cups. It offers all the cozy flavors of traditional pumpkin pie in a portable, make-ahead format.
- Prep Time: 20 minutes
- Cook Time: 10 minutes
- Total Time: 30 minutes
- Yield: 6 servings
- Category: Dessert
- Method: No-Bake
- Cuisine: American
- Diet: Vegetarian
Ingredients
- 2 cups graham cracker crumbs (finely crushed)
- 5 tablespoons melted butter
- 1/8 cup granulated sugar
- 1 teaspoon ground cinnamon
- 15 oz canned pumpkin puree
- 2 beaten eggs
- 1 packet unflavored gelatin
- 1/2 teaspoon ground nutmeg
- 1 cup heavy cream
- 1/2 teaspoon salt
- Whipped cream (optional, for garnish)
Instructions
- Place graham crackers in a ziplock bag and crush with a rolling pin until they resemble fine sand.
- In a medium bowl, mix crushed graham crackers with melted butter until well combined.
- Divide the crust mixture evenly into serving cups and press lightly to form the base.
- In a heavy saucepan, combine gelatin, cinnamon, nutmeg, and salt.
- Add sugar, heavy cream, and beaten eggs to the saucepan and mix well.
- Cook over low heat, stirring continuously, for about 10 minutes until the mixture thickens and the gelatin dissolves.
- Remove from heat and stir in the pumpkin puree until smooth.
- Pour the filling over the graham crusts in each cup.
- Cover with foil and refrigerate for at least 2 hours to set.
- Top with whipped cream before serving, if desired.
Notes
- Use gingersnap cookies instead of graham crackers for a spicier crust.
- Substitute coconut cream and plant-based butter for a dairy-free version.
- Replace gelatin with agar-agar for a vegetarian alternative.
- Add vanilla or a splash of bourbon for extra depth of flavor.