The first time I baked this 4-ingredient artisan bread, it was on a quiet Saturday afternoon. I’d finally decided to face my fear of homemade bread. No mixers. No fancy flours. Just a bowl, four ingredients, and time. I wasn’t expecting much—just something edible. But what came out of the oven looked and smelled like something from a Parisian bakery: golden crust, airy interior, deep flavor. My family stood around the counter, tearing off warm pieces and smearing them with butter. From that moment, it became a weekly ritual.
This 4-ingredient artisan bread recipe is for anyone who wants bakery-style results with zero intimidation. No kneading, no special equipment beyond a basic Dutch oven, and just a handful of pantry staples. You’ll gain not just a recipe, but a process—one that’s surprisingly relaxing, flexible, and endlessly adaptable.
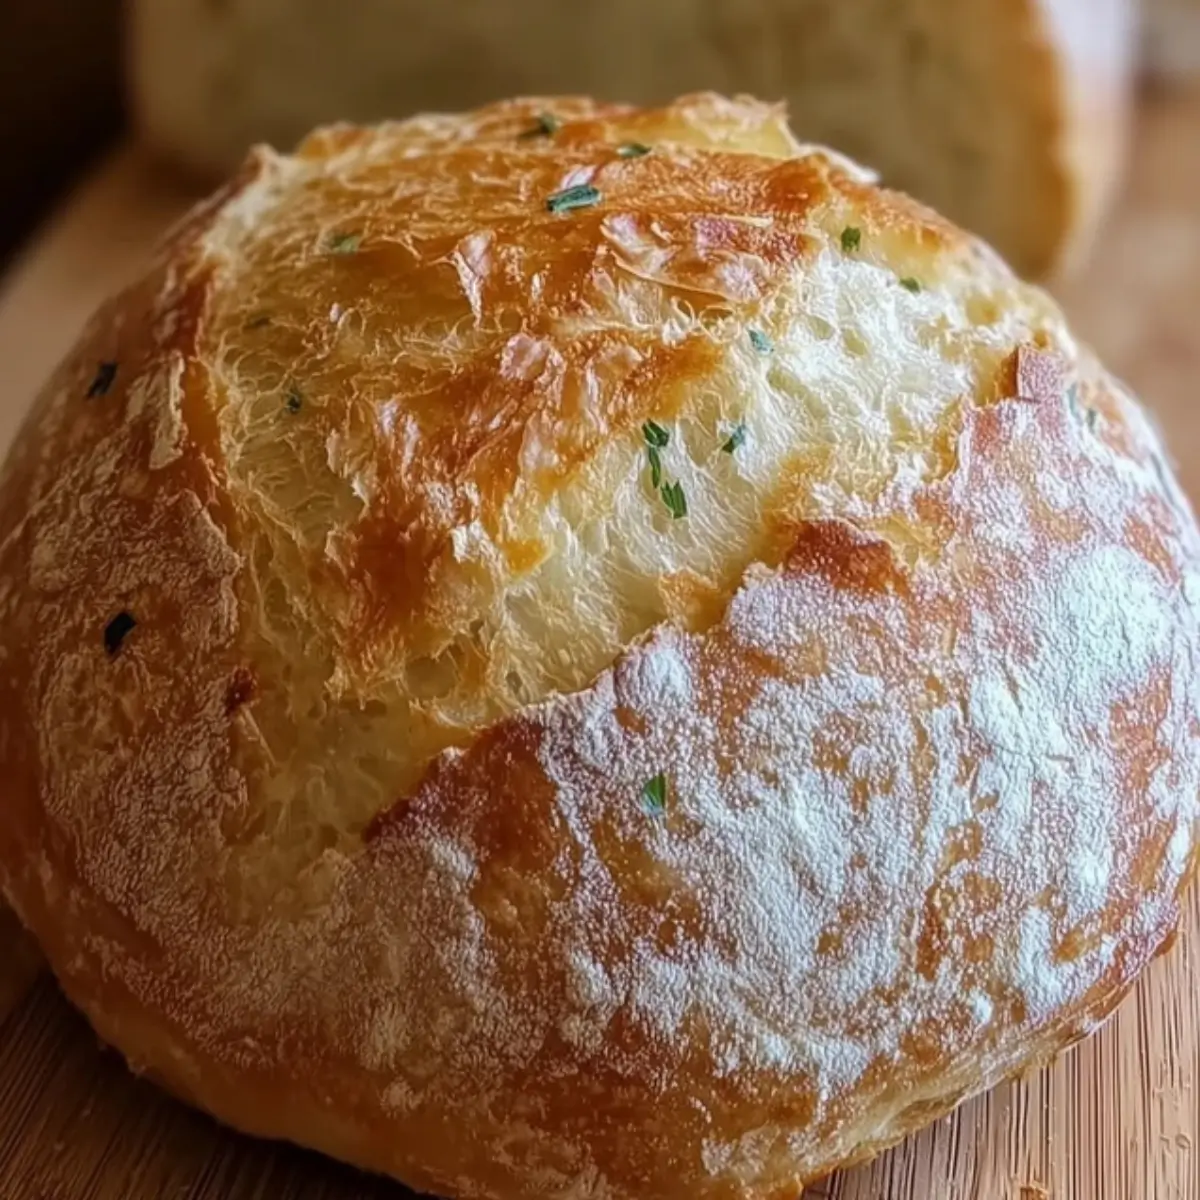
Table of Contents
Ingredients & Substitutions
Every version of 4-ingredient artisan bread starts with this core quartet. These ingredients work together to build flavor, texture, and structure with stunning simplicity.
The Core Four
- All-Purpose Flour: 3 cups (400g). Use unbleached for the best flavor. You can substitute bread flour for a slightly chewier texture. Weighing the flour gives the most consistent results, but if using cups, gently spoon and level—don’t scoop.
- Instant Yeast: ¼ teaspoon. This small amount works because of the long fermentation. You can substitute with ½ teaspoon active dry yeast—just proof it in warm water with a pinch of sugar for 5–10 minutes until foamy.
- Fine Sea Salt: 1½ teaspoons. Salt adds flavor and helps regulate yeast activity. Kosher salt also works (adjust slightly due to grain size). Avoid iodized table salt, which can leave a metallic aftertaste.
- Warm Water: 1½ cups (355–360ml), between 105–115°F (40–46°C). Think warm bath—not hot. Water that’s too hot can kill the yeast; too cold will slow fermentation.
Smart Swaps & Flavor Options
- Gluten-Free Option: Use a 1:1 gluten-free flour blend that contains xanthan gum.
- Add-ins: Dried herbs (1–2 tbsp), shredded cheese (½–¾ cup), seeds or nuts (¼–½ cup), or chopped olives/roasted garlic make excellent flavor upgrades.
- Liquid Tweaks: If using active dry yeast, dissolve it in the warm water before mixing with dry ingredients.
Equipment You’ll Need
You don’t need a stand mixer or dough hook. Just a few tools and a little patience.
- Large Mixing Bowl: For combining ingredients and bulk fermentation.
- Dutch Oven (5–6 qt): Crucial for trapping steam and producing a crispy crust.
- Parchment Paper: Makes transferring the dough easier and prevents sticking.
- Kitchen Towel or Plastic Wrap: Keeps the dough moist during rises.
- Spatula or Wooden Spoon: For mixing the wet dough.
- Instant-Read Thermometer (optional): Helps verify doneness and water temperature.
- Sharp Knife or Bread Lame: For optional scoring before baking.
Step-by-Step Instructions
This no-knead 4-ingredient artisan bread develops most of its magic during long, slow fermentation. Your hands-on time is less than 20 minutes.
Step 1 – Mix the Dry Ingredients
In a large bowl, whisk together 3 cups of flour, 1½ teaspoons salt, and ¼ teaspoon instant yeast. This ensures even distribution, which is key for consistent rising and flavor.
Step 2 – Add Warm Water
Pour in 1½ cups warm water (105–115°F / 40–46°C). Stir with a spatula or wooden spoon until you have a sticky, shaggy dough. It will look messy—this is exactly right.
Step 3 – First Rise (12–18 Hours)
Cover the bowl tightly with plastic wrap or a damp kitchen towel. Let it sit at room temperature (68–72°F / 20–22°C) for 12 to 18 hours. The dough will double or triple, with a jiggly, bubbly surface and a tangy aroma.
Step 4 – Shape the Dough
Dust a clean surface with flour. Gently scrape the dough onto it. With floured hands, fold the edges toward the center, rotating as you go. After 4–6 folds, you’ll have a loose ball. Don’t overwork it.
Step 5 – Second Rise (1–2 Hours)
Place the dough seam-side down on a floured piece of parchment paper. Lightly dust the top with flour. Cover loosely and let rise until it increases by about 50% and leaves a slight indentation when poked.
Step 6 – Preheat the Oven and Dutch Oven
About 30–45 minutes before the second rise finishes, place your Dutch oven (with lid) into the oven. Preheat to 450°F (232°C). A fully heated pot ensures a rapid steam burst when baking begins.
Step 7 – Score and Bake
Remove the hot Dutch oven carefully. Optional: Use a sharp blade to slash the top of the dough ½ inch deep. This controls where it expands. Lift the parchment and dough into the pot, cover with lid, and return to oven.
- Bake Covered: 30 minutes.
- Bake Uncovered: Remove lid and continue for 15–25 minutes until crust is deep golden. Internal temp should be 200–210°F (93–99°C).
Step 8 – Cool Completely
Lift bread out using parchment and place on a wire rack. Let cool at least 1–2 hours before slicing. Cutting too soon releases steam and makes the interior gummy.
Why This Recipe Works
The power of 4-ingredient artisan bread lies in its slow fermentation and simple technique.
- Slow Fermentation: Builds flavor and structure naturally without kneading.
- Minimal Yeast: Long rise time allows even small amounts to do the job effectively.
- Steam Baking: Dutch oven traps moisture for a glossy, crackly crust.
- Hydration: High water ratio yields open crumb and chewy interior.
- No-Knead Method: Limits gluten overdevelopment while encouraging elasticity.
Pro Tips & Variations
Level up your bake with these easy upgrades.
- Use Bread Flour: Sub 1:1 with all-purpose for extra chew.
- Cold Ferment: Refrigerate the dough up to 24 hours for stronger tang.
- Flavor Add-ins: Mix in ingredients like shredded cheese or chopped rosemary when combining dry ingredients.
- Score with Confidence: A decisive slash prevents awkward blowouts during baking.
- Scale It: Halve for a smaller loaf, or double the recipe for two rounds (bake separately).
Make-Ahead, Storage & Freezing
This 4-ingredient artisan bread is flexible for busy schedules.
- Make-Ahead: Prepare dough the night before and bake the next day.
- Room Temp Storage: Leave cut side down on a board or store in a paper bag for 1–2 days.
- For Longer Storage: Use a bread box or loose plastic bag (will soften crust).
- Freeze: Slice, wrap tightly, and freeze for up to 3 months. Toast or reheat directly from frozen.
Serving Suggestions & Pairings
Once baked, your 4-ingredient artisan bread is ready for anything.
- Classic: Warm with butter, or paired with honey or jam.
- Savory Meals: Use as a soup dipper, pasta side, or with hearty salads.
- Appetizer Base: Slice thin for bruschetta, crostini, or cheese boards.
- Sandwiches: Toasted or fresh, it holds up to thick fillings.
- Breakfast: Makes exceptional French toast or egg-dipping toast.
Dietary Notes & Allergen Considerations
- Vegan: Yes, as written—no dairy, eggs, or animal products.
- Dairy-Free: Completely dairy-free by default.
- Nut-Free: No nuts unless you add them.
- Gluten-Free: Use a certified GF flour blend with xanthan gum; results may vary.
Troubleshooting & Common Mistakes
Avoid these common pitfalls for perfect results.
- Flat Loaf: Yeast was inactive or water was too hot/cold.
- Dense Crumb: Bread was sliced too early or dough was under-proofed.
- Pale Crust: Oven or Dutch oven not fully preheated.
- Sticky Dough: High hydration is normal; use floured hands, not extra flour in the mix.
- Overproofing: Dough becomes slack and collapses—shorten second rise slightly.
Nutritional Information (Estimates)
- Serving Size: 1 slice (1/12 of loaf)
- Calories: 120–150
- Sugar: <1g
- Sodium: 250–300mg
- Fat: <1g
- Saturated Fat: <0.5g
- Unsaturated Fat: Trace
- Trans Fat: 0g
- Carbohydrates: 25–30g
- Fiber: 1–2g
- Protein: 3–4g
- Cholesterol: 0mg
FAQs
Can I make 4-ingredient artisan bread without a Dutch oven?
Yes. Use a baking stone or heavy sheet pan, and place a metal pan with hot water on the lower rack to create steam.
How do I know when my 4-ingredient artisan bread is done?
Check for a deep golden crust and an internal temperature of 200–210°F (93–99°C). The loaf should sound hollow when tapped.
Can I refrigerate the dough overnight?
Absolutely. Cold fermentation (up to 24 hours) develops a deeper flavor.
Why didn’t my 4-ingredient artisan bread rise properly?
Check yeast freshness, water temperature, and room conditions. Cold rooms or expired yeast are common culprits.
What’s the best way to store leftover bread?
Store at room temperature cut-side down, or freeze slices in airtight bags. Avoid refrigeration—it stales bread quickly.
Conclusion
This 4-ingredient artisan bread is proof that great baking doesn’t require complexity. Just a bowl, four humble ingredients, and a little time transform into something golden, crackly, and deeply satisfying. It’s bread that’s as fun to make as it is to eat.
Give it a try this weekend. Once you bake your first loaf, you’ll understand why so many home bakers never go back to store-bought. Make it your own, share it with friends, and enjoy the ritual of baking—one simple loaf at a time.
More Relevant Recipes
- No-Knead Garlic Bread: If you loved the simplicity of 4-ingredient artisan bread, this no-knead garlic bread adds a savory twist. It’s packed with roasted garlic flavor and delivers the same crisp crust and soft interior—perfect alongside pastas, soups, or simply enjoyed warm with butter.
- Cheese Bread: This rich and savory cheese bread offers a buttery, fluffy crumb enhanced with melted cheese throughout. It’s a crowd-pleasing bake that pairs beautifully with Italian meals or serves as an indulgent breakfast slice.
- Easy Homemade White Bread Recipe: For those looking to expand from artisan loaves, this classic white bread delivers a tender, versatile loaf perfect for sandwiches or toast. The soft crumb and gentle flavor make it a kitchen staple.
4-Ingredient Artisan Bread

This 4-ingredient artisan bread yields a bakery-quality loaf with a golden, crackly crust and airy crumb. It’s a no-knead recipe perfect for beginners and experienced bakers alike, requiring minimal hands-on time and pantry staples.
- Prep Time: 15 minutes
- Cook Time: 55 minutes
- Total Time: 70 minutes
- Yield: 1 loaf (10–12 slices)
- Category: Bread
- Method: Baking
- Cuisine: Rustic
- Diet: Vegan
Ingredients
- 3 cups (400g) all-purpose flour
- 1 ½ teaspoons fine sea salt (or kosher salt)
- ¼ teaspoon instant yeast (or ½ teaspoon active dry yeast)
- 1 ½ cups (355–360ml) warm water, 105–115°F (40–46°C)
Instructions
- In a large mixing bowl, whisk together the flour, salt, and yeast until evenly combined.
- Pour in the warm water and mix using a spatula or wooden spoon until a sticky, shaggy dough forms. Do not knead.
- Cover the bowl with plastic wrap or a damp towel. Let the dough rise at room temperature (68–72°F / 20–22°C) for 18 hours, or until bubbly and doubled or tripled in size.
- Lightly flour a clean surface and scrape the dough onto it. Gently fold the edges inward 4–6 times to form a rough ball.
- Place the dough seam-side down on a floured piece of parchment paper. Cover loosely and let rise for 2 hours until puffed and slightly springy when poked.
- Preheat the oven to 450°F (232°C) with a Dutch oven inside (with lid) for at least 45 minutes before baking.
- Optional: Score the top of the dough with a sharp knife or lame.
- Carefully lift the parchment with dough into the hot Dutch oven. Cover and bake for 30 minutes.
- Remove the lid and bake uncovered for an additional 25 minutes, or until the crust is deep golden and internal temp reaches 200–210°F (93–99°C).
- Transfer bread to a wire rack and cool for at least 2 hours before slicing.
Notes
- Bread flour can be used 1:1 for a chewier texture.
- Active dry yeast must be proofed in the warm water with a pinch of sugar before adding.
- Add-ins like herbs, cheese, or seeds can be mixed in during the first step.
- Use a thermometer to ensure water temperature is ideal for yeast activation.
- Don’t skip the cool-down period to avoid gummy texture.