The first time I made a Bunny Cinnamon Roll Skillet, there was a dusting of flour on my shirt, mugs of warm coffee on the counter, and almost tangible anticipation in the air. There’s something instantly delightful about breakfast coming together in one golden, bubbling skillet—especially when it takes the shape of a cheerful bunny. This isn’t just breakfast; it’s a bit of edible fun for slow weekend mornings, Easter brunches, or even those rainy Saturdays begging for a cozy treat. The blend of gooey cinnamon, pillowy rolls, and silky vanilla icing makes it impossible to serve without at least one person sneaking a taste before you’ve even set the skillet down.
And you know what? Watching the edges go crisp while the center stays irresistibly fluffy gets me every time. Even after making this dozens of times, that sweet, spiced aroma turning my kitchen into a bakery never gets old.

When Bunny Cinnamon Roll Skillet Steals the Show at Breakfast
It’s still early, the house a little too quiet, and you pop open a can of cinnamon rolls with that signature “thwack.” Instantly, things feel festive—like you’re about to pull off a secret, spontaneous celebration. That’s what makes a Bunny Cinnamon Roll Skillet such a crowd-pleaser, especially around spring or whenever you want the breakfast table to feel extra special.
Sometimes, I make this skillet the morning after a sleepover or holiday, and seeing everyone light up at the silly bunny shape is almost as sweet as the rolls themselves. This isn’t just for kids, either. Grownups lean in close, each picking out their favorite “ear” or swiping a taste of oozy icing with the corner of their fork. It’s the kind of breakfast that brings people closer—warmth you can taste, right out of the cast iron pan.
The Ingredients That Bring This Skillet to Life
You don’t need a fancy bakery pantry to turn out a Bunny Cinnamon Roll Skillet—just a few reliable basics, and maybe a touch of childlike imagination. Here’s what you’ll be grabbing:
- Refrigerated cinnamon rolls – Sweet, already-spiced dough that puffs up beautifully and simplifies the whole process, thanks to a ready-to-use icing tucked inside every can.
- butter – Melted and brushed across your skillet, it keeps the rolls from sticking and adds that unmistakable bakery-style richness.
- Ground cinnamon – Optional, but if you want deeper spice, a little extra dusting takes these to new heights.
- Granulated sugar – Also optional, for those who crave a little extra sparkle and crunch across the tops of each roll.
- Vanilla extract – Stirred into the icing, it’s the secret for that fragrant hit of vanilla every time you go in for another bite.
See the recipe card below for the full list of ingredients and measurements.
Building and Baking Bunny Cinnamon Roll Skillet
This is where the fun really starts—the kind of straightforward, hands-on recipe where you can let your creativity (and the scent of cinnamon) fill up the kitchen. Here’s how I do it:
- Heat your oven to a toasty 175°C, then set your cast iron skillet nearby. Brush a slick of melted butter all over the bottom and edges—don’t skimp here, you want every roll to slide out and crisp up just right.
- If you’re after extra flavor, mix a bit of cinnamon with sugar in a small bowl and set aside. Then, pop open those cinnamon roll cans (I’ll admit, that satisfying pop always makes me jump) and separate each roll.
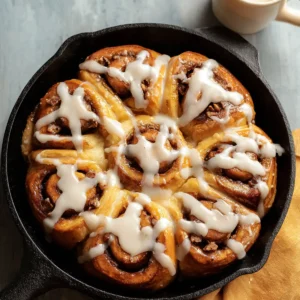
- Start by placing one roll dead center in the skillet—this is your bunny’s face. Begin circling the rest around, nestling them together to form a plump “head.” For the ears, pinch and elongate about three rolls, then attach them at the top in soft, overlapping arcs. No need for perfection—a little wobble makes it even more inviting.
- If you’re going the extra mile, sprinkle your cinnamon-sugar mixture across the tops so it bakes into a shimmery, golden crust.
- Slide the skillet into the oven and bake until the rolls turn deeply golden and the aroma is enough to pull people out of bed—usually about half an hour, but keep an eye out. The edges will be crisp and the center should spring back gently when pressed.
- While those rolls work their magic, take your vanilla extract and stir it into the pouch of icing that comes with the rolls. Once you pull the skillet from the oven and it’s still piping hot, zig-zag generous ribbons of icing all over. It’ll melt into every nook, pooling just where you want it most.
- Bring the skillet straight to the table. Trust me, the dramatic reveal is half the fun. Let everyone see that big bunny before the first bite—and then, dig in.
The Texture and Flavor That Make It Irresistible
It’s all about that first forkful—the way the roll tears apart with just enough resistance, showing off their cloud-soft interior. The exterior edges bake up crisp, almost caramelized, especially if you went heavy on the butter. Cinnamon coils nestle inside, warm and sweet, barely waiting for the icing to melt and settle into all the crevices.
The scent gets you before the first taste—a heady blend of sugar, cinnamon, and creamy, real vanilla. Each bite balances gooey and golden, with a rich, almost nutty depth from the skillet itself. It’s cozy and nostalgic and a little bit decadent, the sort of breakfast that feels like an occasion even if it’s just a random Tuesday.
Little Details for a Picture-Perfect Bunny
Don’t worry if your bunny has one ear bigger than the other—quirkiness adds to the homemade charm. Here are a few tweaks and tips I lean on again and again:
- For easy removal (if you ever want to slide the bunny onto a board for serving), give the pan an extra swipe of butter just before laying in the dough.
- If you can, use a true cast iron skillet. It radiates heat perfectly and gives the rolls a lovely, bakery-worthy crust. If not, a heavy baking dish works in a pinch—just adjust your baking time and check often.
- Adding a touch more vanilla or even a pinch of orange zest to the icing can change up the flavor profile.
- Want more color? Tuck a few small berries (blueberries work) into the “ears” before baking, or use sliced almonds for playful whiskers post-bake.
- If your rolls are browning too fast but feel a little underdone inside, cover loosely with foil for the last 10 minutes. That way, you’ll get just the right texture—no raw centers.
- Any leftovers (if you somehow have any) can be gently rewarmed the next morning at a low oven temperature.
Serving Bunny Cinnamon Roll Skillet for Celebrations or Anytime
This skillet isn’t just for holidays, though it does own Easter in my house. It’s ideal for brunches, cozy Sunday mornings, or any day you want to spark a little extra magic at the table. Bring it to a potluck and you’ll be invited back, I swear.
Pair your Bunny Cinnamon Roll Skillet with fresh fruit or scrambled eggs for balance. If you’re feeling playful, use more colored icing or even a few candy bunnies for decoration. A mug of strong coffee or a cold glass of milk takes the sweetness just where it needs to go.
It’s also fun to let everyone pull apart their own “ear” or swipe some extra icing from the skillet itself. Warm, gooey, and guaranteed to draw a smile—that’s what breakfast is about.
FAQs about Bunny Cinnamon Roll Skillet
How should I store leftover Bunny Cinnamon Roll Skillet?
If there are any leftovers, just cover the skillet with foil or transfer the rolls to an airtight container once they’ve cooled. They’ll keep well at room temperature for about a day, or you can refrigerate for up to three days. A quick warm-up in the oven or microwave brings back their softness.
Can I make Bunny Cinnamon Roll Skillet ahead of time?
Absolutely. You can arrange the rolls in the skillet the night before, cover tightly, and refrigerate. The next morning, allow the skillet to come back to room temperature while the oven heats up, then bake as usual. Wait to add the icing until just before serving.
Does Bunny Cinnamon Roll Skillet freeze well?
You can freeze baked cinnamon roll pieces, but texture does change a little after thawing. If you’d like to freeze, do so before icing. Let rolls cool completely, wrap well, then thaw and rewarm in a low oven before icing and serving for best results.
What can I use if I don’t have a cast iron skillet?
No cast iron? No problem. A heavy ceramic or glass baking dish works too, though bake times may vary a bit. Just be careful—darker pans brown the rolls a little faster, so check doneness a little early.
In the end, Bunny Cinnamon Roll Skillet is more than just a fun breakfast—it’s a memory waiting to be made. The scent of cinnamon, the pull-apart softness, and the playful shapes lend a bit of magic to the table, whether you’re celebrating a holiday or just making an ordinary morning something special. There’s nothing like sharing gooey, golden rolls straight from a skillet while laughter and stories fill the air. Next time you need a little joy baked in, trust that this skillet bunny will bring it, ear by delicious ear.
Discover More Recipes
- Amish Style Apple and Cinnamon Baked Oatmeal: This cozy baked oatmeal features warm cinnamon and sweet apples, making it a delightful breakfast option similar to the cinnamon rolls.
- Breakfast Rolls: Make Ahead Breakfast Ideas: Perfect for lazy mornings, these make-ahead breakfast rolls provide that same comfort and sweetness you’re getting with the Bunny Cinnamon Roll Skillet.
- Lemon Rolls: Offering a zesty twist, these lemon rolls pair beautifully with sweet icing, much like the cinnamon roll goodness.
Bunny Cinnamon Roll Skillet
Equipment
- cast iron skillet
Ingredients
Ingredients
- 2 cans refrigerated cinnamon rolls 8 rolls per can, about 12.4 ounces each
- 1 tablespoon unsalted butter melted
- 1 teaspoon ground cinnamon (optional)
- 1 tablespoon granulated sugar (optional)
- 1 teaspoon vanilla extract
Instructions
Instructions
- Preheat oven to 350 degrees Fahrenheit and lightly grease a 10 inch cast iron skillet with melted butter.
- If using extra cinnamon and sugar, mix them together in a small bowl. Open the cinnamon roll cans and separate the rolls.
- Arrange one roll in the center of the skillet for the bunny face. Place rolls closely around it to form a large circle, then use three additional rolls to create two ear shapes at the top.
- Sprinkle the optional cinnamon sugar mixture lightly over the tops for extra flavor.
- Bake for 25 to 30 minutes, or until the rolls are golden brown and cooked through in the center.
- Stir vanilla extract into the included icing, then drizzle generously over the warm rolls.
- Serve warm straight from the skillet and enjoy.