I first made this artisan bread on a rainy Sunday with a nearly empty pantry and a craving for something warm, hearty, and soul-satisfying. What started as an experiment quickly turned into a ritual. This is the loaf I come back to when I want something that smells like home, looks like it came from a Parisian bakery, and takes almost no effort to pull off. Whether you’re a seasoned home baker or just dipping your toes into bread making, this artisan bread recipe is a game-changer.
No kneading, no mixers, no stress. Just four ingredients, a bowl, and your oven. The result? A crusty, golden loaf with a tender interior that you’ll want to tear into the second it cools. But trust me—wait the 30 minutes.
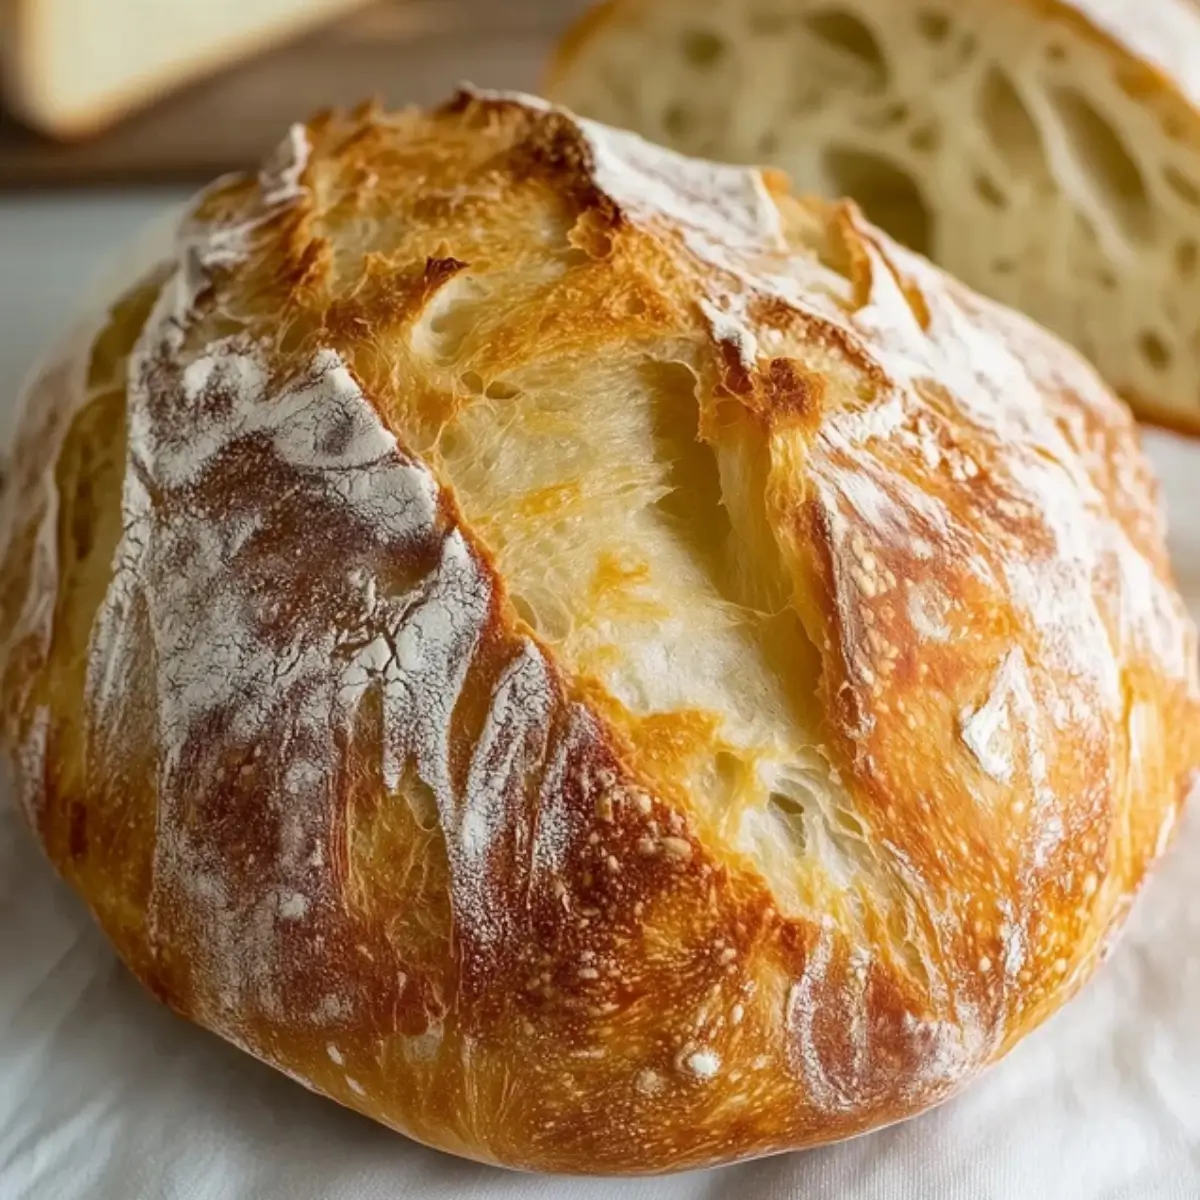
Table of Contents
Recipe Overview & Why You’ll Love It
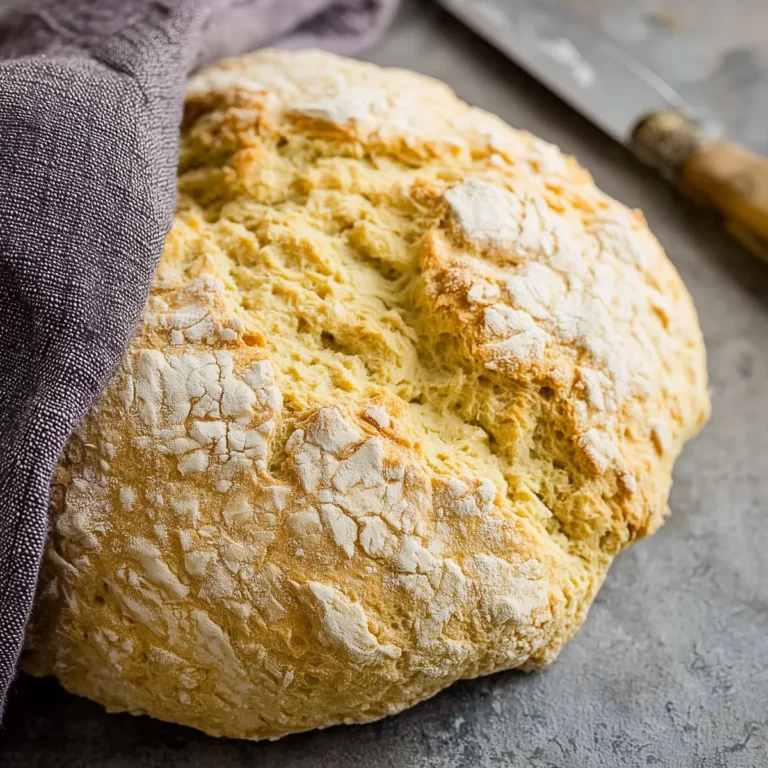
This artisan bread is a no-knead wonder that yields a crusty exterior and soft, chewy center every time.
The simplicity of this method is what makes it magic. The high hydration dough creates those gorgeous, irregular air pockets inside, while the long fermentation brings out deep, nuanced flavor. It’s perfect for beginners because there’s no kneading and very little handling. And for experienced bakers? It’s the reliable, low-maintenance recipe you turn to when you want a great loaf without fuss.
You’ll love how flexible this artisan bread is. Bake it same-day with just a few hours’ rise, or let it rest overnight for extra flavor. You can enjoy it plain, or fold in cheese, herbs, or olives for something special. This loaf slices beautifully, toasts perfectly, and freezes well—making it ideal for meal prep or impromptu gatherings.
Ingredients & Substitutions
This artisan bread recipe uses just four pantry staples to deliver impressive results.
Core Ingredients
- 3 cups (395g) all-purpose flour or bread flour – Both work well. Bread flour gives a slightly chewier texture.
- ½ tablespoon kosher salt – Enhances flavor; adjust slightly if using fine salt.
- ¼ ounce (2¼ teaspoons) instant or active dry yeast – Either type works; no proofing needed.
- 1½ cups warm water (105°F / 40°C) – Warm, not hot. Helps activate the yeast and hydrate the flour.
Smart Substitutions
- Flour: You can swap in up to 50% whole wheat flour for a nuttier, heartier loaf. Avoid using 100% whole wheat without adjustments, as it can lead to dense results.
- Salt: Sea salt or fine salt are okay substitutes; reduce slightly if using finer grains.
- Water: Filtered water is best if your tap water is heavily chlorinated.
- Yeast: If using active dry yeast, no need to proof—this recipe allows direct mixing.
Optional Add-Ins
- Fold in chopped olives, shredded cheese, herbs, or roasted garlic before shaping.
- Add sunflower seeds, flaxseeds, or chopped walnuts for texture and nutrition.
Equipment You’ll Need
You don’t need fancy gear to make this artisan bread, but a few key tools help.
- Large mixing bowl
- Dough whisk, spatula, or clean hands for mixing
- Parchment paper
- Plastic wrap or clean kitchen towel
- Sharp knife or bread lame for scoring
- Baking vessel: Dutch oven, cast iron skillet, pizza stone, or thick baking sheet
- Optional: Small broiler pan or 5 ice cubes (for steam)
If you don’t have a Dutch oven, a preheated heavy pan will still give you a great crust. Just don’t skip the preheating step—it’s essential.
Step-by-Step Instructions
Follow these simple steps to get perfect artisan bread every time.
Step 1 – Mix the Dough (5 minutes)
In a large bowl, combine 3 cups flour, ½ tablespoon kosher salt, and 2¼ teaspoons yeast. Pour in 1½ cups warm water (105°F) and stir until a sticky, shaggy dough forms.
Sensory cue: The dough should be sticky but not soupy. If it’s too wet, sprinkle in a tablespoon of flour.
Step 2 – Let It Rise (2 to 10 hours)
Cover the bowl with a towel or plastic wrap. Let the dough rest at room temperature for at least 2 hours, or up to 10 hours. For the best flavor, let it rise overnight.
Look for: A bubbly surface and doubled volume. Longer rests yield more complexity.
Step 3 – Shape the Loaf (10 minutes)
Lightly flour a surface. Wet your hands, gently lift the dough, and fold the edges toward the center to form a round. You can also divide into two smaller loaves.
Place the loaf onto parchment paper, dust with a little flour, and score 1 to 4 lines across the top using a sharp knife.
Let rest for 20 to 30 minutes uncovered.
Step 4 – Bake (25–30 minutes at 450°F / 230°C)
Preheat your oven to 450°F (230°C) with your Dutch oven, cast iron skillet, or pizza stone inside. Once hot, carefully slide the dough (on parchment) onto the hot surface.
For a crispier crust, toss 1 cup of hot water or 5 ice cubes into a broiler-safe pan at the bottom of the oven. Quickly close the door to trap steam.
Bake for 25 to 30 minutes, until the crust is deep golden and the bread sounds hollow when tapped.
Cooling: Let cool on a wire rack for at least 30 minutes before slicing.
Why This Recipe Works
The magic of this artisan bread comes from time, not technique.
- No kneading required: Time does the heavy lifting, letting gluten develop naturally.
- High hydration dough: The sticky texture creates steam and a chewy, open crumb.
- Steam bake method: Traps moisture to build that glossy, crackling crust.
- Minimal handling: Keeps gas bubbles intact for better rise and texture.
- Slow fermentation: Coaxes out deep, complex flavor even without a starter.
This is a prime example of how understanding your ingredients—and trusting the process—makes all the difference.
Pro Tips & Variations
Customize or upgrade your artisan bread with these smart ideas.
- Use a kitchen scale for consistent results.
- Fold gently during shaping to avoid deflating the dough.
- Let it rest in the fridge overnight for even more flavor depth.
- Press sesame or poppy seeds onto the top before baking for a seeded crust.
- Mix in ½ cup shredded cheese or chopped olives for savory flair.
- Add ½ teaspoon garlic powder or dried rosemary to the flour mix for aromatic loaves.
Want to double or halve the recipe? Go ahead. Just remember: smaller loaves bake faster; larger ones may need a few extra minutes.
Make-Ahead, Storage & Freezing
Here’s how to keep your artisan bread tasting fresh.
- Room temp: Store in a paper bag or wrapped in a kitchen towel for up to 2 days.
- Freezing: Slice, then freeze in an airtight bag for up to 3 months.
- Reheating: Warm slices in a toaster or 350°F oven for 5–10 minutes to restore crustiness.
Avoid plastic wrap—it softens the crust. If freezing, let bread cool completely first.
Serving Suggestions & Pairings
Artisan bread is endlessly versatile. Here are a few ways to enjoy it:
- Soups: Serve with tomato basil, French onion, or creamy lentil soup.
- Sandwiches: Ideal for grilled cheese, turkey melts, or open-faced bruschetta.
- Breakfast: Toasted with jam, smashed avocado, or almond butter.
- Sides: Slice and serve with charcuterie, olive oil and balsamic, or herbed butter.
- Drinks: Pairs well with coffee, herbal teas, red wine, or craft ales.
Serve thick slices slightly warm for the best texture.
Dietary Notes & Allergen Considerations
- Vegetarian: Yes
- Vegan: Yes
- Dairy-free: Yes
- Nut-free: Yes (if no add-ins)
- Gluten-free: No (this recipe requires gluten-based flour)
To make a gluten-free version, you’ll need specialty GF bread flour and adjusted hydration levels—not a 1:1 swap.
Troubleshooting & Common Mistakes
Baking artisan bread isn’t hard, but these quick fixes can save your loaf.
- Sticky dough: Add flour 1 tablespoon at a time until manageable. Expect stickiness—don’t overcorrect.
- Flat loaf: Could be over-proofed or shaped too roughly. Try a shorter rise or gentler handling.
- Dense texture: Usually under-proofed or over-handled. Let it rise fully and fold gently.
- Tough crust: Overbaked or steam was skipped. Add steam and bake only until golden.
- Pale color: Not hot enough. Make sure your oven and baking surface are fully preheated.
Nutritional Information (per serving; estimated)
- Serving Size: 1 slice
- Calories: 120
- Sugar: 0.1g
- Sodium: 200mg
- Fat: 0.5g
- Saturated Fat: 0.1g
- Unsaturated Fat: 0.3g
- Trans Fat: 0g
- Carbohydrates: 25g
- Fiber: 1g
- Protein: 4g
- Cholesterol: 0mg
FAQs
How long should I let artisan bread dough rise?
Let the dough rise for at least 2 hours at room temperature, or up to 10 hours. Overnight fermentation delivers the best flavor and structure.
Can I use active dry yeast in this artisan bread recipe?
Yes. Active dry yeast works just as well. There’s no need to proof it first—just mix it in with the dry ingredients.
How should I store artisan bread to keep it crusty?
Store it in a paper bag or wrap in a towel at room temperature for up to 2 days. Avoid plastic wrap unless you prefer a softer crust.
How do I get a crispier crust on artisan bread?
Add steam to your oven. Either pour 1 cup hot water into a broiler pan or toss in 5 ice cubes when you start baking. Quickly close the oven door to trap the steam.
Can I freeze artisan bread?
Absolutely. Slice it first for convenience, then freeze in a zip-top bag. Reheat slices in the oven or toaster.
Conclusion
This artisan bread recipe has earned its place as a staple in my kitchen, and I hope it becomes one in yours too. It delivers everything you want in a homemade loaf—flavor, texture, and pride—with none of the fuss.
If you’ve been intimidated by bread baking, this is the one to try. You don’t need a mixer or starter—just time and a bit of curiosity. Make it once, then make it yours. Add your favorite flavors, find your rhythm, and don’t be surprised if you start baking two loaves at a time.
More Delicious Recipes
- 4 Ingredient Artisan Bread: A streamlined, rustic loaf that aligns perfectly with the no-knead artisan bread method. With just four ingredients, this bread delivers a hearty crust and soft crumb, ideal for pairing with soups or making sandwiches.
- No Knead Garlic Bread: Bursting with flavor and simplicity, this recipe brings together the ease of no-knead dough and the boldness of garlic. Perfect as a side to pasta, soups, or served warm with butter.
- Cheese Bread: This savory loaf blends classic bread-baking techniques with gooey cheese for a rich and satisfying result. It’s an excellent alternative or addition to any artisan bread lover’s collection.
Artisan Bread

This no-knead artisan bread is a simple, homemade loaf that delivers a golden crust and a soft, airy interior. Perfect for beginners or busy bakers, it uses only four ingredients and minimal hands-on time to create bakery-quality results.
- Prep Time: 5 minutes
- Cook Time: 30 minutes
- Total Time: 10 hours 35 minutes
- Yield: 12 slices
- Category: Bread
- Method: No-Knead Baking
- Cuisine: Artisan
- Diet: Vegetarian
Ingredients
- 3 cups (395 grams) all-purpose flour or bread flour
- 1/2 tablespoon kosher salt
- 1/4 ounce (2 1/4 teaspoons) instant or active dry yeast
- 1 1/2 cups warm water (105°F)
Instructions
- In a large bowl, combine flour, salt, and yeast.
- Pour warm water over the dry ingredients and mix until a sticky dough forms.
- Cover the bowl with a towel or plastic wrap and let rise at room temperature for up to 10 hours or overnight.
- Wet your hands and turn the dough onto a lightly floured surface. Gently fold the edges into the center to form a round loaf or divide into two loaves.
- Place the dough on parchment paper, lightly dust the top with flour, and score 1 to 4 lines across the surface with a bread knife. Let rest for 30 minutes.
- Preheat the oven to 450°F and place a Dutch oven, cast iron skillet, or baking stone inside to heat.
- Slide the dough with the parchment paper onto the hot surface. Add 1 cup of hot water or 5 ice cubes to the bottom of the oven to create steam, then quickly close the door.
- Bake for 30 minutes, or until golden brown and crusty.
- Cool on a wire rack for at least 30 minutes before slicing.
Notes
- Letting the dough rise overnight enhances the flavor.
- You can substitute half the flour with whole wheat flour for a heartier texture.
- Add-ins like herbs, cheese, or olives can be mixed into the dough for variations.
- To maintain the crust’s crispness, store the bread in a paper bag.
- Reheat slices in a 350°F oven for 10 minutes to refresh the crust.